Author Topic: Madaguy 1955 Nomad Build  (Read 365081 times)

N PRGRES

  • Oracle Forum Member
  • *
  • Posts: 1886
Re: Madaguy 1955 Nomad Build
« Reply #360 on: June 24, 2025, 05:42:31 AM »
Looks awesome!  Mine is a bit "darty" also after I put in the new steering pump.  The fix is a shim kit for Borgeson to reduce the pressure some.

https://www.summitracing.com/parts/brg-899001?seid=srese1&gclid=CjwKCAjwmenCBhA4EiwAtVjzmq7zQXmB0WRCIBLevazaI4Ta7MYu3o-16vnfH-esetauza9WYOT9khoCugEQAvD_BwE
Dave

81 Trans Am w/73 400.

ryeguy2006a

  • Oracle Forum Member
  • *
  • Posts: 6270
Re: Madaguy 1955 Nomad Build
« Reply #361 on: June 24, 2025, 09:44:49 AM »
I am running a manual steering box, so that isn't an option for me. I'm thinking that it may be the springs have settled slightly and the car is now slightly toe out.

1976 Trans Am LS1 and much more...SOLD
1968 Camaro LSA, T56 Magnum, and much more...SOLD

Current Project: 1955 Nomad LC9, 4L80e, C5 brakes and etc...

MNBob

  • Oracle Forum Member
  • *
  • Posts: 2070
Re: Madaguy 1955 Nomad Build
« Reply #362 on: July 14, 2025, 12:06:22 PM »
Stance looks good, a little lower but not too much.  Nice rear brakes and tie rod adjusters. 

Congratulations on all the work you have done and in a very short time!
1979 TATA Extreme TKO .64
Hedman elite; Pypes 2.5; Borla XS; MSD 6A; Performer intake; open scoop; Sniper QJ;  110 Amp Alt; Alum. radiator/Mark VIII fan; RobbMc mini starter; subframe connectors; solid body mounts; fiberglass rear springs; poly sway bar and link bushings; 81 master; C6 & Blazer disks; 225/60 & 235/60 17's TrueContact's; relays for PW, PDL, lights; keyless entry

ryeguy2006a

  • Oracle Forum Member
  • *
  • Posts: 6270
Re: Madaguy 1955 Nomad Build
« Reply #363 on: July 16, 2025, 11:21:42 AM »
Thanks! I haven't really done anything on it other than driving it, which is a great thing. Other than sloppy steering, the thing runs and drives great. It needs to have the steering box tightened up I think. I had a remote tune done on it last weekend by a friend of mine and it has much better throttle response and transmission shifting.

1976 Trans Am LS1 and much more...SOLD
1968 Camaro LSA, T56 Magnum, and much more...SOLD

Current Project: 1955 Nomad LC9, 4L80e, C5 brakes and etc...

FormTA

  • Oracle Forum Member
  • *
  • Posts: 6153
  • Life is short, have fun, Drive a T/A
Re: Madaguy 1955 Nomad Build
« Reply #364 on: July 17, 2025, 07:05:24 AM »
What? Losing your tuning talent? That is one thing I wish I had time to learn. Otherwise I would be turbocharging everything....
79 Trans am low buck LS swapped
79 Formula 301 (Work in progress)
67 RS Camaro (waiting it's turn)
69 Dodge charger on late model charger chassis
49 Ford F1 on a 2003 Chevy ZR2 Chassis (current project)
Names, Luke. If I hear anyone telling me they're my father....

Re: Madaguy 1955 Nomad Build
« Reply #364 on: July 17, 2025, 07:05:24 AM »

ryeguy2006a

  • Oracle Forum Member
  • *
  • Posts: 6270
Re: Madaguy 1955 Nomad Build
« Reply #365 on: July 21, 2025, 10:56:22 AM »
I can get the cars up and running really good, but this car has transmission controller and Drive by Wire throttle body. Both of those were uncharted territory for me and thought I'd save some time and get help from a guy who does this for a living. He said that my tune was pretty good overall, but he tweaked several tables and re-did my VE table. It doesn't feel anymore powerful, but the shifting is greatly improved and the DBW has a smoother transition than it did.

1976 Trans Am LS1 and much more...SOLD
1968 Camaro LSA, T56 Magnum, and much more...SOLD

Current Project: 1955 Nomad LC9, 4L80e, C5 brakes and etc...

jonathonar89

  • Oracle Forum Member
  • *
  • Posts: 2516
    • Mark's Cars Inc.
Re: Madaguy 1955 Nomad Build
« Reply #366 on: August 02, 2025, 02:42:13 AM »
Haven’t checked this thread in a while.  Looking good as always.  Keep up the work!
Mark's Cars Inc.

https://markscarsinc.com

ryeguy2006a

  • Oracle Forum Member
  • *
  • Posts: 6270
Re: Madaguy 1955 Nomad Build
« Reply #367 on: August 04, 2025, 09:21:32 AM »
It's been a while since I've had any updates. Been busy building a back porch on our house and that has taken most of my free time. I've been putting a bunch of miles on the car recently and it feels great. Wife and I have taken several longer trips with the most recent one being a 150 mile round trip to a Brewery. Runs great and finally got it out on the highway. She runs great at 80+ and just purrs along which is so much nicer than with the 3.70 gears. It's a great road trip car. I don't have a great gauge, but it must have averaged around 20 mpg with all the highway driving.

Drove to get some lunch in Culpeper, VA.


This was leaving Cars and Coffee in Charlottesville, VA. Some guys shoot the cars as they leave. Really cool action shot and love the new lowered stance! Very happy with that.


I think that is my favorite one.


After C&C we saw a familiar car parked in the shopping plaza.


I installed a flex fuel sensor as part of my winter upgrades since I was re-doing the fuel system. I finally got the tune-up all ready to go and the wiring adapter from Current performance. I didn't want to go all in, but I had about 3-4 gallons in the tank and then topped it off with 3 gallons of e85. It ran great and didn't even notice any difference in performance. Pretty cool that I have that option now. With the mix of 93 and 3 gallons of e85 it brought the ethanol up to 42%. I like having that little gauge there and should help keep the IAT's cooler when running the turbo.


About a month ago I put a post online asking if anyone had a pair of fender trim pieces for a 55 Nomad. A few guys reached out, but one guy actually had a set that he wanted to let go. I talked with him a bit and he sent me some pictures. Then come to find out he wanted to just give them to me! I couldn't thank the guy enough!! I thought it was a scam honestly at first, but I gave him my address and about a week later they showed up.

They are heavily pitted, but are better than nothing and will really fit the look of the car. I'm going to repair some of the really heavy pits and a few cracks with a product called Muggy Weld Alloy 1. I tested it out and it works great, but you cannot have any contaminations whatsoever or it won't have good adhesion. Really looking forward to installing the trim. I'm still torn on if I should just leave the pitted/chrome and attempting to polish the aluminum pieces to match as close as I can or maybe painting flat black/silver.


Hoping to attend some car shows later this summer and fall once I get the porch finished. I'm really getting close to the finish line so I want to get that behind me.

Thanks,
Ryan

1976 Trans Am LS1 and much more...SOLD
1968 Camaro LSA, T56 Magnum, and much more...SOLD

Current Project: 1955 Nomad LC9, 4L80e, C5 brakes and etc...

5th T/A

  • Oracle Forum Member
  • *
  • Posts: 1753
Re: Madaguy 1955 Nomad Build
« Reply #368 on: August 04, 2025, 04:48:20 PM »
Ryan, what a transformation from what you started out with. Nice that you’re putting on miles and enjoying your car. Even though you don’t need more power I’ll be interested in hearing about how it runs with a turbo upgrade.
1980 T/A with a Pontiac 461

Gone but not forgotten;
1973 T/A 455
1975 T/A 400
1978 T/A W72
1982 T/A cross fire injected

Two wheel toys;
2014 Harley Ultra Classic Limited
2013 Honda CB1100
2010 Yamaha Vmax
1982 Yamaha Seca 750

ryeguy2006a

  • Oracle Forum Member
  • *
  • Posts: 6270
Re: Madaguy 1955 Nomad Build
« Reply #369 on: October 13, 2025, 07:26:22 AM »
I haven't updated this in a while, but thought I'd share some photos from the summer. I really haven't been doing much at all to the car other than driving it. I was looking around at local car events and came across something called the Hazzard Run that was about an hour away and gave us a good excuse to drive through the Blue Ridge mountains. The run is a Duke's of Hazzard theme, and was a lot of fun. They organized a police escort through a few small towns in central Virginia. Started in Luray, then Shenandoah, Stanley, and back to Luray.


The Hellcat powered Hazzard police car was my favorite.


My wife snapped this picture while we were driving. One of my favorite pictures so far.


Trying to blend in with the regular crowd.


We ended up putting about 125 miles on the car and she ran great. One thing that I did notice was that I kept smelling some raw fuel every so often, but it wasn't consistent. I had been smelling it ever since I had the car out this year, but chalked it up to my tune maybe needing some tweaking or something because I never found anything wrong. Then after this cruise, I was checking things out as I usually do and noticed there was some fuel leaking out of the injectors on both 7 and 8 cylinder. That was the last straw with this Dorman LS2 Intake. It looks nice, but I posted some pictures online and listed it for sale. I was either going to buy some cheap adapter plates to run the really nice LS3 intake I have, or swap back to the TBSS truck intake.


Then it just so happened that I was looking around at intake manifolds and I found that Holley was having an Open box sale for several returned intakes without original boxes and I jumped on the last modular Lo Ram intake that they had listed. It was $350 off which was not more than what I was asking for the Dorman Intake. Then 2 days later I sold it and shipped out the Dorman intake.


I also have been slowly collecting parts for my turbo swap and finally decided on which one I wanted. I went back and forth, and went with the 78/75 turbo with Billet wheel on eBay with the smaller .96 A/R. I was on the fence about the new turbo that Richard Holdener sells that is supposed to be a great match for smaller LS engines. It looks really nice and very similar to the VS Racing units.


I'm starting to get really excited now. The last big parts that I need before I can start installing it is a new driveshaft, dual valve springs, and an intercooler. I've got something pretty cool in the works for that though. Should have some updates over the next few weeks.

Cheers,
Ryan

1976 Trans Am LS1 and much more...SOLD
1968 Camaro LSA, T56 Magnum, and much more...SOLD

Current Project: 1955 Nomad LC9, 4L80e, C5 brakes and etc...

5th T/A

  • Oracle Forum Member
  • *
  • Posts: 1753
Re: Madaguy 1955 Nomad Build
« Reply #370 on: October 13, 2025, 11:56:16 AM »
Ryan,

Your posts are always entertaining. Love the photo of the Hazzard Garage with the General sitting out in front. A long time ago I spent too much time watching this show. Was it the car chases or Daisey Duke, maybe both. Also got a kick out of the vintage police car with Hellcat power. Have your boys ever seen any Dukes of Hazzard reruns?

I am looking forward to seeing and reading about the turbo upgrade on your Nomad, should be pretty wild.
« Last Edit: October 13, 2025, 04:27:55 PM by 5th T/A »
1980 T/A with a Pontiac 461

Gone but not forgotten;
1973 T/A 455
1975 T/A 400
1978 T/A W72
1982 T/A cross fire injected

Two wheel toys;
2014 Harley Ultra Classic Limited
2013 Honda CB1100
2010 Yamaha Vmax
1982 Yamaha Seca 750

FormTA

  • Oracle Forum Member
  • *
  • Posts: 6153
  • Life is short, have fun, Drive a T/A
Re: Madaguy 1955 Nomad Build
« Reply #371 on: October 14, 2025, 05:44:27 AM »
As a once obscure Christmas movie staring Schwarzenegger once said.... It's Turbo Tine!
79 Trans am low buck LS swapped
79 Formula 301 (Work in progress)
67 RS Camaro (waiting it's turn)
69 Dodge charger on late model charger chassis
49 Ford F1 on a 2003 Chevy ZR2 Chassis (current project)
Names, Luke. If I hear anyone telling me they're my father....

ryeguy2006a

  • Oracle Forum Member
  • *
  • Posts: 6270
Re: Madaguy 1955 Nomad Build
« Reply #372 on: October 14, 2025, 03:05:43 PM »
Thanks guys! I'm very happy with this round of upgrades. Runs much better.

Although the car is still under construction, I peeled off the old sticker for the new one. Fits the car better I think.


Once the intake was delivered, I wasted no time with the installation. I pulled off all of the sensors from the Dorman intake and transplanted them over to the new Holley intake. I had to do a few test fits, but it fits really well overall. One thing that was interesting/annoying is that the factory LS3 MAP sensor that the intake is designed for actually contacts the gen4 oil pressure port. So I had to flip it 180* to make it work. Not a big deal, but seems like a silly oversight to me. Also, I needed to get a 45* adapter for my oil pressure sensor to clear the lid. Then I got the fuel rails, injectors and harness installed.


I test fit the intake manifold and decided to pull the radiator and give it a good flush since I noticed some "junk" in the upper side.


About this time I went into rush mode and stopped taking pictures as I was going. I got the lower intake torqued down and installed. Then before I installed the upper manifold I decided to add a 3/8" barb fitting for the new catch can. I've had this for a while, but have been putting off the install for one reason or another.


I pulled the driver's valve cover to install a second passenger side valve cover so that I can use a filler adapter to -10AN.


To be Continued...

1976 Trans Am LS1 and much more...SOLD
1968 Camaro LSA, T56 Magnum, and much more...SOLD

Current Project: 1955 Nomad LC9, 4L80e, C5 brakes and etc...

N PRGRES

  • Oracle Forum Member
  • *
  • Posts: 1886
Re: Madaguy 1955 Nomad Build
« Reply #373 on: October 17, 2025, 12:24:08 PM »
darn......
Dave

81 Trans Am w/73 400.

ryeguy2006a

  • Oracle Forum Member
  • *
  • Posts: 6270
Re: Madaguy 1955 Nomad Build
« Reply #374 on: October 20, 2025, 07:00:56 AM »
Had some time to finish the updates. While the intake install was happening I picked up a few parts. I wasn't necessarily looking for this, but happened to find a guy selling a 2.3L Whipple Supercharger off of a late model 5.0 Mustang GT. It was pulled for noisy rear bearings and in the meantime the guy blew up the motor and just needed cash to get the car back together. He sold it to me completely disassembled, and I'm pretty handy so I grabbed it. He sold it to me crazy cheap so I really couldn't pass on it and he was only 10 mins from my house.

It just so happens that there is a company SWS Motorsports that sells an adapter for the Holley Lo ram to a variety of Ford based superchargers... Not sure that's the direction I want to go, but is interesting. Probably will be a rebuild and sell part to fund my project.


I also was able to pick up a really nice 1955 Belair factory radio delete. Thanks Pops!! At some point this winter I'll be building a lower center console that will hole a double din radio, cubby for switches/USB/ect with some much needed cup holders! So I wanted a cool option to cover that hole. Love how this looks and matches my worn dash bezels really well.


Continuing the progress of getting the car back on the road, as I was test fitting the new Holley intake it became clear that I needed to move the radiator forward more than I could with the factory latch in place. So after thinking on it for a week or so, I decided to go the quick and dirty route and notched the bottom side of the latch so that I could bent the rear to a 90* and twisted the lower brace to match. I decided to keep the nutsert in place so I cut it off and relocated to match the new angled upper piece.


With that modified, it gained me about 2" of clearance so I could slide the radiator forward where it needed to be. This won't be my long term solution, but is strong and keeps the hood latched. Doesn't look too bad for about 30 mins work. I think I want to build something like a company Sweet Components used to sell. I will likely be swapping out to the radiator for a dual pass LS swap unit at some point in the future, so I may be reconfiguring the whole assembly at some point.


With that modified, we were able to get the car back on the road and took the car to a show on Sunday


Love the way that intake looks!


Even got to see a guy who had a striking resemblance to the late Hulk Hogan checking out my car.


We had a great time at the show and had wonderful weather. Tons of really nice cars.

When we got back, I decided it was time. I pulled off my driver's side door panel to pop off the little plates the previous owners installed when they painted the car. Thankfully they didn't weld the holes. Can anyone can guess why I punched holes in the doors?


Cheers,
Ryan

1976 Trans Am LS1 and much more...SOLD
1968 Camaro LSA, T56 Magnum, and much more...SOLD

Current Project: 1955 Nomad LC9, 4L80e, C5 brakes and etc...

Re: Madaguy 1955 Nomad Build
« Reply #374 on: October 20, 2025, 07:00:56 AM »

ryeguy2006a

  • Oracle Forum Member
  • *
  • Posts: 6270
Re: Madaguy 1955 Nomad Build
« Reply #375 on: October 20, 2025, 07:35:00 AM »
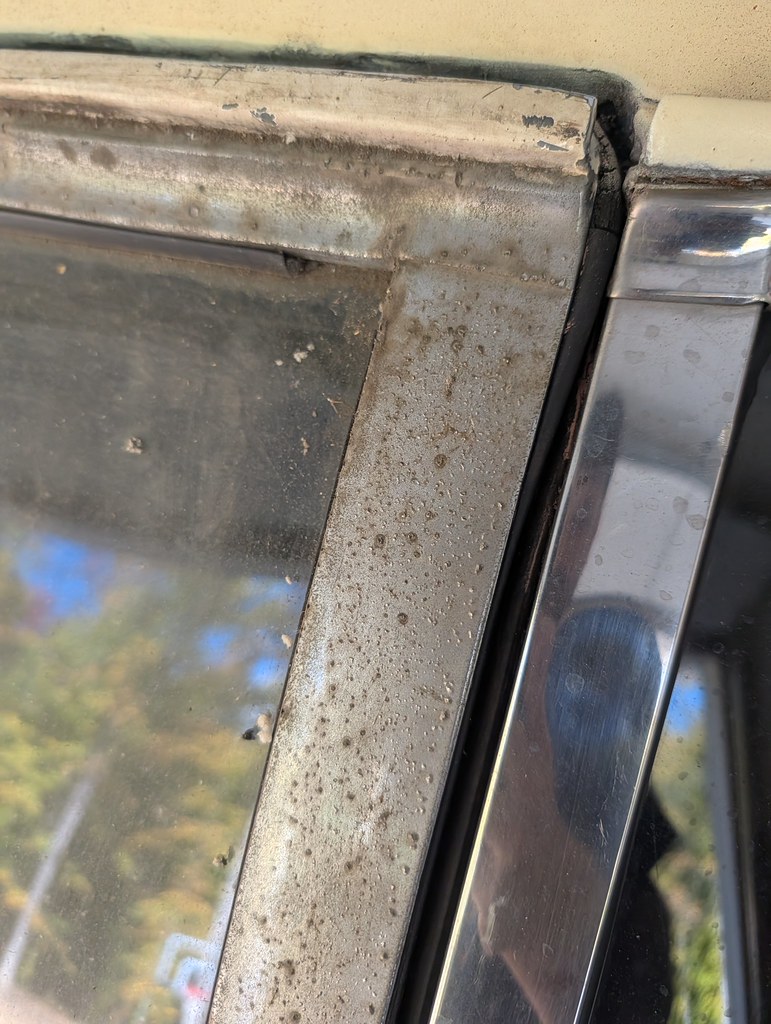
In an effort to fundraise a bit for this project, I started selling some parts from the huge lot of Nomad and 55 Belair parts I bought in the spring. The lot came with a Nomad rear liftgate that I had listed for sale with the lot of parts. I had a gentleman who was interested so I pulled it out and thought it might be worth a shot to test fit on my car to verify the degree to which it was bent. Well to my surprise, it wasn't bent at all. In fact it fit the car incredibly well. So well, that I decided to keep it rather than sell. (Sorry Carl) The downside is the chrome is in much worse condition than the one that came on my car.


But the tradeoff is how well it fits on the car!
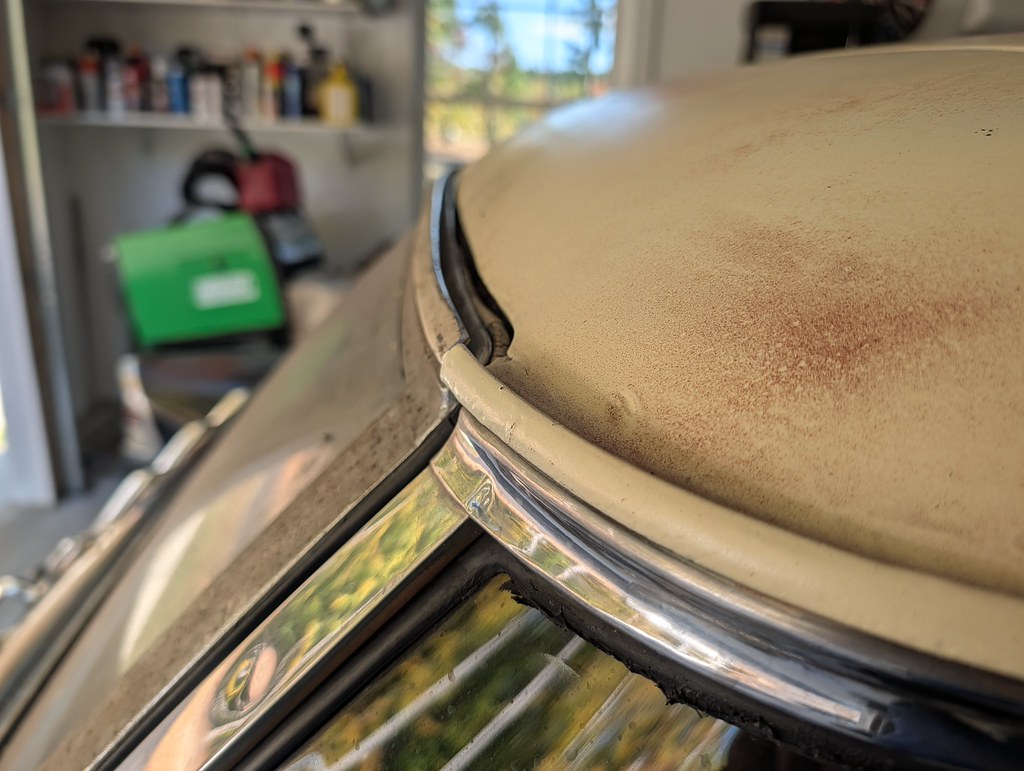


I got out some steel wool and polished it the best that I could and it actually turned out better than I expected. Still much worse condition, but something I can live with.

Before


After


Now that the liftgate was fitting so nicely, I got sidetracked and decided to finish pulling off the rear strikers for the tailgate. I don't believe that they had ever been removed from the car and most of the hardware was frozen when I got it. Several months ago I started to remove the bolts with the impact tool. That loosened the bolts, but they still couldn't come out all the way. I used a lot of tools to get them all out. Impact, welder, heat, and etc. I got lucky that I was able to remove them all without the need to drill/tap new holes. So they are all the factory threads. You can still see the original color too. I'm leaning towards it being Sea Mist or Regal Turquoise. Any thoughts?


I cleaned up the strikers and reinstalled with some new stainless hardware. Should be good for another 70 years!


My next update is something I've been waiting a long time to do.

Cheers,
Ryan

1976 Trans Am LS1 and much more...SOLD
1968 Camaro LSA, T56 Magnum, and much more...SOLD

Current Project: 1955 Nomad LC9, 4L80e, C5 brakes and etc...

ryeguy2006a

  • Oracle Forum Member
  • *
  • Posts: 6270
Re: Madaguy 1955 Nomad Build
« Reply #376 on: October 20, 2025, 01:30:35 PM »
In an effort to fundraise a bit for this project, I started selling some parts from the huge lot of Nomad and 55 Belair parts I bought in the spring. The lot came with a Nomad rear liftgate that I had listed for sale with the lot of parts. I had a gentleman who was interested so I pulled it out and thought it might be worth a shot to test fit on my car to verify the degree to which it was bent. Well to my surprise, it wasn't bent at all. In fact it fit the car incredibly well. So well, that I decided to keep it rather than sell. (Sorry Carl) The downside is the chrome is in much worse condition than the one that came on my car.


But the tradeoff is how well it fits on the car!
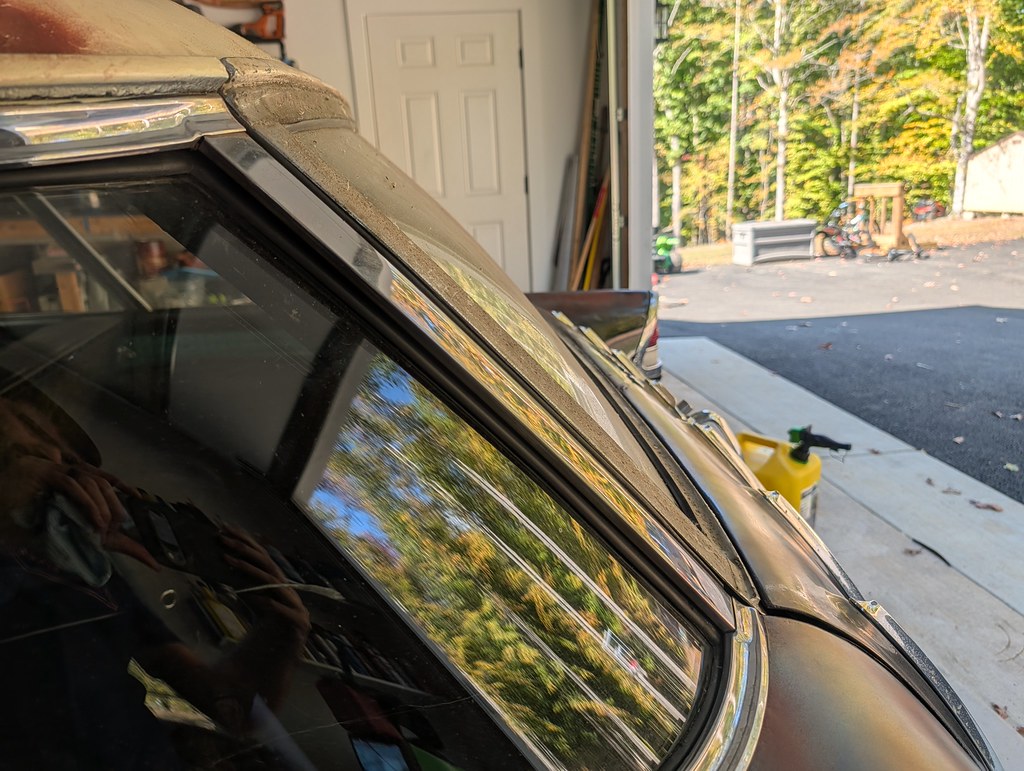


I got out some steel wool and polished it the best that I could and it actually turned out better than I expected. Still much worse condition, but something I can live with.

Before
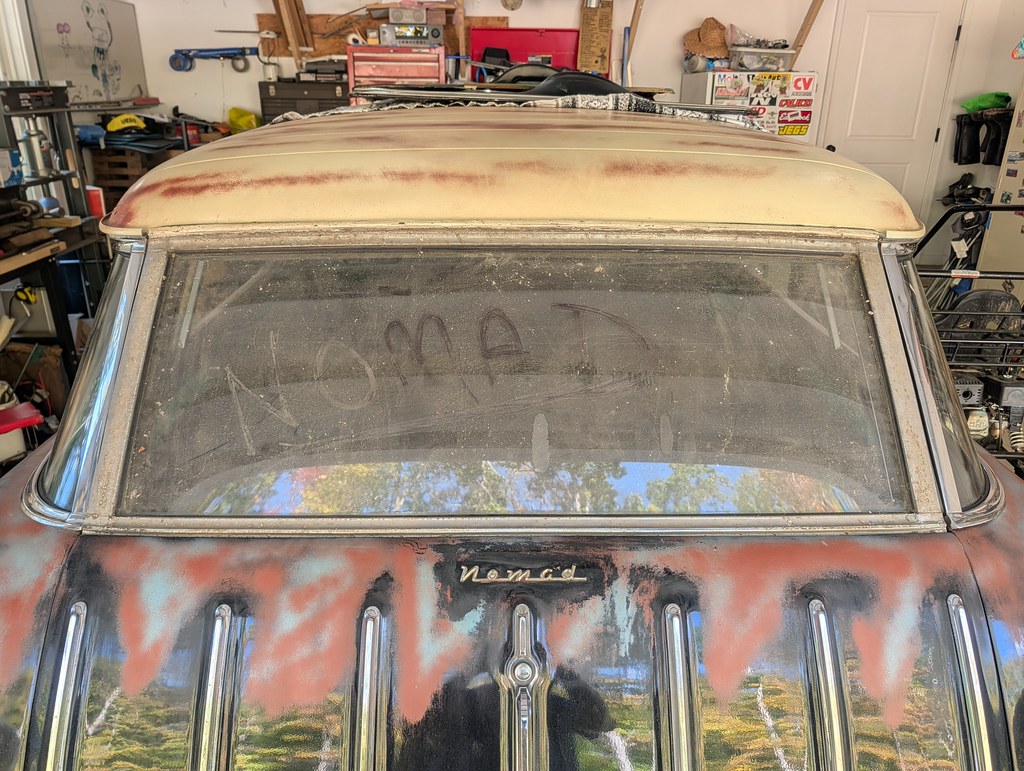


After
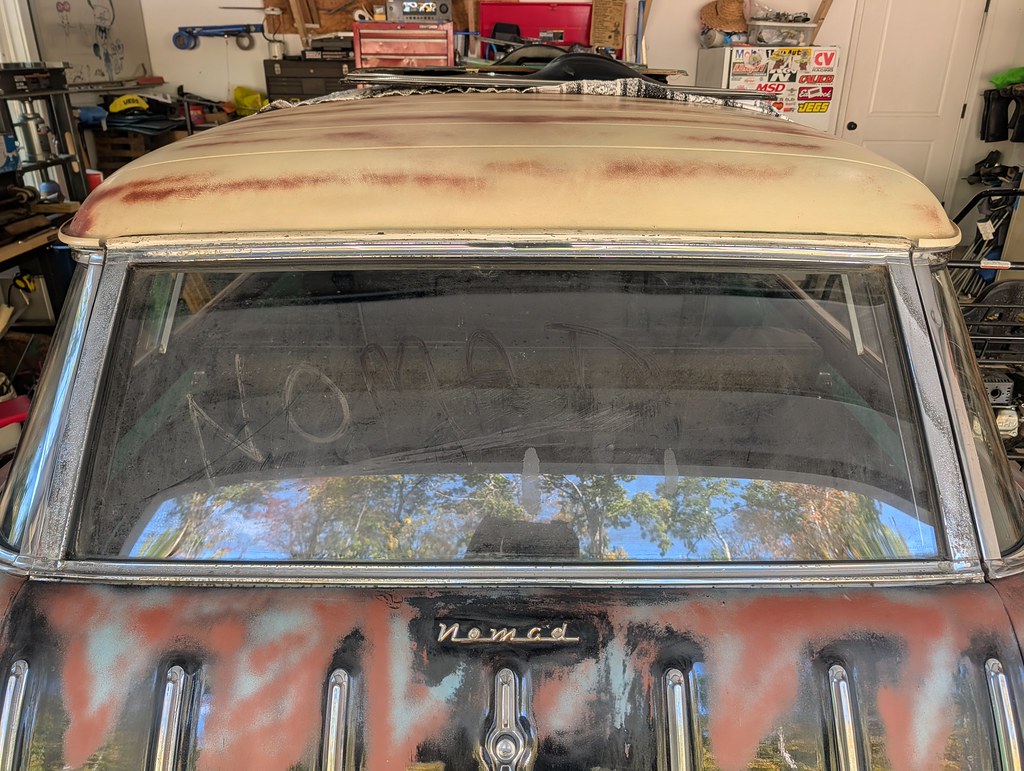


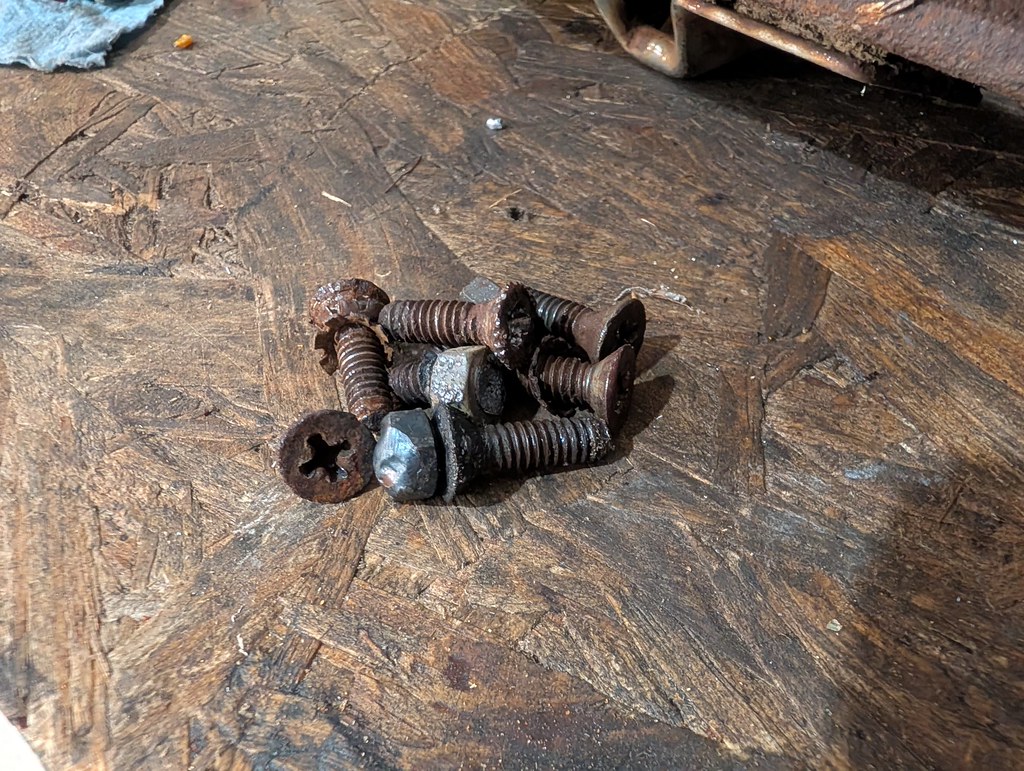
Now that the liftgate was fitting so nicely, I got sidetracked and decided to finish pulling off the rear strikers for the tailgate. I don't believe that they had ever been removed from the car and most of the hardware was frozen when I got it. Several months ago I started to remove the bolts with the impact tool. That loosened the bolts, but they still couldn't come out all the way. I used a lot of tools to get them all out. Impact, welder, heat, and etc. I got lucky that I was able to remove them all without the need to drill/tap new holes. So they are all the factory threads. You can still see the original color too. I'm leaning towards it being Sea Mist or Regal Turquoise. Any thoughts?


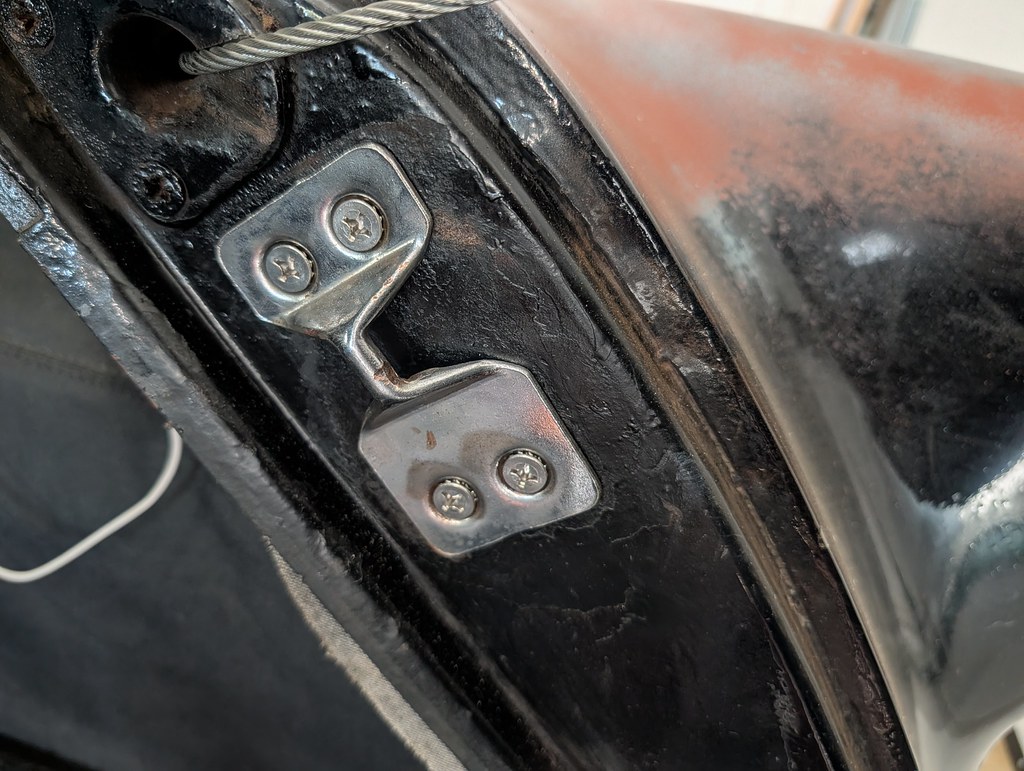
I cleaned up the strikers and reinstalled with some new stainless hardware. Should be good for another 70 years!


My next update is something I've been waiting a long time to do. Now that the rear of the car is tightened up significantly, it was time to start installing the eyebrows and spears. I've had the eyebrows test fit no less than a dozen times, but wasn't able to work up the courage to drill into my fenders/doors until this past weekend. When one of the previous owners restored the doors, they cut the skin halfway down and blended it together with a new skin. On the driver's door thankfully they cut below the original holes for the spears, but the passenger side they cut above that line, so I was missing the original holes. I took a bunch of measurements from the driver's side and transferred to the passenger side. I marked where the eyebrow hole needed to be, and then held up the trim as best as I could to get me into the ballpark.


I used the driver's side keyhole as a reference guide and transferred that to the passenger side. After a bunch of test fits and being mocked up with tape, I laid out the holes and drilled the holes. I used a flexible metal ruler that I bought a while ago to get nice crisp lines. I got a little more delamination around the drill sites than I would have liked, but no turning back now.


After the holes were drilled, I went ahead and drilled the eyebrows and fender spears. I used some blue painters tape under the fender and eyebrows then let the studs mark where they needed to be. It worked incredibly well and the trim nearly fell into place.


There was a little nub left on each eyebrow and I wanted to figure out a way to use it to mount if I could. I found these little couplers at Lowe's that were made of aluminum and threaded #6. I was able to tap what was left of the stud, and threaded on this little extension. It seems to work great and is holding firmly.


I didn't get any pictures of the during process, but the door spears that I have are reproduction aluminum pieces with no provisions for mounting hardware. So what I did was taped them to the doors where I wanted them, marked the back with a sharpie, then drilled/tapped the holes. I used some small fender washers and #10-32 studs/nuts. It worked really well and holds very firmly. I got in a hurry to install them, and probably should have done some epoxy in the threads so I don't have to worry about them coming apart. But I'm going to likely pull them to try and polish to match the fender spears and paint the middle at some point. I got excited to have the trim installed. I also used some thread cutting nuts on the existing studs and it worked beautifully on the fender spears.


The tricky one was the driver's side for one reason or another. The eyebrow fit tighter to the fender, so it was harder to manipulate without cracking. When I drilled the inner hole for the eyebrow, it allowed the side mount to slide back about a 1/4" which threw all my other holes off. So I had to redrill to allow everything to shift back. Which was great becuase it made the trim fit much tighter at the door gap. The driver's side was in fairly good condition, but I didn't notice until I went to install and the front most stud that holds the eyebrow was about 1/4" shorter than the rest of the original studs. That caused the threaded nut to not have enough length to grab. After thinking on it for a while I realized that it would fit if I flipped it upside down but wouldn't have anyway to tighten. Then it occurred to me that I could Tig weld them together and allow me to tighten them! It worked beautifully and I added a washer so it didn't dig into the fender.


I noticed that the original driver's door panel was starting to fall apart right where the upper trim meets the waffle panel. I found some thick material (cake display pieces at Wal-Mart) that was a similar thickness as the original card stock and used some contact cement to attach to the original. Let it cure for 24 hours and then I was able to reinstall.


I also got sidetracked with other projects with the door panels off. The passenger side garnish moulding never quite fit right, so I had to weld a hole shut and then redrill. Also added the door locks and a new glove box liner.


After driving my family a little crazy this weekend with things not going my way, but fighting through I was able to get the trim all buttoned up and installed and the interior back together. I pulled the car into the driveway and snapped a few cool pictures. They turned out way better than I thought for being my driveway.


We took the car out for a big loop and put maybe 25 miles on it. Was beautiful driving through the back country roads with all the fall leaves. I'm hoping to take the car out to drive on Skyline Drive in the Blue Ridge Mountains this weekend.

Seems silly, but a huge milestone for me to have the car riding with the original trim once again. Most people will have no idea or ask why my trim is so pitted, but if you know you know. Fender trim is hard to find regardless of condition.

Cheers,
Ryan

1976 Trans Am LS1 and much more...SOLD
1968 Camaro LSA, T56 Magnum, and much more...SOLD

Current Project: 1955 Nomad LC9, 4L80e, C5 brakes and etc...

76455sd

  • Oracle Forum Member
  • *
  • Posts: 3149
Re: Madaguy 1955 Nomad Build
« Reply #377 on: October 20, 2025, 05:01:19 PM »
I enjoyed reading your update.  The car looks great and I’m glad you’re enjoying it with the family.
Steve D
'76 LE 455/4speed/solid roof - SOLD
'02 WS6 T/A convertible

N PRGRES

  • Oracle Forum Member
  • *
  • Posts: 1886
Re: Madaguy 1955 Nomad Build
« Reply #378 on: October 21, 2025, 05:54:10 AM »
Your dedication and skill is impressive.  Awesome job!
Dave

81 Trans Am w/73 400.

ryeguy2006a

  • Oracle Forum Member
  • *
  • Posts: 6270
Re: Madaguy 1955 Nomad Build
« Reply #379 on: October 21, 2025, 08:32:16 AM »
Thanks guys, I appreciate the compliments. Drove the car to work this morning. Got some funny looks on the commute in haha

1976 Trans Am LS1 and much more...SOLD
1968 Camaro LSA, T56 Magnum, and much more...SOLD

Current Project: 1955 Nomad LC9, 4L80e, C5 brakes and etc...

FormTA

  • Oracle Forum Member
  • *
  • Posts: 6153
  • Life is short, have fun, Drive a T/A
Re: Madaguy 1955 Nomad Build
« Reply #380 on: October 22, 2025, 04:51:41 AM »
Looking great! Cool car.
79 Trans am low buck LS swapped
79 Formula 301 (Work in progress)
67 RS Camaro (waiting it's turn)
69 Dodge charger on late model charger chassis
49 Ford F1 on a 2003 Chevy ZR2 Chassis (current project)
Names, Luke. If I hear anyone telling me they're my father....

kentucky yeti

  • Jedi Council
  • Oracle Forum Member
  • *
  • Posts: 33556
  • located in western Ky
Re: Madaguy 1955 Nomad Build
« Reply #381 on: October 29, 2025, 06:00:18 AM »
The driveway pics are cool!  I was just bragging on your skills, along with FormTA 's skills, in his thread. 
Mike (aka Yeti)

1977 Y82 Trans Am
1978 F-250 4x4
1982 Silverado (my Dad's old truck)
2002 WS6 Trans Am
2015 F-150 Lariat 4x4 (twin turbo)
2025 Explorer Platinum
…and over 80 other sold Firebirds ‘69-2002

ryeguy2006a

  • Oracle Forum Member
  • *
  • Posts: 6270
Re: Madaguy 1955 Nomad Build
« Reply #382 on: November 10, 2025, 08:49:15 AM »
Thankfully, I've just been driving the car and haven't done anything to it recently. I'm happy to report that I finally clocked in over 1000 miles since putting it back together this spring. Would have liked to drive it more, but the porch project took up a lot of my summer. I even let my sister-in-law put in some miles! First time I've ever spent time in the back seat. Actually pretty darn comfortable.


I've been slowly collecting parts for the next stages of the build. I want to say a huge thanks to @Crawdad55 who send me some really great parts that I can't wait to get installed on the car. Will definitely go a long way towards retrofitting AC!


I also met up recently with a guy who removed an original Vintage Air Gen1 unit from his car and gave me a great price on it. Apparently shortly after it was installed in the late 90s the compressor blew, and he never got that part fixed. Recently he decided to pull it all out and go back to an original heater box. We weren't too far from each other, so we met in the middle. I took my car and it was a beautiful day for a cruise. Unbelievably he had the original installation instructions too! My engine bay is getting very tight, so I'll be trying out one of those 12v compressor pumps that I've been seeing online since I won't have the room once the turbo is mounted.


Last but certainly not least is one of the last big components that I needed before the turbo swap can begin. My buddy upgraded to the ultra low profile intercooler, and sold me the original unit that he had for a great price. The unit is beautifully built.


I need to buy a heat exchanger, reservoir and turbo drain lines and I'll be ready to make the swap. Colder weather is moving in so that may be a great time to start the swap.

Cheers,
Ryan

1976 Trans Am LS1 and much more...SOLD
1968 Camaro LSA, T56 Magnum, and much more...SOLD

Current Project: 1955 Nomad LC9, 4L80e, C5 brakes and etc...

ryeguy2006a

  • Oracle Forum Member
  • *
  • Posts: 6270
Re: Madaguy 1955 Nomad Build
« Reply #383 on: December 15, 2025, 09:06:15 AM »
It's been a few months since I've had any meaningful updates, but I've been busy this past weekend. About 2 weeks ago it snowed about 3-4" overnight and I had to get a photo with the car in the fresh snow. Love the way they turned out.


I had been holding off on starting the turbo install since many times we don't get snow until late January/early February when they put down salt or salt brine. Well they laid it down on the roads so that was my cue to get the car up on wheel stands to start the winter mods. First up was to get the complete passenger's side exhaust removed. Starting with the manifold back to the muffler and tailpipe. Then it was the first real test fit of the turbo log with the billet wheel 7875 turbo.


Everything cleared as I expected it to because I have had this manifold on back when I originally installed the LS in the car. My original plan was to install this manifold but run it N/A with a dummy turbo pipe in place that just routed it back. But I scrapped that idea since the vband could be in so many different places and I didn't want to modify the exhaust multiple times. Only thing that needs adjustment is one zerk fitting on the upper control arm needs to be relocated as it points directly at the manifold. Next up was test fitting the turbo! It has tons of clearance everywhere which makes me very happy.


Then I had to mock up the Tick intercooler brick to see if it has any clearance issues. It is very close to the wiper motor, but has about 1/2" clearance around the whole thing. It couldn't fit any better around the motor!


So close, but it doesn't touch. I'll definitely keep an eye on it though for any witness marks with the engine shifting around.


The turbo outlet to TB opening is tight, but I think with a few tight 90* elbows it will fit.


Next up was making sure that with the taller intake that I'd have enough hood clearance. First attempt I wasn't even touching the hood, second attempt didn't either, and then on the third attempt I was finally making contact with the hood. Even with the added 3.25" intercooler brick, I still have over 2" of clearance between the intake and hood! That was a pleasant surprise.


Now it was time to see what the exhaust fitment was going to look like. With the battery right there, I thought it may be sort of tight, but after trimming the pipe down a bit, I'll have plenty of clearance around everything. I realized though that I'm going to need to get the crossover fit and mocked up though before I get too far with building this downpipe. I want to make sure that there is good fitment while also leaving a little room to grow in the future. I am running a 3" downpipe which I'm sure many will say that I should just go with 4", but I'm not sure for the power level that I want that is necessary. So I have a 3" mandrel bent stainless exhaust that I'm running back to the same muffler. I am however going to add a vband to replace the exhaust clamps that have been leaking since day 1.


One last picture where the billet wheel is visible.


That's all for now, but next up is the radiator, heat exchanger and A/C condenser fitment and mockup. I've got a lot of things to fit into a fairly small place, but I'm confident that I'll get it all to fit.

Cheers,
Ryan

1976 Trans Am LS1 and much more...SOLD
1968 Camaro LSA, T56 Magnum, and much more...SOLD

Current Project: 1955 Nomad LC9, 4L80e, C5 brakes and etc...

5th T/A

  • Oracle Forum Member
  • *
  • Posts: 1753
Re: Madaguy 1955 Nomad Build
« Reply #384 on: December 15, 2025, 12:54:55 PM »
Some very impressive fabrication work you got going on. Other than the large diameter wheels, this will definitely be a wolf in sheep's clothing! 
1980 T/A with a Pontiac 461

Gone but not forgotten;
1973 T/A 455
1975 T/A 400
1978 T/A W72
1982 T/A cross fire injected

Two wheel toys;
2014 Harley Ultra Classic Limited
2013 Honda CB1100
2010 Yamaha Vmax
1982 Yamaha Seca 750

Re: Madaguy 1955 Nomad Build
« Reply #384 on: December 15, 2025, 12:54:55 PM »

FormTA

  • Oracle Forum Member
  • *
  • Posts: 6153
  • Life is short, have fun, Drive a T/A
Re: Madaguy 1955 Nomad Build
« Reply #385 on: December 17, 2025, 01:15:08 PM »
Pretty cool you're starting this. What PSI are you planning on running?
79 Trans am low buck LS swapped
79 Formula 301 (Work in progress)
67 RS Camaro (waiting it's turn)
69 Dodge charger on late model charger chassis
49 Ford F1 on a 2003 Chevy ZR2 Chassis (current project)
Names, Luke. If I hear anyone telling me they're my father....

N PRGRES

  • Oracle Forum Member
  • *
  • Posts: 1886
Re: Madaguy 1955 Nomad Build
« Reply #386 on: December 19, 2025, 07:20:34 AM »
Some very impressive fabrication work you got going on. 
I am always amazed with Ryans work
Dave

81 Trans Am w/73 400.

ryeguy2006a

  • Oracle Forum Member
  • *
  • Posts: 6270
Re: Madaguy 1955 Nomad Build
« Reply #387 on: December 19, 2025, 08:04:32 AM »
Thanks guys, I appreciate it. It should wake it up a little bit! I'm going to be honest, swapping to the 3.25 gears from the 3.70 made the 300 rwhp less impressive. I'm definitely looking forward to more get up and go. I'm planning to run around 10psi right now. The wastegate came with springs to run up to 17psi, but I'm not sure I'm ready for that much right now haha. I think around 10psi should put me right around 500whp which I think is a great place to be.

1976 Trans Am LS1 and much more...SOLD
1968 Camaro LSA, T56 Magnum, and much more...SOLD

Current Project: 1955 Nomad LC9, 4L80e, C5 brakes and etc...

FormTA

  • Oracle Forum Member
  • *
  • Posts: 6153
  • Life is short, have fun, Drive a T/A
Re: Madaguy 1955 Nomad Build
« Reply #388 on: December 20, 2025, 07:01:46 AM »
I can't remember (It's probably in this post too) did you gap your rings for boost?
79 Trans am low buck LS swapped
79 Formula 301 (Work in progress)
67 RS Camaro (waiting it's turn)
69 Dodge charger on late model charger chassis
49 Ford F1 on a 2003 Chevy ZR2 Chassis (current project)
Names, Luke. If I hear anyone telling me they're my father....

ryeguy2006a

  • Oracle Forum Member
  • *
  • Posts: 6270
Re: Madaguy 1955 Nomad Build
« Reply #389 on: January 05, 2026, 09:16:40 AM »
Yes, I knew at some point I'd be running boost so when I built the engine a few years ago I gapped the rings to around .025" top and bottom. I don't remember exactly, but that was the ballpark.

1976 Trans Am LS1 and much more...SOLD
1968 Camaro LSA, T56 Magnum, and much more...SOLD

Current Project: 1955 Nomad LC9, 4L80e, C5 brakes and etc...

ryeguy2006a

  • Oracle Forum Member
  • *
  • Posts: 6270
Re: Madaguy 1955 Nomad Build
« Reply #390 on: January 05, 2026, 09:18:08 AM »
Hope everyone had a Merry Christmas (or other holidays celebrated) and Happy New Year! I was able to get quite a done on the few down days we had during our time off. After going around and back and forth trying to decide where the best location will be for the wastegate, I finally decided to locate it similarly to where the Huron Speed truck kit does on their log manifold. This should give a good priority wastegate flow. I wanted to locate it straight inline with the exhaust flow at the elbow, but there were too many other things in the way and it would also make for a long pipe back into the downpipe. I'll be able to tuck it up nicely and will clear the inner fender and allow for easy access to change springs if needed. It also gives a nice clear shot to route the wastegate exhaust back into the main exhaust.


I pulled off the manifold and mocked everything up on my welding table. That way I could get to things much easier to mock it all up. Used some CAD from an old paper towel roll haha.


Once I nailed down the location where I wanted to the pipe to come out, I started drilling with the hole saw. Those manifolds are thick! I destroyed 2 before I finally bored all the way through. Then I trimmed up some of the summit racing 304 stainless pipe that I bought for the job. They had a nice mandrel bent pipe with a 180* and some long sections with a 45* as well. Cut off a section to get it mocked in position then test fit on the car.


This was the first of about 37 times the manifold was bolted on with the turbo, then down pipe to check for fitment.


Once I was happy with the fitment, I tacked the first pipe into place. I then determined that I needed another small pipe to angle the wastegate up and at a different angle. I cut and tacked that piece into place and was happy with the fitment. It was tight, but cleared everything. I didn't get any pictures during, but I set up the TIG and purge welded to eliminate the oxidation behind the weld. I'm still practicing with the TIG, but I turned the amps way up and got full penetration into the cast manifold. I made sure to use 309L filler wire that has good adhesion with dissimilar metals such as welding steel to stainless steel.


Here's the test fit fully welded to see the clearance. Will be relocating those wires up and away from the heat.


Here's my purge welding setup. I actually used my son's 3D printer to make that little puck for the end of the pipe. Worked really nicely too.


I didn't take any pictures while I was welding, since I wanted to move quickly to avoid using up more gas than I needed. But here's the end results. I welded everything fully bolted together to avoid warping or shifting. I'm very happy with the way it turned out. I'm pretty happy with how I progressed with my welding as the project went on. I was able to get the settings pretty dialed in.


Then at long last, I was able to do a final mock up with the completed pipes. I need to pull them off one last time to paint the log manifold where I welded it, then wrap the down pipe with header wrap to protect the battery.


That's basically what the end result will be. I'm very happy with how nicely it tucks up and in.


I finally received all the parts for adding the AC condenser, heat exchanger and a new radiator. I'm working now on mocking up all the components to see how they all work together. Hopefully it won't take too much work to get them all to live happily together. Now that the more difficult fabrication work is done on the hot side, I just need to connect the crossover pipe to my passenger side log. Does anyone have a good recommendation for a higher quality flex pipe?

Cheers,
Ryan

1976 Trans Am LS1 and much more...SOLD
1968 Camaro LSA, T56 Magnum, and much more...SOLD

Current Project: 1955 Nomad LC9, 4L80e, C5 brakes and etc...

N PRGRES

  • Oracle Forum Member
  • *
  • Posts: 1886
Re: Madaguy 1955 Nomad Build
« Reply #391 on: January 05, 2026, 09:35:32 AM »
darn dude that is amazing
Dave

81 Trans Am w/73 400.

ryeguy2006a

  • Oracle Forum Member
  • *
  • Posts: 6270
Re: Madaguy 1955 Nomad Build
« Reply #392 on: January 06, 2026, 08:34:12 AM »
Next on the list was to start mocking up all the coolers and see how they work together. Given the minor damage on the radiator that came in my car and that it had something inside of it, I opted to order a new radiator from Auto City Classics. I hadn't seen it before, but they offer a dual mount for installing radiators in either V8 or 6 Cylinder positions. What I'm hoping is that I can use the V8 mount in my 6 cylinder radiator support to center the radiator and sneak the heat exchanger between the condenser and set back radiator. This will require that I cut the core support cross bar and build a new one, but I think it will be my best bet.


This new radiator has a slightly smaller core than the old one in the car, but I'll be able to make my modified C7 fan work with a little bit of trimming or maybe different brackets. That's a huge relief.


And here's the heat exchanger on top of the radiator. They have nearly the same size core, so that should make for an efficient heat exchanger. Also, the distance between the mounting tabs is about 1/4" longer than the distance inside of the AC condenser brackets. This is supposed to be an upgraded unit for a Cobalt SS.


AC brackets are installed using the stock hardware and locations, so that made things very easy.


First test fit of the condenser was disappointing. The filler panel hit the condenser and required some clearance around a hump to fit. I was hoping that it would have fit in without modification, but that's how it goes sometimes. It was minor, but I didn't want to change the location of the condenser because it came with pre-bent hard lines to the dryer. I know this isn't the final location where I will put it, but thought it would be good to test fit to get some measurements. It's going to be very close, but doable.


I was also looking at different options for the heater block off that is needed for Vintage Air Gen1 unit. I found that Old Air Products sells a  Bypass Heater Valve, Cable Operated, Pull to close 25-1019 that will close the flow to the heater box, but allows for recirculation. This is a better option for LS engines so that the coolant is still flowing through the ports. Some have had issues plugging them off so I figured this would be a safe option.


Last up was just a cool trade that I stumble on. I found a guy selling a Whipple supercharger that was disassembled and needed new rear bearings, so I picked it up really cheap. I found what it needed and slowly assembled it and got it all back together properly. I had it online for sale on FB Marketplace with an option to trade for LS parts. Some guy reached out and had a T56 transmission with new clutch, TOB, shifter and a few other new parts for trade. I had to meet him about 2.5 hours away, but it was much more useful to me than the supercharger. A company SWS motorsports sells an adapter plate for this supercharger to LS motors using the Holley Lo Ram which was an option, but I decided to stay turbo.


It's a little dirty, but should clean up nicely. Now I kinda want to find a cheap IROC or T/A 3rd gen roller and 5.3 motor to make a fun daily driver.


That brings me up to present. I'm hoping to get the hot side wrapped up soon, and then I can focus on getting the cold side buttoned up. I can't wait to hear all of the turbo noises!

Cheers,
Ryan

1976 Trans Am LS1 and much more...SOLD
1968 Camaro LSA, T56 Magnum, and much more...SOLD

Current Project: 1955 Nomad LC9, 4L80e, C5 brakes and etc...

FormTA

  • Oracle Forum Member
  • *
  • Posts: 6153
  • Life is short, have fun, Drive a T/A
Re: Madaguy 1955 Nomad Build
« Reply #393 on: January 12, 2026, 05:16:08 AM »
Great work Ryan! You welds look fantastic for a "beginner"! The crossover exhaust for turbos always seem to stump me. Do you just run the exhaust all together to get equal exhaust back pressure? Always seem like the flow will be really less than optimal. Now, twin turbos, I understand that....
79 Trans am low buck LS swapped
79 Formula 301 (Work in progress)
67 RS Camaro (waiting it's turn)
69 Dodge charger on late model charger chassis
49 Ford F1 on a 2003 Chevy ZR2 Chassis (current project)
Names, Luke. If I hear anyone telling me they're my father....

ryeguy2006a

  • Oracle Forum Member
  • *
  • Posts: 6270
Re: Madaguy 1955 Nomad Build
« Reply #394 on: January 13, 2026, 07:33:57 AM »
Yes, the crossover loops to the passenger side where the log manifold is. The primary tubes face forward slightly so all of the flow is going in the same direction so the driver's side exhaust is exiting normally, but the passenger's side flows forward up into the turbo. The casting was pretty rough when I first got it, but I did a lot of clean up on the ports which should help significantly with the flow. While it does present a restriction over a tubular manifold, the back pressure is what helps spool up the turbo. Up to a certain point that is. Generally it's accepted that you want to have a 2:1 backpressure vs boost psi.   

1976 Trans Am LS1 and much more...SOLD
1968 Camaro LSA, T56 Magnum, and much more...SOLD

Current Project: 1955 Nomad LC9, 4L80e, C5 brakes and etc...

ryeguy2006a

  • Oracle Forum Member
  • *
  • Posts: 6270
Re: Madaguy 1955 Nomad Build
« Reply #395 on: January 14, 2026, 01:58:02 PM »
Continuing to make steady progress. After taking lots of measurements and getting the AC condenser mounted, I knew that was as far forward as I could go. I determined that with the dual mounts on the radiator support, that I would have just enough room to mount the heat exchanger right between the condenser and the radiator. However, that required some cutting. I made a jig for myself before I made any cuts so that I could make a new center mount with the same width before I made any cuts.


The big cut.


Now it was time to test fit the radiator using the V8 mounts in the 6 cylinder radiator support. This essentially centers the radiator between the radiator support and will give me plenty of room to mount the heat exchanger.


I just have the heat exchanger sitting in this position to confirm that the width will work for me. So happy that it all fits together. I'll rotate the heat exchanger 90* so that the outlets are pointing towards the driver's side where it's less cluttered. I'll mount the heat exchanger pump down low, so I'll find somewhere for that to live. What is even cooler is that by dumb luck, the distance between the AC brackets and the heat exchanger mounts is about 1/8". I'll be able to trim down the mounts just slightly and use the mounts that came on the heat exchanger.


It is fun building cars, but sometimes you take 2 steps forward and one step back. I think that I have a plan that will solve this issue, but I need to do a bit more research. If it works, it will also solve my turbo charge piping issue as well.


I'm fairly confident that a new or modified intake lid would solve my charge pipe and coolant hose issues. So, after a friend send me a picture of a really cool design he did on fusion, it got me thinking about was CAD options were out there. Then I realized that Chat GPT does a really good job of photoshop and asked it to modify the generic Holley lid. Here's what it came up with after I asked it to move the throttlebody opening to the front and added some ribbing.


Pretty impressive actually! I don't mind it at all. Then I noticed that people were using it to export to CAD and AI would be able to spit out a model. So I gave it a shot... Well we're not quite there yet with AI haha


Moving back to the hot side fabrication. I thought that the pipes were welded enough that I could unbolt the downpipe to finish up some welding in tight spots, but unfortunately it still warped and moved on me. So, this time I took no chances and kept it all bolted together to weld and cool. I decided the best course of action was to cut the pipe that recirculates the wastegate back to the exhaust. This also gave me an opportunity to get a burr bit into the hard to reach spots to clean up any flash and excess exhaust piping that was hanging out there. Hopefully this avoids any strange sounds or whistles.


Once that was done, I took it all back apart and confirmed fitment on the car and it all fit together just like it came apart. Very nice! Now it was time to start connecting the rest of the hot side together. This took a lot more effort than I thought, but I now have all the pipes tacked together and things fit great.


That's all for now. Hoping to get some time here and there throughout the week to get the hot side pipes all welded up now that I have it all cut and fit. I'm also going to add an exhaust hanger at the rear where it goes around the transmission to support the weight. Once that is finished up, I can work on the rest of the downpipe and get the muffler hooked back up. I'm probably going to just keep the muffler and side exhaust to keep things simple. If I have time I may try to mock up a pipe to go over the axle.

Thanks,
Ryan

1976 Trans Am LS1 and much more...SOLD
1968 Camaro LSA, T56 Magnum, and much more...SOLD

Current Project: 1955 Nomad LC9, 4L80e, C5 brakes and etc...

FormTA

  • Oracle Forum Member
  • *
  • Posts: 6153
  • Life is short, have fun, Drive a T/A
Re: Madaguy 1955 Nomad Build
« Reply #396 on: January 14, 2026, 09:40:56 PM »
Your pipe and fitment looks great! Way better than I could do!
79 Trans am low buck LS swapped
79 Formula 301 (Work in progress)
67 RS Camaro (waiting it's turn)
69 Dodge charger on late model charger chassis
49 Ford F1 on a 2003 Chevy ZR2 Chassis (current project)
Names, Luke. If I hear anyone telling me they're my father....

ryeguy2006a

  • Oracle Forum Member
  • *
  • Posts: 6270
Re: Madaguy 1955 Nomad Build
« Reply #397 on: February 06, 2026, 11:18:31 AM »
I've been continuing to work on the down pipe and decided to add another vband near the frame, so that I could remove the pipe much easier. I put a few tack welds on the pipes, then my old welding mask died on me. It was a cheaper unit I got on Amazon probably 10 years ago, so it's served it's purpose for me. When looking around I found a Vulcan unit that was on sale so I picked that one up. What a huge difference it made being able to see. The viewing window is significantly larger than the old one I had, and the auto dim is much more sensitive.


With the practice I've been doing on the pipes and with the new helmet, I was able to lay down some of the best welds I've done so far. Pretty happy with how they turned out.


I still need to weld the O2 bung to the pipe, and that section will be done. Then I am going to redo my tailpipe and the full hot side will be fully welded. I'm going to wrap the crossover pipe and add a hanger that will attach to the transmission. Then I can call the hotside completed.

I started to test fit my other components and the turbo drain that came with the VS racing kit wouldn't allow the fitting to be tightened because it hit the housing bolts. I bought an extended drain fitting and that one was too tall. So I opted to trim off the one that came in the kit and weld the -10AN bung I had to it. I've only welded a few things that were Aluminum and I definitely need more practice, but it's stuck together.


Right about this time we were hit with a huge snow storm that brought 7" of snow and about a 1/4" of ice on top of it all. I had to move my tractor into the garage to keep it from gelling up as the temps dropped to sub-zero. My welding station had to be taken down to fit it inside.


The temps finally came back up this week and decided it was time to move the tractor back outside. With that outside I decided to tackle the mounting of the heat exchanger and see what the final fitment of my cooling blocks will be. I started by locating the heat exchanger within the vintage air brackets. It fits perfectly in between which makes me very happy. I had to cut some holes into the driver's side to allow for the heat exchanger lines to come out.


Once I confirmed fitment and ensured that there was enough room for me to tighten the VA condenser fittings, I drilled the side mounting holes. It came together really cleanly. The radiator will tuck in nicely as well. Very happy with this setup so far.


I still need to finalize the fitment of the cooling fan which should fit about 1" closer to the radiator once mounted. The radiator hose will be tight, but I'll be able to sneak it up and around once I trim off a bit of the hose inlet and move the radiator fan.


One last thing that is unexpected, but super cool is the rear battery relocation. A guy I've been messaging on line with for a few years works with a restoration shop and did a 56 Nomad and designed this really cool rear battery pocket in CAD. I've been wanting to do that every since I bought the car, but didn't want to take the time to build one. I paid him to let me use his file, then sent it into Send Cut Send. Was very impressed with the company's site as this is the first time I've worked with them. They offered options for me to add bends which is super helpful. In under a week it was delivered to my door. I also picked up a Gen6 Camaro battery cable which has a factory rear mounted battery. Is very heavy gauge wire and will make relocating the battery much easier.


I bought a bunch of TIG Filler rod too so I'm hoping to use this project to get more seat time. I'm still up in the air at this point about how I'm going to do my cold side. I'm either going to buy a new lid that will line up the TB with the turbo outlet, cut and reweld my stock lid, or build a cold side pipe two really tight 90* bends. I need to decide soon.

Cheers,
Ryan

1976 Trans Am LS1 and much more...SOLD
1968 Camaro LSA, T56 Magnum, and much more...SOLD

Current Project: 1955 Nomad LC9, 4L80e, C5 brakes and etc...

FormTA

  • Oracle Forum Member
  • *
  • Posts: 6153
  • Life is short, have fun, Drive a T/A
Re: Madaguy 1955 Nomad Build
« Reply #398 on: February 06, 2026, 07:47:43 PM »
Man your welding skills are rapidly advancing there Ryan! Looks really professional!

The guys from Send cut Send were actually at our shop a few weeks ago. We run lots of CNC machines and some have their own robots to load and unload them. They wanted to see them and talk to our programmers. They have added CNC to their already laser cut and bend operation. We have a very high tech shop and always have tours coming through.

Anyways they gave my buddy (the owner of the company) a $2500 credit so he could use their services. We've had a vew things made and it's pretty amazing how nice of a product they can produce and how quickly you get it shipped to you. And fairly reasonable as well.
79 Trans am low buck LS swapped
79 Formula 301 (Work in progress)
67 RS Camaro (waiting it's turn)
69 Dodge charger on late model charger chassis
49 Ford F1 on a 2003 Chevy ZR2 Chassis (current project)
Names, Luke. If I hear anyone telling me they're my father....

ryeguy2006a

  • Oracle Forum Member
  • *
  • Posts: 6270
Re: Madaguy 1955 Nomad Build
« Reply #399 on: February 23, 2026, 08:32:22 AM »
I decided to take a break from working on the exhaust pipes to get the cooling fan mounted onto the new radiator. After tossing around several ideas, I finally decided that I needed to add a few tabs to the radiator to hold the fan. That meant that I needed to bite the bullet and start practicing on my aluminum welding. I've been welding steel/stainless steel for many years, but aluminum is new territory. I had some coupons from a tig welding kit I bought a long time ago and surprisingly the beads looked pretty good after I dialed in my settings.


The first two tabs were a bit hot so they melted too much, and I was getting used to how the puddle reacts.


The next two turned out pretty good IMO.


All ready to install now. Thankfully the wiring and everything is the same, so there won't be any changes needed there.


With the final fitment after I trimmed the fans a bit closer, it clears by about a half inch now.


Now back to the exhaust pipes. After fumbling around with the fitment this whole time I pulled the trigger on a set of these exhaust fitment tools for tack welding pieces together. These are worth it and wished I had them from the beginning!


Got the O2 bung welded in and then fit up the final location for the muffler. I'm running the same Walker Quietflow stainless muffler from the beginning. I moved it slightly closer to the frame so that it cleared the ebrake components. When I first built the exhaust I didn't have that installed and it contacted the muffler, so ever since I had to have it twisted down which I didn't like. Now it's nice and flat.


The big cut... I won't lie, I did hesitate for a minute. No turning back now!!


When I made the initial cut, I measured about a half inch longer than I needed to account for any changes that I needed to make. Then I slowly crept up on the final location. I ended up cutting an additional half inch to recess the flange, but kept the outer sides to help locate the flange. This helped out a lot when I tack welded it together.


Since I paid the Holley tax on the parts, I wanted to make sure to keep that logo intact after all the modifications.


My initial measurements were close that I may not need to add pieces to the sides, but the way the inlet is shaped, I didn't have an choice.

I had some thick pieces of aluminum left over from another project, and they worked perfectly as filler plates for the sides. Once I shaped them for a nice fitment on the sides, I tack welded everything together.


And the final test fit is just what I was hoping for. Everything fits everywhere and I'm very happy with the charge pipe angles and the stock radiator hoses are now a great fit.


Needs a little trimming, but will clear everything! Huge win.


To be continued...

1976 Trans Am LS1 and much more...SOLD
1968 Camaro LSA, T56 Magnum, and much more...SOLD

Current Project: 1955 Nomad LC9, 4L80e, C5 brakes and etc...

Re: Madaguy 1955 Nomad Build
« Reply #399 on: February 23, 2026, 08:32:22 AM »
You can help support TAC!