Author Topic: 1976 Trans Am Resto-Mod; Rebuild Thread  (Read 4140 times)

ryeguy2006a

  • Oracle Forum Member
  • *
  • Posts: 6039
Re: 1976 Trans Am Resto-Mod; Rebuild Thread
« Reply #40 on: January 27, 2023, 07:25:18 AM »
Got a little cleaning up done around my garage and the motor and trans. I also got some of my swap parts ready to install into my car. Here are the Dirty Dingo engine mounts, DSE hydraulic clutch bracket and a new Hurst shifter knob.


Here are some before and after pictures of the engine clean up.


And after a little Purple Power.


Not a bunch of updates, but I was busy parting out the Camaro, and didn't have a ton of time for the TA.

All for this weekend.

1976 Trans Am LS1 and much more...SOLD
1968 Camaro LSA, T56 Magnum, and much more...SOLD

Current Project: 1955 Nomad LC9, 4L80e, C5 brakes and etc...

ryeguy2006a

  • Oracle Forum Member
  • *
  • Posts: 6039
Re: 1976 Trans Am Resto-Mod; Rebuild Thread
« Reply #41 on: January 27, 2023, 07:25:39 AM »
I got all of this from a company called Waytek, and they specialize in wiring, and since it is a bulk company you can get some tremendous deals. I highly recommend the company. If you look I got two spools of wiring. I bought one red and one black 18 gauge automotive grade wiring reels 250 ft. for 18 each!! That is cheap. I also got a Bussmann fuse/relay box that is sealed and uses micro relays and micro blade style fuses. I also bought all of the necessary pieces to wire it up.


I also bought a brand new in the box Baer adjustable proportioning valve for my LS1 rear disk swap. That is the final piece that I needed. Now, I just need to actually do the swap!


That is all for today, but I should have some pictures from tomorrow of the first test fit of my new Engine!! I have to pick up my motor mounts from the post office first thing tomorrow and while the wife is away at an event I will be busy trying to get my engine in.

Cheers,
Ryan

1976 Trans Am LS1 and much more...SOLD
1968 Camaro LSA, T56 Magnum, and much more...SOLD

Current Project: 1955 Nomad LC9, 4L80e, C5 brakes and etc...

ryeguy2006a

  • Oracle Forum Member
  • *
  • Posts: 6039
Re: 1976 Trans Am Resto-Mod; Rebuild Thread
« Reply #42 on: January 27, 2023, 07:26:53 AM »
I got my motor and transmission in for a first test fit. Overall I was very happy with the fitment. I will have to take the motor in and out a few more times, but it fits really great for a first test. Here are some pictures.

Here is a picture of the Dirty Dingo engine mounts. They fit great and they are a very great company to work with. I ended up buying the wrong engine mounts, and needed to exchange them for the right ones. They were great and I was able to ship mine to them and get the new ones in less than a week. Excuse the oil on the engine.


Here is one of many times the motor will be on the engine hoist, but this is the first test fit.


And here it is in with the Corvette Fuel Rail Covers. I like what I am seeing. And for those of you that may ask, the motor is tilted towards the rear because the shifter won't fit into the interior...yet. So for now it is tilted towards down in the rear.


Here are some pictures of the ground clearance.


Now, the big debate I have been having is which headers to buy. But since I had the engine in there, I thought why not check and see how the stock manifolds will fit. And to my surprise they fit great! I have at least a fingers width around everything. So, for now I am just going to use the stock manifolds and save some money.


And now it was time to see if we can get that shifter into the car, so I got out the sawzall and started cutting a little at a time. And I ended up with this.


I know that the cuts aren't that clean, but I will make some panels and weld them in to make it look good. The reason that I cut through the factory 4 speed hump is because it was already shot. You can't see it, but before I ever got the car someone tried to change the shifter and decided to crudely cut a hole in the side of the hump. So, for now I am just cutting it up, and will probably drill out the spot welds and patch in a new panel.


Now, a test fit of the console. Another surprise to me is that the shifter is very close to the stock location. Not sure what an auto console will fit like, but I may end up making an adapter for the shifter to have it come out in the factory 4 speed location.


As you can see it is only about 2-3 inches back from the stock location.


That is all for now. Won't be long and I will be uploading a video of the first start up!

Ryan

1976 Trans Am LS1 and much more...SOLD
1968 Camaro LSA, T56 Magnum, and much more...SOLD

Current Project: 1955 Nomad LC9, 4L80e, C5 brakes and etc...

ryeguy2006a

  • Oracle Forum Member
  • *
  • Posts: 6039
Re: 1976 Trans Am Resto-Mod; Rebuild Thread
« Reply #43 on: January 27, 2023, 07:27:28 AM »
It doesn't look like a lot was accomplished, but it was certainly a lot of work. Pulled the motor out again, that was temporarily in the engine bay in order to mount my new engine mounts. With the mounts in the stock 350 location on the subframe, the mounts didn't quite fit. So what I did was got the engine exactly where I wanted it, and drilled my own holes.


Here is the motor in the permanent location.


The Dirty Dingo mounts with new Anchor engine mounts for 1980-81 Camaro with 350 Chevy Engine.

Now, I would like to ask for everyone's opinion. The shifter is located farther forward than I was thinking, so using an automatic console would put the shifter too far forward. So my question to everyone, is what do you guys think of moving the stock 4 speed console rearward about 2-3 inches? Here is the console complete as it would look in the car. I was going to flip the upper mounting locations on the front 180 degrees, and it should give me enough room to still mount in the stock location. I plan to bend the shifter to fit more towards the center, as currently it is a straight shifter that is bent slightly towards the driver. Here are the pictures in 1st gear, neutral and 6th gear. Which are all the most extreme shifter positions.


Here are a few pictures of how the console looks in the proposed position.


Here is what the difference is between the mount and where I plan to flip it 180 degrees and mount it in the stock location. Don't mind the wiring mess.


1976 Trans Am LS1 and much more...SOLD
1968 Camaro LSA, T56 Magnum, and much more...SOLD

Current Project: 1955 Nomad LC9, 4L80e, C5 brakes and etc...

ryeguy2006a

  • Oracle Forum Member
  • *
  • Posts: 6039
Re: 1976 Trans Am Resto-Mod; Rebuild Thread
« Reply #44 on: January 27, 2023, 07:28:33 AM »
I finally did enough research on the wiring for my car that I was able to start eliminating wires from my ECU and cleaning up the wiring harness. My goal is to make the engine ECU a stand alone harness. There are many companies that do this, but most charge around $500 to do. I have spend around 120 bucks for the Bussmann relay box and all of the metri-pack connections for a factory style feel.

I have decided that I will utilize the hole in the firewall that is behind the passenger side cylinder head to route the ecu inside the car. I think it will make for a cleaner build. I will also put my fuses and relay box inside as well. I plan to mount them behind the center console similar to where they were mounted in 1981 where the CCC was located.

I started by pulling the pin retainer caps off of the two large connectors that go to the ECU.


I got the factory Pin-outs online and took out the pins that were no longer needed, there were about 20 pins that I was able to take out of both connectors.


You can see all of the pins that I pulled back from the main bundle of wires.


Now, I am not sure why this was done, but the cam position sensor, had an extension connector with another 2 feet of wiring? So I de-pinned the connectors, and put the correct Cam Position sensor end on the pig-tails.


Here is where I am currently, and I am starting to bundle the wires and recreating my harness. I need to finalize the layout and hook-up the fuse and relays to make everything work correctly.


And here is a pile of wires that I was able to delete for the system.


That is all for now. Lots more wiring to come.

Ryan

1976 Trans Am LS1 and much more...SOLD
1968 Camaro LSA, T56 Magnum, and much more...SOLD

Current Project: 1955 Nomad LC9, 4L80e, C5 brakes and etc...

Re: 1976 Trans Am Resto-Mod; Rebuild Thread
« Reply #44 on: January 27, 2023, 07:28:33 AM »

ryeguy2006a

  • Oracle Forum Member
  • *
  • Posts: 6039
Re: 1976 Trans Am Resto-Mod; Rebuild Thread
« Reply #45 on: January 27, 2023, 07:29:56 AM »
Small update from the weekend. I straightened out some more wiring. If you noticed my lump of wiring from before, I couldn't live with that. I needed to straighten it out and lengthen a few of the wires to get more of a straight shot for the wiring.

Before


During


After


Now that I have the wiring straightened out, I need to figure out the next step of my wiring which is my relay/fuse panel. I first need to figure out where I want to mount it, then route the wiring to the fuse panel. I am trying to replicate the factory wiring, by separating circuits in order to make it easier to trouble shoot malfunctions.

All for now.

Ryan

1976 Trans Am LS1 and much more...SOLD
1968 Camaro LSA, T56 Magnum, and much more...SOLD

Current Project: 1955 Nomad LC9, 4L80e, C5 brakes and etc...

ryeguy2006a

  • Oracle Forum Member
  • *
  • Posts: 6039
Re: 1976 Trans Am Resto-Mod; Rebuild Thread
« Reply #46 on: January 27, 2023, 07:30:50 AM »
I am making progress, but it is much slower than I thought. I am taking my time with the wiring as I really only want to do it once.

I finally finished the wiring for the engine. I had to take the wiring harness out and lengthen a bunch of wires to allow the wiring to lay straight rather than bunched up as pictured before. I hopefully installed it for the last time, but time will tell. I still need to Loom the wires with covers, but I am not going to do that until I am 100% sure that the motor runs without any issues. Here is the finishing up of the wiring.


Here is a plug that I wired in to allow for easy removal of the harness if it became necessary. This harness will route all the wires to the relay box.


And now the harness is finally installed!

Now, I started to think of what console I wanted to run. I bought an auto console for the swap, but wasn't sure if that was the look that I was after. Then for fun, I took the center console from the Camaro that I parted out and put it in place just for fun. To my surprise it actually fit quite well, and didn't look bad at all. I actually really like the way that it looks. I am going to either redye it black to match the rest of the interior or possibly wrap it in leather to give it the original texture.


I really like the way that it looks, and it feels really comfortable. I really like where everything it located using that console. I will have to bend the shifter slightly, but gives a great feel overall.

Now it was time to start on the relay/fuse box that I bought. It is a very compact unit, that I want to place somewhere where it will be easily accessible, yet completely hidden. I thought about the glove box, just not sure that I like that.


Then I thought that if I am using the 97-02 center console, it would fit nicely below the upper console cover. It fits down in their and would allow for easy access if needed.


Although I haven't finalized the placement of the relay/fuse box, I still wanted to start wiring it up. I started off with my computer, diagrams, pinouts, tons of waytech wiring and a lot of luck. I haven't finished with all the relays, but the fuses are all finished.


And that is all from the weekend. Not too much visual progress, but a lot of solder wire and time. I still need to figure out where exactly I am going to put the relay/fuse box and then I can finally place it. I also need to build brackets for the ECU, new console, and relay box. Along with about 100 other things.

Cheers,
Ryan

1976 Trans Am LS1 and much more...SOLD
1968 Camaro LSA, T56 Magnum, and much more...SOLD

Current Project: 1955 Nomad LC9, 4L80e, C5 brakes and etc...

ryeguy2006a

  • Oracle Forum Member
  • *
  • Posts: 6039
Re: 1976 Trans Am Resto-Mod; Rebuild Thread
« Reply #47 on: January 27, 2023, 07:32:04 AM »
I have decided that I am going to use the 99 center console. It fits really great and will give the interior a little custom feel. And having cup holders won't hurt either.

Anyway, I got tired of wiring so I took a break and focused on other things. I started out by fitting my headers to the engine. I bought some mid-length *Mac headers. They are originally for a 98-02 Camaro so they had to be modified to fit. I had to notch the subframe in order for the passenger side to fit.


Once it was notched it fits great. The picture makes the header look closer to the sub-frame than it really is.

The driver's side needed to be bent in towards the engine around 1 1/2" to clear the lower control arm mount. Now after wearing myself out by trying to pry the headers with a long bar and a torch, I realized that I need to work smarter and not harder. I put a ratchet strap around the motor/trans and slowly tightened the strap and heated the headers to make them fit tighter to the block and away from the lower a arm mount.


It is hard to see, but you can see there is about a 1/2" gap between the header and LCA mount.


And here is the motor with both headers on!!


I also had to notch the frame to let the Alternator fit. Since I slid the motor back I didn't have much clearance. I cut some small sections out and will weld in some steel to fill in the hole.


I also finished up my transmission mount. I ended up flipping the cross member and cutting the mount off and re-welding it on. It fits great and I ended up putting it on the farthest stock mount on the sub-frame. So I didn't need to drill any new holes. This has been the easiest part of the swap so far! With the transmission crossmember finished, and the subframe notched for the headers I now have the the final placement for the motor.

It has been over 6 months since I have laid down a bead of weld so be easy on me. But by the end I got the hang of it. Just like riding a bike.


And the finished product.


I still need to patch up the holes that I made for the alternator and header, so that will have to wait for another day. I am starting to see the light at the end of the tunnel.

Ryan

1976 Trans Am LS1 and much more...SOLD
1968 Camaro LSA, T56 Magnum, and much more...SOLD

Current Project: 1955 Nomad LC9, 4L80e, C5 brakes and etc...

ryeguy2006a

  • Oracle Forum Member
  • *
  • Posts: 6039
Re: 1976 Trans Am Resto-Mod; Rebuild Thread
« Reply #48 on: January 27, 2023, 07:33:23 AM »
Small visual update, but I got lots accomplished. I finished welding up the notches that I made on the sub-frame. Then ground it all down and sprayed on some duplicolor black paint so it won't rust. Lots of time welding, shaping and grinding that isn't seen.


Then I made brackets to finalize the mounting of my new center console.


And here is the final position of the center console. When I am finished it will either get a black vinyl wrap, or painted black to match the interior. I am leaning towards the wrap, but I will decide at a later date.


Smaller update this weekend, but a lot of time was spent planning and thinking about how best to accomplish what I want to do. Now that I have the brackets finalized, I need to patch up the hole that I made for the 6 speed shifter. Then I will be done welding and can focus back on wiring and the final installation of my engine!! Lots more to do, but having a bunch of fun doing it.

Cheers,
Ryan

1976 Trans Am LS1 and much more...SOLD
1968 Camaro LSA, T56 Magnum, and much more...SOLD

Current Project: 1955 Nomad LC9, 4L80e, C5 brakes and etc...

ryeguy2006a

  • Oracle Forum Member
  • *
  • Posts: 6039
Re: 1976 Trans Am Resto-Mod; Rebuild Thread
« Reply #49 on: January 27, 2023, 07:33:43 AM »
I ordered my gauges last Friday from Speedhut. They had a 25% off sale that I couldn't pass up. I ordered all gauges for my car; Speedo, Tach, water temp, oil press, volt, fuel and a clock. I decided to order them all in the Tangerine color, and I think they will look killer with the carbon fiber panel in the background. I bought a beat up bezel a few weeks ago that I will use as a template and put a new piece of metal in and custom cut my gauges in. I am going to delete things like the HVAC and turning signals, then wrap the whole bezel in a 3M REAL 3D carbon fiber vinyl. The wrap looks just like the real thing. Once I get the gauges I will post up a picture of what they really look like, but for now here is a poor representation of my vision.


1976 Trans Am LS1 and much more...SOLD
1968 Camaro LSA, T56 Magnum, and much more...SOLD

Current Project: 1955 Nomad LC9, 4L80e, C5 brakes and etc...

ryeguy2006a

  • Oracle Forum Member
  • *
  • Posts: 6039
Re: 1976 Trans Am Resto-Mod; Rebuild Thread
« Reply #50 on: January 27, 2023, 07:34:50 AM »
Well, I found a great deal and couldn't pass it up. DynaTech Muscle Maxx 2nd gen swap headers.


1976 Trans Am LS1 and much more...SOLD
1968 Camaro LSA, T56 Magnum, and much more...SOLD

Current Project: 1955 Nomad LC9, 4L80e, C5 brakes and etc...

ryeguy2006a

  • Oracle Forum Member
  • *
  • Posts: 6039
Re: 1976 Trans Am Resto-Mod; Rebuild Thread
« Reply #51 on: January 27, 2023, 07:35:27 AM »
I finally got done with what I had been putting off for so long... Welding in the floor pan extensions due to the new transmission being located towards the rear. I started out trying to weld in a piece of metal that my dad had laying around. That was a terrible decision. It didn't fit well at all, so I went to get some new 20 gauge steel panels which were the same size as my floor pans. That turned out much better than I even though. I was mostly putting this off because I didn't want to tear my interior apart. Which turned out to be not as bad as I thought originally.

First I had to remove the factory 4 speed hump as it was badly damaged.


Once that was removed, I could get a clear view of what needed to be welded in.


Then I welded in the first new panel and cut around for the shifter to come through.


Then the other half of the panel to the rear fill all around the shifter. I painted the raw steel to prevent any rust and put my carpet back down.


I am glad that I got that done and over with. I was putting it off mostly because I wasn't sure how I was going to tackle the project.

Next on my list is to fully shave the firewall. I have decided that I don't like the way that the block off plate that I made, and it will look best with it fully shaved. While I am in there I am going to smooth off any imperfections and fill any holes in that I don't need.

That is all for now. I look forward to testing how the Headers fit that I just bought. I am hoping that they will fit with the engine in it's current position. If not, I am going to have to redo somethings...

Ryan

1976 Trans Am LS1 and much more...SOLD
1968 Camaro LSA, T56 Magnum, and much more...SOLD

Current Project: 1955 Nomad LC9, 4L80e, C5 brakes and etc...

ryeguy2006a

  • Oracle Forum Member
  • *
  • Posts: 6039
Re: 1976 Trans Am Resto-Mod; Rebuild Thread
« Reply #52 on: January 27, 2023, 07:36:00 AM »
I got another few mins in the garage on Sunday. I finalized the placement of the center console and the shifter. I had to make a pretty serious bend in the shifter and to my surprise, got it right on the money the first time just eyeballing it! It fits perfectly and shifts great. Once I get the seats in I will be able to see how comfortable it is to shift.


And here is the console fully bolted down with the shifter boot in place. Next step is to paint/wrap it to match my interior.


I am very happy with the fitment and can't wait to get it painted/wrapped to see how it blends with my interior. I am still playing around with the placement of my fuse/relay box. I may just put it in the center console so it is very accessable, but still is up in the air.


Cheers,
Ryan

1976 Trans Am LS1 and much more...SOLD
1968 Camaro LSA, T56 Magnum, and much more...SOLD

Current Project: 1955 Nomad LC9, 4L80e, C5 brakes and etc...

ryeguy2006a

  • Oracle Forum Member
  • *
  • Posts: 6039
Re: 1976 Trans Am Resto-Mod; Rebuild Thread
« Reply #53 on: January 27, 2023, 07:36:58 AM »
It is time to shave my firewall. I wanted to add a something to my shaved firewall so that it wasn't just a large flat space. I took a 1/2" bead roll and put two parallel 16" bead rolls into the panel that I cut out of my 20 gauge steel. I took a cardboard template to check and see what it would look like. Here are some pictures. I am almost done with welding on this stage of my project, and look forward to that.

Here is what I started with.


And the process of making my block off plate.


Making sure that there was good penetration with the welds.


And here it is with some gloss paint on it. I still need to add body filler in and make everything smooth, but for now I just wanted to put some paint on it just to see what kind of work I need to do in order for it to get it straight.


Thanks,
Ryan

1976 Trans Am LS1 and much more...SOLD
1968 Camaro LSA, T56 Magnum, and much more...SOLD

Current Project: 1955 Nomad LC9, 4L80e, C5 brakes and etc...

ryeguy2006a

  • Oracle Forum Member
  • *
  • Posts: 6039
Re: 1976 Trans Am Resto-Mod; Rebuild Thread
« Reply #54 on: January 27, 2023, 07:37:37 AM »
I finally got my Speedhut gauges!! I couldn't be happier. I love the way that they look. The gauges are a little lighter than they looked online, but still very happy and can't wait to get them all hooked up.

I also got a free t-shirt and decals.


Here is all of the installation wiring and diagrams.


Ryan

1976 Trans Am LS1 and much more...SOLD
1968 Camaro LSA, T56 Magnum, and much more...SOLD

Current Project: 1955 Nomad LC9, 4L80e, C5 brakes and etc...

Re: 1976 Trans Am Resto-Mod; Rebuild Thread
« Reply #54 on: January 27, 2023, 07:37:37 AM »

ryeguy2006a

  • Oracle Forum Member
  • *
  • Posts: 6039
Re: 1976 Trans Am Resto-Mod; Rebuild Thread
« Reply #55 on: January 27, 2023, 07:38:14 AM »
My dad Emailed me this picture that he took with his phone recently. It is me under the car taking out the headers for the last time on this Pontiac engine. Made me a little sad, well maybe not.  :lol:


1976 Trans Am LS1 and much more...SOLD
1968 Camaro LSA, T56 Magnum, and much more...SOLD

Current Project: 1955 Nomad LC9, 4L80e, C5 brakes and etc...

ryeguy2006a

  • Oracle Forum Member
  • *
  • Posts: 6039
Re: 1976 Trans Am Resto-Mod; Rebuild Thread
« Reply #56 on: January 27, 2023, 07:39:06 AM »
Ok, so I have to say I hate when people don't do what they say. I will explain. As you will see earlier in my build, I bought a set of swap headers for my project. It has been over 3 weeks since I bought them and they haven't been received and I cannot get ahold of the seller. So, I filed a complaint and will get my money back... Hopefully anyway, shouldn't be a problem but you never know. Anyway, so I have been bummed out because I was looking forward to the Dynatech swap headers and I have since sold any manifold that I could use, I am without an exhaust. Or so I thought. I posted up a wanted ad on another forum, and within minutes I had someone respond to me. Speedway motors hasn't had the Dynatech headers since they went from 399.99 to 600.00 bucks, but they must have had a set that was returned because there was a pair in "Garage Sale" Section. They were having a 7.99 flat rate on shipping, so I got an almost brand new set of 600.00 headers a grand total of $377 shipped to my door.

I am very pleased with Speedway already. I placed my order at 12:58 pm and the order was shipped out UPS at 2:04 pm with a tracking number!! Talk about fast service!! They should be here around 12/26, so it will be a late Christmas present to myself! Here is the picture that they provided.


They look really nice!!

1976 Trans Am LS1 and much more...SOLD
1968 Camaro LSA, T56 Magnum, and much more...SOLD

Current Project: 1955 Nomad LC9, 4L80e, C5 brakes and etc...

ryeguy2006a

  • Oracle Forum Member
  • *
  • Posts: 6039
Re: 1976 Trans Am Resto-Mod; Rebuild Thread
« Reply #57 on: January 27, 2023, 07:40:29 AM »
Ok, so I have to say I hate when people don't do what they say. I will explain. As you will see earlier in my build, I bought a set of swap headers for my project. It has been over 3 weeks since I bought them and they haven't been received and I cannot get ahold of the seller. So, I filed a complaint and will get my money back... Hopefully anyway, shouldn't be a problem but you never know. Anyway, so I have been bummed out because I was looking forward to the Dynatech swap headers and I have since sold any manifold that I could use, I am without an exhaust. Or so I thought. I posted up a wanted ad on another forum, and within minutes I had someone respond to me. Speedway motors hasn't had the Dynatech headers since they went from 399.99 to 600.00 bucks, but they must have had a set that was returned because there was a pair in "Garage Sale" Section. They were having a 7.99 flat rate on shipping, so I got an almost brand new set of 600.00 headers a grand total of $377 shipped to my door.

I am very pleased with Speedway already. I placed my order at 12:58 pm and the order was shipped out UPS at 2:04 pm with a tracking number!! Talk about fast service!! They should be here around 12/26, so it will be a late Christmas present to myself! Here is the picture that they provided.


They look really nice!!

1976 Trans Am LS1 and much more...SOLD
1968 Camaro LSA, T56 Magnum, and much more...SOLD

Current Project: 1955 Nomad LC9, 4L80e, C5 brakes and etc...

ryeguy2006a

  • Oracle Forum Member
  • *
  • Posts: 6039
Re: 1976 Trans Am Resto-Mod; Rebuild Thread
« Reply #58 on: January 27, 2023, 07:41:09 AM »
Just messing around last night and grabbed my stock bezel out of the car and threw the gauges into it. It actually doesn't look half bad, but not as good as it will look with the Carbon fiber look. I also wired them up breifly just to see what they look like, but didn't get a good picture of them.


Not too shabby.

1976 Trans Am LS1 and much more...SOLD
1968 Camaro LSA, T56 Magnum, and much more...SOLD

Current Project: 1955 Nomad LC9, 4L80e, C5 brakes and etc...

ryeguy2006a

  • Oracle Forum Member
  • *
  • Posts: 6039
Re: 1976 Trans Am Resto-Mod; Rebuild Thread
« Reply #59 on: January 27, 2023, 07:43:46 AM »
Got a chance to get into the garage today. I was focusing on getting the firewall done so that I can get my engine in for a final fitment. I got all of the spot welds ground down and some filler put on to fill the imperfections. Not a whole lot to show for it, but was a lot of work. I still need to do a lot more finish sanding and then I can paint it. I am also going to finish the top of the cowl and fill in any dents and smooth everything out. I need to get my air compressor fixed so I can borrow some power sanding tools.


I feel like I am going backwards on this project sometimes...


I needed to get the stock ducting out from behind the dash, so I could better fit my components such as the LS1's computer. So, out goes the dash. Again. While it was out I took the liberty of modifying it for my other new 'mini' project... Delay wipers. Here is the motor I will be using.


One think that I never liked about the stock firewall was that huge wiper motor. So, I decided to do something about it. First I needed to decide how to I was going to control the wipers. I took the switch out of the stock 1999 Camaro column, and I am pretty sure that it is a common switch that is in many different models.


Once it was out I cut off the aluminum bracket that was attached as I will no longer use it.


Now, I needed to figure out how I was going to attach it near the stock position for the wiper switch. Not sure how it came to me, but this fits in there almost like it was made for it. Using the tab on the one end as a main anchor point, drill a small hole into the duct on the side near the stock location for the switch.


Once the hole is drilled, I also had to cut down the lower screw hole, and notch the one side of the opening for the switch to mount in there.


Once you have those small modifications done to your dash, the switch will fit in there very nicely.


This won't be my final mounting, but for temporary I used a zip tie, which actually works quite nicely.


Since I had a few extra wiper switches, I gutted one and used the steel shell as a template for a bracket that I will make in the future. I will also make a decal for the actual functions of the car.


I used the stock turning signal switch from the 99 Camaro and cut off the end to use as my new switch. I will attach the stock knob onto the switch when everything is all done.


Here is the switch at rest.


And here is the switch at high speed function. As you can see the knob spins and will function just the same as the stock switch on the 99 Z28. It is very similar to the switch that DSE has for their delay wiper upgrade.


Now, this isn't the final product. But as a first test fit with the bezel on it clearly needs to be raised up in order to look normal in the off position. But here it is with the bezel in and in the stock position.


The best part of this is that even if you wanted to do this swap and return your car to stock in the future you would be able to. Nothing that was modified will be able to be seen while the car is fully assembled. Everything that I have done on my car has been done with this thinking. Although my firewall was shaved, if the spot welds were drilled out the whole panel would come off and someone could put the stock heater box back on.

All for this weekend. Hope everyone has a Merry Christmas.

Ryan

1976 Trans Am LS1 and much more...SOLD
1968 Camaro LSA, T56 Magnum, and much more...SOLD

Current Project: 1955 Nomad LC9, 4L80e, C5 brakes and etc...

ryeguy2006a

  • Oracle Forum Member
  • *
  • Posts: 6039
Re: 1976 Trans Am Resto-Mod; Rebuild Thread
« Reply #60 on: January 27, 2023, 07:44:33 AM »
Ok, I got a little more done yesterday. It isn't a very time consuming modification, but is a very visual modifcation. Plus I was able to do this work inside where it is nice and warm. I wanted to see what the stock bezel would look like with the vinyl wrap I got from 3M and see how it would cover. I did a test fit and it looked pretty good and decided that it looked good enough not to justify custom making my own bezel. Maybe at a later date I will get a real piece of carbon fiber and make a custom piece like the write up in one of the threads on this site. Anyway here are some pictures of my test panel to see what the turning signals would look like covered up with just the wrap.


I thought that it looked good enough to justify wrapping my bezel. So here we go.


I have been waiting for a long time to see what those gauges would look like against the carbon fiber and it was certainly worth the wait. I think that it looks great and I can't wait to see what it will look like with the dash back in the car. I just need to finish doing the wiring for the gauges while the dash is out, and then figure out centering my new wiper switch in the bezel and I think I will be good to put the dash pad back into the car and wrap my interior up.

I should be getting my headers today, but really depends on the weather. We got around a foot of snow last night so UPS will be a little behind today.

Cheers,
Ryan

1976 Trans Am LS1 and much more...SOLD
1968 Camaro LSA, T56 Magnum, and much more...SOLD

Current Project: 1955 Nomad LC9, 4L80e, C5 brakes and etc...

ryeguy2006a

  • Oracle Forum Member
  • *
  • Posts: 6039
Re: 1976 Trans Am Resto-Mod; Rebuild Thread
« Reply #61 on: January 27, 2023, 07:45:57 AM »
Small update. I finally got my set of Dynatech headers. I ended up getting them from Speedway Motors, and they were absolutely great to work with. I am certainly going to work with this company again. The Headers were Garage Sale items, and they were at a nice discount and they were having a sale on their shipping for 7.99 flat rate shipping, so I got the headers for $377 shipped to my front door. And as garage sale items they said that the items may be dinged up or scratched, but they were in brand new condition. I am very happy with them. Here are some pictures.


And here they are installed.


The headers hang a little lower than I would have liked, but time will tell on how they actually ride. I think with 300 pounds off the front end of the car, the springs will react differently so I may be surprised. Many people have these headers and don't have any issues with the headers scraping.


This is the great quality fitment.


And from the front, seeing those massive 1 7/8 primary tube headers.


Overall I am very happy with the fitment and quality of these headers. Would recommend them to anyone.

Thanks,
Ryan

1976 Trans Am LS1 and much more...SOLD
1968 Camaro LSA, T56 Magnum, and much more...SOLD

Current Project: 1955 Nomad LC9, 4L80e, C5 brakes and etc...

ryeguy2006a

  • Oracle Forum Member
  • *
  • Posts: 6039
Re: 1976 Trans Am Resto-Mod; Rebuild Thread
« Reply #62 on: January 27, 2023, 07:47:05 AM »
I got a little bit further on getting my firewall done. I have to admit, I am getting sick of body work. It isn't something that I do very often so I am quite slow at it, but I am slowly progressing. It is tough to get everything straight and looking good. I think, I am about 80% done with the firewall. I just need to do some more finish sanding, and it will be ready for final coats of paint. Anyway, here are a few pictures.


And now for the interesting part. After quite a bit of research and going back and forth with my A/C options, I have decided to utilize the factory A/C compressor as it sits down low and won't be a eye sore in the engine compartment. So, in order for me to use the stock A/C compressor I needed to notch the frame. I will post up more on what I will have to do in order to use the factory A/C compressor. In a nutshell, the factory compressor is a variable load, and I need to convert it over to fixed in order to work properly with Vintage Air.

Please excuse the compressor and bracket being filthy. I didn't have time to


It ended up being much easier than I thought and I am so thankful that I bought adjustable engine mounts. I have changed the motors position at least a dozen times for different things. Now the motor is in its final position. Once I finish the firewall the motor will be put in for good, and not to come out for a long time. (Hopefully)

Here is a perspective picture of how quickly my garage filled up once I started stripping out two cars.


That is all for now.

1976 Trans Am LS1 and much more...SOLD
1968 Camaro LSA, T56 Magnum, and much more...SOLD

Current Project: 1955 Nomad LC9, 4L80e, C5 brakes and etc...

ryeguy2006a

  • Oracle Forum Member
  • *
  • Posts: 6039
Re: 1976 Trans Am Resto-Mod; Rebuild Thread
« Reply #63 on: January 27, 2023, 07:48:11 AM »
Ok, so I am sick of not making progress on my car due to lack of motivation. I have said it before, but I don't like doing body work. I am going to get it done this Friday no matter how long it takes me. *:-D

Here is what I will start with tomorrow, and some materials to get the job done.


I bought some more parts for my car, so here is a sneak preview of what's to come. I am going to redo, my bezel, and I am going to use a woodgrain so I can weld and finish the underside to reapply some of the carbon fiber wrap again.


Lokar throttle cable.


Stainless Steel Dynatech Musclemaxx reducers


And a new Spectra gas tank in order to modify for my 4th gen fuel assembly. More on that to come.


By the end of tomorrow I will have my firewall done and the engine in for final placement.

More to come, Ryan.

1976 Trans Am LS1 and much more...SOLD
1968 Camaro LSA, T56 Magnum, and much more...SOLD

Current Project: 1955 Nomad LC9, 4L80e, C5 brakes and etc...

ryeguy2006a

  • Oracle Forum Member
  • *
  • Posts: 6039
Re: 1976 Trans Am Resto-Mod; Rebuild Thread
« Reply #64 on: January 27, 2023, 07:49:10 AM »
Ok, well after a long night and some time today, I was finally able to get that firewall done.  :-x After a difficult battle getting my garage from 30* to around 50 in order to paint, I was finally able to get some matte black paint on my firewall. Since it was in the single digits outside it was such an uphill battle. I had to have my kerosene heater running as well as my wood stove roaring at full boar. I was finally able to get to 55 and able to spray some paint.

It is a huge weight lifted off of my shoulders having this job done. It isn't perfect, but it is good enough for me. Overall I am happy with the way that it turned out. I still need to make a bracket for my new wiper motor to mount to the firewall, but there isn't any hurry for that. It doesn't look like a big update, but there are many hours into getting the firewall straight and filling in little imperfections.


Now that I am done painting the firewall, I need to clean everything up from all the sanding dust!


When I get done with my sub-frame clean up I will bolt in the engine and transmission for good. Can't wait. One more step closer to hearing the car come to life again.

All for now.

1976 Trans Am LS1 and much more...SOLD
1968 Camaro LSA, T56 Magnum, and much more...SOLD

Current Project: 1955 Nomad LC9, 4L80e, C5 brakes and etc...

Re: 1976 Trans Am Resto-Mod; Rebuild Thread
« Reply #64 on: January 27, 2023, 07:49:10 AM »

ryeguy2006a

  • Oracle Forum Member
  • *
  • Posts: 6039
Re: 1976 Trans Am Resto-Mod; Rebuild Thread
« Reply #65 on: January 27, 2023, 07:49:56 AM »
Seems like most of my updates have been parts updates, but I plan to get some time in the garage this Friday and Saturday so I am hoping to make some real progress. These are hopefully the last two large components for my LS1 swap! I am sick of spending money.

Here is the Vetteworks Kit that will allow me to use my 1999 LS1 Fuel Pump Assembly. It was a nice touch that they laser engraved the panel on the top. Also came with a full set of color installation instructions.


And the other is a Universal Painless wiring harness that I got from Mrbandit. Great guy to deal with. It is an 18 Circuit harness with provisions for power windows, locks and other accessories. He gave me a great deal on it and my next project will be fully wiring my whole car. I am actually excited to do because I like the challenge of wiring and getting everything to work properly.


And a big box of wires for the rest of the wiring.


Cheers,
Ryan

1976 Trans Am LS1 and much more...SOLD
1968 Camaro LSA, T56 Magnum, and much more...SOLD

Current Project: 1955 Nomad LC9, 4L80e, C5 brakes and etc...

ryeguy2006a

  • Oracle Forum Member
  • *
  • Posts: 6039
Re: 1976 Trans Am Resto-Mod; Rebuild Thread
« Reply #66 on: January 27, 2023, 07:51:40 AM »
The motor is finally in!!! I am excited to have the motor in for good as it is one huge step towards getting my car back together. To me this is a big deal because now, I can do many of the little projects as I get time. Once the motor was in finally for about the 20th time, I started on some of my other larger tasks. Here are some pictures.

Before I could put in my motor I wanted to clean up the sub-frame and freshen up the paint. I painted some of the steering linkages to break up all of the black. Here is what I started with and here is what I ended up with.


Now that the sub-frame is all painted up it is ready for the motor. *:grin:


Here is the wiring mess that I have to look forward to! And as a side, I am still up in the air about what center console to use. I really like the way that the 99 console looks, but where the shifter comes out, may not be comfortable. When I had the full interior in with the transmission in its current spot, with the straight shifter shown with the stock tan console, the shifter was very comfortable. I feel that it may be a reach for the 99 console. For now, I am going to focus on the wiring.


I put in the clutch hydraulics bracket on and got my clutch test fit. It is amazing how easy things can be with the right parts. The bracket is from DSE and it is made specifically for the LSx swap which allows you to bolt on the stock slave cylinder and puts it at the correct angel. All I had to do to modify the firewall slightly and drill another hole in the clutch petal. The bracket sandwiches between the firewall and the brake booster.


I drilled my one hole in the firewall for my engine wiring. I laid out the wiring where it will roughly go, and will eventually loom up the harness and get everything looking clean.


I feel like accomplished quite a bit this weekend and I feel great because I am not starting to bolt things back onto the car rather than tearing them off or modifying. I should have the car fired up within the next month. I hope to have it running by the end of the month.

Thanks for looking.

Ryan

1976 Trans Am LS1 and much more...SOLD
1968 Camaro LSA, T56 Magnum, and much more...SOLD

Current Project: 1955 Nomad LC9, 4L80e, C5 brakes and etc...

ryeguy2006a

  • Oracle Forum Member
  • *
  • Posts: 6039
Re: 1976 Trans Am Resto-Mod; Rebuild Thread
« Reply #67 on: January 27, 2023, 07:53:38 AM »
No really huge progress, but I couldn't sleep last night so I went in the garage for a few hours to clean up and package up some parts I sold. After I finished cleaning up, I looked over at my wiring mess and thought to myself, "What have I done now..."

I sat down and started looking at the wiring and started placing bundles of wires where they would go. Once you break the wiring down into sections it really isn't as intimidating as it looks. Each wire is labled "radio section" or "lighting section" so it is very difficult to mess up. The biggest task is going to be figuring out the wiring diagrams for my stock car, because the wiring is a universal harness, everything is un-terminated and you have to re-use the stock connectors. Which isn't a big deal for me. I like the idea of upgrading to the blade fuses with newer technology. Over the next few weeks I will be blending the Painless harness into my car, and integrating with the factory LS1 engine harness.  As well as adding my Speedhut wiring, as some gauges have their own sensors. (oil pressure, coolant temp)

Here is the mess a little more organized and the engine a little more complete.


I will get some better pictures, and some better updates soon. My wife will have to start working on Saturdays starting Feb. 23rd so I will have a lot of Saturday's to get the car back together.

All for now.

1976 Trans Am LS1 and much more...SOLD
1968 Camaro LSA, T56 Magnum, and much more...SOLD

Current Project: 1955 Nomad LC9, 4L80e, C5 brakes and etc...

ryeguy2006a

  • Oracle Forum Member
  • *
  • Posts: 6039
Re: 1976 Trans Am Resto-Mod; Rebuild Thread
« Reply #68 on: January 27, 2023, 07:54:42 AM »
It is difficult to capture what I have done through pictures as I have been doing a lot of wiring. I did find a final place for my ECU, and I am really happy how well it is hidden. I mounted it in the vacant pocket where there used to be a vacuum operated flap for the A/C. I used a modified ecu bracket from the 99. I removed the insulation that was glued into the cup and slightly trimmed the back of the cup. Here are some pictures.


That is all for now. I am hoping to start up the car within the next month... We will see if that happens.

Cheers,
Ryan

1976 Trans Am LS1 and much more...SOLD
1968 Camaro LSA, T56 Magnum, and much more...SOLD

Current Project: 1955 Nomad LC9, 4L80e, C5 brakes and etc...

ryeguy2006a

  • Oracle Forum Member
  • *
  • Posts: 6039
Re: 1976 Trans Am Resto-Mod; Rebuild Thread
« Reply #69 on: January 27, 2023, 07:55:55 AM »
Again, not much for visual progress for an update, but I got most of my custom wiring done. It was difficult figuring out all of the wiring schematics and finding a way to splice them all together, but in the end it turned out great. I was able to get all of the relays and fuses hooked up for my LS1 harness and was able to splice it all together and blend well. It helped once I found a good easy to read relay diagram, which I can share if anyone needs.

I was able to mount the relay box in the glove box for easy access, while not taking up too much room. I have also been trying to think ahead at any future modifications that I may want and wiring them in now. I brought in a constant main feed into the cabin for any future electronics. I wired in the trunk release and ran that to the trunk so I can finally hook up the auto release button. Here are the few pictures that I took.

A lot of my time was dedicated to making the mess of wires manageable and neat. I decided to use zip ties rather than electrical tape because it is much easier to cut a zip tie and replace rather than trying to tape and retape everything.


Trying to make all the wiring neat and easy to read.


I also started to wire up the tail lights and trunk release. There was a lot of custom wiring and although, I don't have much to "show" for it, there was a lot of progress made. In reality, the fuse block I wired up only accounts for about 20% of the wiring, but due to its complexity takes up majority of the time. I am about 70% done with my wiring now, since most everything will be very easy to splice and solder together.

1976 Trans Am LS1 and much more...SOLD
1968 Camaro LSA, T56 Magnum, and much more...SOLD

Current Project: 1955 Nomad LC9, 4L80e, C5 brakes and etc...

ryeguy2006a

  • Oracle Forum Member
  • *
  • Posts: 6039
Re: 1976 Trans Am Resto-Mod; Rebuild Thread
« Reply #70 on: January 27, 2023, 07:57:15 AM »
I got some more wiring done yesterday. It isn't completely done, but is getting close. I got all the wiring done for the trunk, which has provisions for a third brake light, power antenna(or amplifier remote), and one other thing I can't remember. lol I finished my wiring for all my Speedhut gauges and wired in connectors for ease of removal. I soldered all the joints and shrink wrapped all connections for longevity. I don't want to have to redo everything in the future.

Here is the wiring in the trunk with the connection.


I didn't realize that I was going to have to take out almost all of my interior just to get the wiring routed to the trunk...


I started with this mess and had to sort, solder, and heat wrap every connection. Doesn't sound like a lot of work, but very tedious to do, although I am having a lot of fun.


This is the type of connection that I used for the gauges.


Here are my gauges installed and one with them lit up at night. I am not sure if Speedhut made the speedomoter brighter than the rest because that is the most important gauge, or if it was a mistake. I need to call them to verify, but all other gauges are the same brightness. The gauges also have a rheostat controller to control the dimmer. *


All for now,

Ryan

1976 Trans Am LS1 and much more...SOLD
1968 Camaro LSA, T56 Magnum, and much more...SOLD

Current Project: 1955 Nomad LC9, 4L80e, C5 brakes and etc...

ryeguy2006a

  • Oracle Forum Member
  • *
  • Posts: 6039
Re: 1976 Trans Am Resto-Mod; Rebuild Thread
« Reply #71 on: January 27, 2023, 07:58:24 AM »
Small update from last night. My wife had to work late, and for a change I didn't so I got a few hours of garage time. I decided to get the dome lights wired up, so I could put the interior panels and rear seats back together. It wasn't too bad other than trying to fish the dome lights through the headliner without taking it off. I managed to get a wire through the dome light hole, just need to solder the connections to the dome light and install.

Went from this


Back to this


Here are the dome light wires ready to be soldered.


I also for got to show this over the weekend. I bought a piece of 1/4" sheet aluminum to make a bracket to hold my new wiper motor that I will be converting to. I still need to wire up the switch and make the bracket, but I will be swapping on my 99 Camaro wiper motor.


All for now. I am hoping to get some time out in the garage this Friday too. I gotta get this thing running soon, the warm weather is on the way!!

1976 Trans Am LS1 and much more...SOLD
1968 Camaro LSA, T56 Magnum, and much more...SOLD

Current Project: 1955 Nomad LC9, 4L80e, C5 brakes and etc...

ryeguy2006a

  • Oracle Forum Member
  • *
  • Posts: 6039
Re: 1976 Trans Am Resto-Mod; Rebuild Thread
« Reply #72 on: January 27, 2023, 08:00:04 AM »
Sorry, I forgot to update this from last weekend. I was doing a lot of trial and testing of wires and sensors, although I did take a lot of pictures. The one large thing that I did complete was that I got my fuel tank modified to accept the LS1 Fbody fuel pump assembly. The full write-up can be seen in the LSx swap section of the site here > http://transamcountry.com/community/index.php?topic=56613.0

Here are some pictures of the before and after.


It is important to think of how the fuel pump assembly needs to be clocked in order to get the fuel level sender to read properly, I will get to that in a min. With my Speedhut gauge, I needed to flip the fuel float from one side to the other so it will read correctly. The stock sender reads 40-240 ohms, and my gauge reads 240-33 ohms. So, it would be opposite if I left it stock. But I just took out the float assembly and flipped it to the other side by bending it 180* and it reads properly.

The arm simply unclips from the sensor, and just needs to be bent. I took some before pictures of the arm at full and empty positions so I could get it the same.


And after it was modified, how it looks. I hooked up my gauge to the sensor and it reads properly full/empty/middle/etc.


Now, to show the importance of having the fuel lines clocked properly. It is hard to tell from the picture, but with the fuel assembly clocked pointing directly towards the fuel neck, the sender will have plenty of room for a full range of motion. There may have been other ways to attempt this, but I decided to go with this direction.


I haven't fully completed the final assembly of the fuel pump assembly, but will be doing so in the near future. It is also important to note that the kit also requires a tank seal.


Onto my other project. I went back and forth between fuel lines with three different options. Stainless hardline vs. NiCopp hardlines vs. Nylon lines. After much research I concluded the following. Of the three I found that it was a tie between Stainless, NiCopp(European Nickle Copper Iron mix), and Nylon lines for longevity. When it came to Function NiCopp lines and Nylon won over stainless due to the difficulty of getting the stainless to seal properly as well as difficulty of bending. And when it came to the price, Nylon won as it only costs about 40 bucks for fittings and lines. As opposed to Stainless and NiCopp which cost around 200 all in. And with Nylon you can make your own tool to press in the fittings. So, I went with Nylon lines and will report back on how they work. I have a buddy that used Nylon on his LS1 swap and he hasn't had any troubles with it.

I bought a roll of 25 Ft. of 3/8 Nylon tubing from Dorman, 2 Straight quick connect fittings, and 10 pack of 3/8 All-Star insulated clamps. Cost: 40 bucks on Amazon.


Now, rather than spending $60 plus on the actual installation kit, I found that you can actually do the same thing with a flaring tool kit, calking gun, large nut, and some patience. I didn't get any pictures, but there are many write-ups to this online to choose from.

Here is the tubing before and after. Important to note, that you need to cut the line to get the end very straight. I used a fresh razor blade. Then press on the fitting with a little dab of oil.


Here is what it looks like on the engine. Very clean stock look. I like it a lot.


I need to figure out my next step. I need a fitting that will go from this fitting pictured below, to the quick connect fitting Pictured above.


I am not sure if I can just use a NPT fitting with some thread tape and that will seal enough for 60+psi or not. Professional Products makes a NPT to quick connect adapter that will work perfectly, just need to do more research.

Thanks,
Ryan

1976 Trans Am LS1 and much more...SOLD
1968 Camaro LSA, T56 Magnum, and much more...SOLD

Current Project: 1955 Nomad LC9, 4L80e, C5 brakes and etc...

ryeguy2006a

  • Oracle Forum Member
  • *
  • Posts: 6039
Re: 1976 Trans Am Resto-Mod; Rebuild Thread
« Reply #73 on: January 27, 2023, 08:00:44 AM »
Very small update. I did a lot of work in the garage, but it is all just wiring. I must admit, I am a little burnt out on wiring, but it is definitely nearing the end. All I have left is to wire up the neutral safety switch, Back up lights, add in a few grounds, fuel pump and fuel level wire and give some power to the remote trunk switch and we are good to go inside the car. The other obstacle is going to be my delay wiper wiring, which shouldn't be too bad. I have all the wiring diagrams and have tested everything and it works great. I look forward to getting all the wiring done, then it is on to plumbing.  :lol:

Here is the one picture I took yesterday. This is my delay wiper motor and switch wired up crudely to test everything for functionality. Click the picture for the video of the functions.


Oh, and I cranked the car for one second to see if the starter was wired up correctly. Oh, it was such a tease as I am getting very close to firing it off. Very soon.

Ryan

1976 Trans Am LS1 and much more...SOLD
1968 Camaro LSA, T56 Magnum, and much more...SOLD

Current Project: 1955 Nomad LC9, 4L80e, C5 brakes and etc...

ryeguy2006a

  • Oracle Forum Member
  • *
  • Posts: 6039
Re: 1976 Trans Am Resto-Mod; Rebuild Thread
« Reply #74 on: January 27, 2023, 08:01:19 AM »
I thought this may be worth a quick update. I have been keeping my eyes out for a rear end for my car with 3.73 gears for a while since finding a rear with the gears in it is much cheaper than buying the gears and doing it yourself. So, I was checking craigslist and found an ad "10 bolt Chevy rear", so I checked it out just out of curiosity. Turns out that the rear is out of a 79 Camaro, and had 3.73 Richmond gears, an Auburn Posi Diff. and the best part is it didn't have any miles on it! The guy that I bought it from bought the 79 to part out. The 79 was someone's project that was never finished. Engine, trans, and rear were all new and the car was just never finished. His loss, my gain. Oh, best part. I got the rear for some old traction bars and $225 bucks!!  :smoke:

Just to be safe, I am having the guy I bought it from contact the original owner to see who installed the rear diff and gears. If he did it himself, I will pay someone to set the gears correctly, but if a reputable shop installed them I will just take my chances. I also want so pull the axles and check the bearings and etc. for wear.

I picked up the rear in my parts hauler Mustang GT...  :cheers: I guess that's what happens when you find a good deal, you have to improvise.


EDIT: more pictures.


1976 Trans Am LS1 and much more...SOLD
1968 Camaro LSA, T56 Magnum, and much more...SOLD

Current Project: 1955 Nomad LC9, 4L80e, C5 brakes and etc...

ryeguy2006a

  • Oracle Forum Member
  • *
  • Posts: 6039
Re: 1976 Trans Am Resto-Mod; Rebuild Thread
« Reply #75 on: January 27, 2023, 08:02:57 AM »
It has been a few weeks since I made any really good update, and unfortunately still no big update. I am inching closer and closer to getting the car to fire up, but have hit many snags along the way. My first big obstacle was finding a fitting that would allow me to use the stock fuel lines from the 99 Z28 and allow me to run the nylon fuel lines from the block to the fuel rail. So, after many parts that didn't work, I decided that having the part made would solve many of my problems. I needed an o-ring based fitting on one end and a GM/Chrysler Quick Connect on the other. To my knowledge, no one makes such a fitting. I took it to a local shop in Binghamton, NY and they made it for me for 10 bucks. That allowed me to connect the the nylon lines to the Tee fitting on the stock lines. Solved that issue.


Next, issue had to deal with my fuel tank, not so much the lines. I was still going back and forth between how I wanted to solve my fuel level sender issue. Originally I planned on using the stock 4th gen sender, but due to some functionality issues I changed my mind. Then I thought about my original sender. It worked fine, but I had heard that it may contact the fuel pump assembly. So, I decided to check on my own, and to my surprise it had about an inch of clearance! I cut off the pick-up off the bottom, removed the vent tube, welded the hole for the vent tube, and welded the pickup tube. I needed to keep the pick-up tube in order to keep the sender in the stock location. It also solved my issue of what to do with the sender hole on the tank. 

Here are some pictures of the modified sender and the clearance with the Vetteworks kit.


Now, you see it. (Picture is taken at an angle)


Now you don't. (Picture was taken straight up and down.


Here is the tank all together waiting to go back into the car for a test fit. I still need to somehow lower the tank roughly 1" to clear the fuel pump assembly out of the top. Looking back I should have just recessed the top of the tank slightly.


What I didn't take a picture of was how I have the tank setup currently. I wired the pump up and plumbed the car to check for leaks with the tank sitting next to the car on the ground. I wanted to check for leaks without having to be under the car. It worked very well, just unusual I guess. Good news was there were no leaks in the fuel system. That means I can move forward with getting the tank in place and finalize the fuel lines. I need to heat and bend the nylon lines in order to fit around components and look good.

When I went to start it this weekend, to my disappointment I have a wiring issue with the car. I need to trace back the wiring that I did and find out what I did wrong. Luckily, I was able to narrow it down to my relay box that I made for the car. I had a lot of late night wiring, so I will blame it on that. :cool: I am getting home early tomorrow night and hope to possibly solve the issue. On a good note, I was able to use HP Tuners to unlock my ECU and delete my VATS, rear O2 sensors and disable my AIR. Then I uploaded that tune to my ECU. Really cool program and I really look forward to using it to the full potential.

Hoping to have the car started very soon.

1976 Trans Am LS1 and much more...SOLD
1968 Camaro LSA, T56 Magnum, and much more...SOLD

Current Project: 1955 Nomad LC9, 4L80e, C5 brakes and etc...

ryeguy2006a

  • Oracle Forum Member
  • *
  • Posts: 6039
Re: 1976 Trans Am Resto-Mod; Rebuild Thread
« Reply #76 on: January 27, 2023, 08:04:12 AM »
It finally runs!! I had some issues with the tune, as I needed to delete some of the stock systems on the car. Such as the VATS, EGR, A.I.R. Pump, and rear O2 sensors. I thought I had a large wiring issue, but it ended up being a poor ground to the engine. After I flashed the new tune on the car and got the ground figured out the car started up and idled. I was alone, so I couldn't get a video, but once the radiator is hooked up and I can let it idle for more than a few seconds I will get a video posted up.

Here is a picture of how the car was set up to test the fuel lines and fuel pump. It is a very temporary setup, but works to get the car running and allowed me to check for leaks without being on my back under the car.


Also, here is the the fitting that I got to adapt the temp sensor to the block. Some people tap the block, but I didn't want to do anything irreversible.


I didn't work on the car very long, but I feel like I got a huge step forward. I am really happy to have the car running!! I hope to get a little work done tomorrow as well. I hope to get the tank in the car tomorrow and the fuel lines fully routed. Time will tell.

1976 Trans Am LS1 and much more...SOLD
1968 Camaro LSA, T56 Magnum, and much more...SOLD

Current Project: 1955 Nomad LC9, 4L80e, C5 brakes and etc...

ryeguy2006a

  • Oracle Forum Member
  • *
  • Posts: 6039
Re: 1976 Trans Am Resto-Mod; Rebuild Thread
« Reply #77 on: January 27, 2023, 08:05:18 AM »
I got a little more done on Saturday, so I thought I would post it up. I finally was able to get that gas tank installed. After fighting with it on my back for an hour trying to make the spacers work, I had enough. I went with my original plan and cut an access panel in the trunk. Since I have already pissed off the purists with the LS1, how much more angry can they get, right? Anyway, it worked great and I will be able to change fuel pumps very easily in the future.

Please excuse the mess in the trunk. I am still figuring out wiring for my fuel pump and fuel sender and the trunk has become a nice hiding spot for parts waiting to go back on the car.


After I got the tank fitted in it's final position I got the fuel lines ran. If you guys don't remember I will refresh your memories. I went with Nylon fuel lines due to the cost and their compatibility with today's fuels. Now, I want to first say that it is very easy and difficult to work with. I will explain. The fittings require the use of the GM/Chrysler Quick Disconnect lines that I have shown before. They are supposed to be pressed into the lines by using a repair tool (or the calk gun method) or by dipping the line in boiling water and forcing it in. I used the calk gun method and it was easy to work with. The fittings very easily were pressed into the line by using a flairing tool to hold the line and a dab of oil to help the fitting slide in a little easier. The hard part of working with the lines is they can very easily kink. I found the best method for working with it was working slowly and applying a little heat from a heat gun to carefully work the lines. I routed the lines in the factory location, with the acception of the fuel filter which I put where the tranverse muffler used to live.

I didn't want to get under the car as I was under their enough on Saturday. Maybe if I get ambitious someday I will take some photos, but you get the idea. Here are some pictures.


Overall, I was very pleased with the nylon and would do it all over again if I had to. Once everything was installed, I tested the system again with no leaks. Overall very successful day. My main issue today is figuring out my tune. I need to go through and delete all the systems that I took off of the stock motor such as VATS, A.I.R., CAGS, EVAP, and rear O2 sensors. Once that is finalized, I am going to reflash that tune to my ecu and see how she runs.

I also picked this up the other day. It is a mirror with a compass and outside temperature built into it.


All for now, Cheers.

1976 Trans Am LS1 and much more...SOLD
1968 Camaro LSA, T56 Magnum, and much more...SOLD

Current Project: 1955 Nomad LC9, 4L80e, C5 brakes and etc...

ryeguy2006a

  • Oracle Forum Member
  • *
  • Posts: 6039
Re: 1976 Trans Am Resto-Mod; Rebuild Thread
« Reply #78 on: January 27, 2023, 08:07:39 AM »
I made a lot more progress this weekend towards getting the car back on the road. And what everyone has been asking for, finally a video of the car running to prove that I really did get it running. I will start with the things that lead up to me getting it running for more than just 30 seconds.

In preparation for the rear disk brakes I will be running and the front brake upgrade I have currently. I needed to upgrade my wheel studs. Since it is going to cost the same, I decided to upgrade to the 1/2 ARP studs with open face Gorilla lugs. With these I will be able to get full lug nut thread engagement, and will more than likely trim the extra length off of the lugs for a cleaner look. I will need to pull my hubs and axles off and drill out my holes in a drill press and then have the new studs pressed into place. Also, what isn't shown is the wheel spacers that I bought for the front. With new brake pads in the front, the caliper would be pressed out too far and contact the spokes of my wheel. The spacers are slightly more than 1/4" so it shouldn't affect the fitment of my front wheels too drastically.


After much research and going back and forth, I decided that the most effective way to deal with the steam ports on the LS1 was to route the coolant through to the water pump. I had to drill and tap my water pump for 1/8" NPT and will put in a 90* barbed fitting and re-routed the steam coolant passages to the water pump. On the stock coolant system in the Camaro, the coolant was routed throught the throttle body, then to the radiator. So, by not having 200* coolant flowing through my throttle body, I should pick up ~5 HP and it makes for a cleaner look. And for those that may ask, there is no interference with the throttlebody or cable.


Due to the way that the LS1 motor is setup, I had to relocate my battery to the passenger's side. Great thing about the way that GM made our cars, is that the core support is symetrical, so it just bolted in. Always cool when stuff like that works out!  :cool:


One other obstacle that I had gone back and forth with was what to do about my power steering pump and lines. The LS1 has metric fittings on the lines, and the stock 1976 steering box I had was metric, and also used different fittings. So, I either took the lines and had them reflared, or I could use a metric box. So, after looking around on the good old internet, I found out that there are several boxes out there in Junkyards that are bolt in and metric. But what gets even better, is that some of the boxes not only bolt into the car and have the correct fittings for the lines, but have a quick ratio steering! I have a buddy who had the exact box I needed. So, after a little elbow grease and paint, I took my old box off and bolted this new box on. Almost too easy.


The last sensor that I needed to hook up was my oil pressure sensor. Now, with the Speedhut gauges, they require their own sensor for the gauge to fully function, so I had to find a port for the sensor. I don't like the look of the redundant sensors, but unfortunately I don't have a choice on this one. A little research yielded me some nice results. The block off plate above the oil filter on the LS1's can be tapped to put a sensor, and great thing is it is down low and completely hidden from sight. The sensor was too close to the exhaust so I needed to get it in a different direction. I bought a 90* fitting from Lowes (I plan to buy a 45* in, but that was all they had) and installed it so it was closer to the engine and away from the headers.


I forgot to get a picture before I put the radiator on again, but the serp belt and all accessories are installed.


Ok, so what everyone has been waiting for. Now please keep in mind that I am having some issues with my tune and that is the reason that it isn't idling down properly. I think I have a vacuum leak somewhere as it is running at 1200 rpms in the video. I will get my tune figured out and get a good video of the car at idle. I also wanted to mention that I have had many things off of the engine so while I was making this video I was checking everything for leaks etc. I am happy to say that the only leak I have is a slight weap from the thermostat housing.


All for now.

1976 Trans Am LS1 and much more...SOLD
1968 Camaro LSA, T56 Magnum, and much more...SOLD

Current Project: 1955 Nomad LC9, 4L80e, C5 brakes and etc...

ryeguy2006a

  • Oracle Forum Member
  • *
  • Posts: 6039
Re: 1976 Trans Am Resto-Mod; Rebuild Thread
« Reply #79 on: January 27, 2023, 08:10:28 AM »
It has been a fast moving few days for me. It started when I got a phone call on Thursday morning about my Daily Driver Mustang GT I was selling. The guy wanted to take a look at my car so we set up a time to meet that night. To my surprise, he brought a pocket full of cash, and a dealer plate. Looked my car all over and bought it on the spot. Now, at this point I was happy I sold the car, but worried because I don't have anything to drive. I wanted to take my time when buying my next car, so what to do. I have an almost complete 76 Trans Am that is begging to get driven. So the rush begins.(Although I am cutting any corners)

So, in order to get the car ready, I have been very focused and prioritizing my time as it is limited. Also a few late nights, :lol:
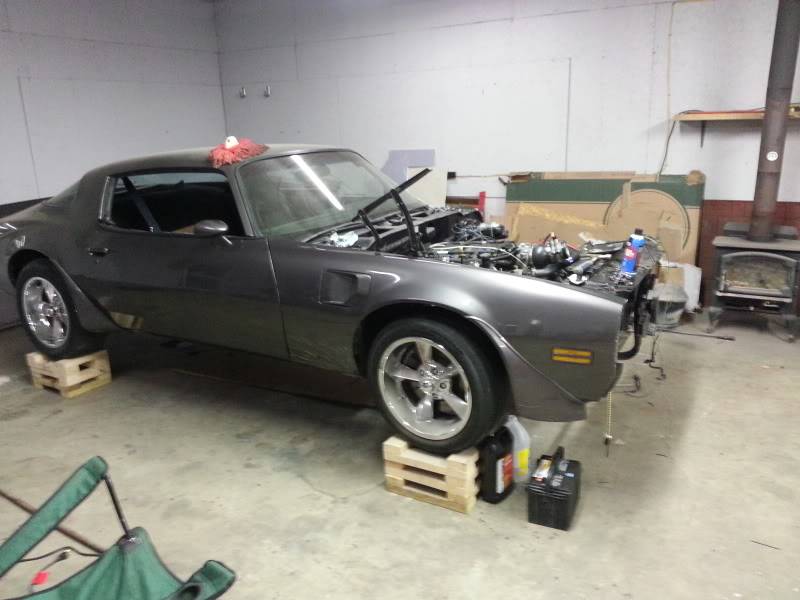
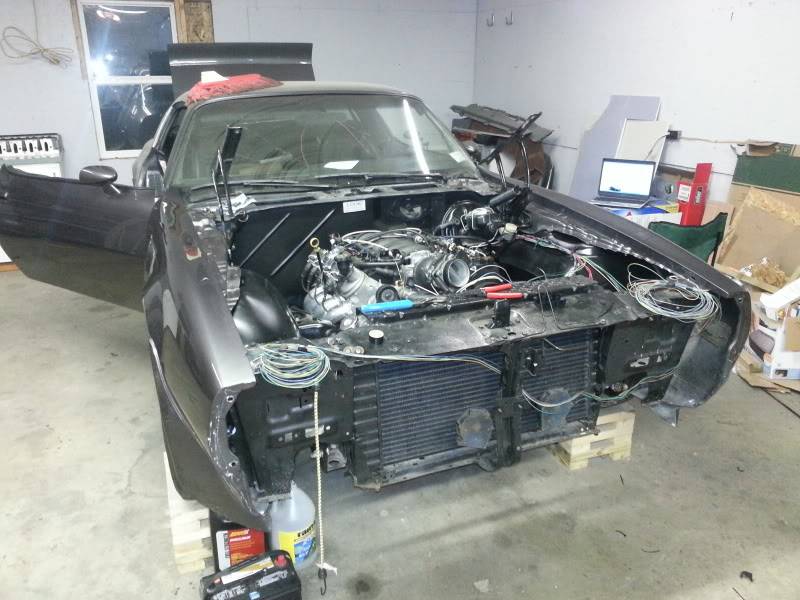
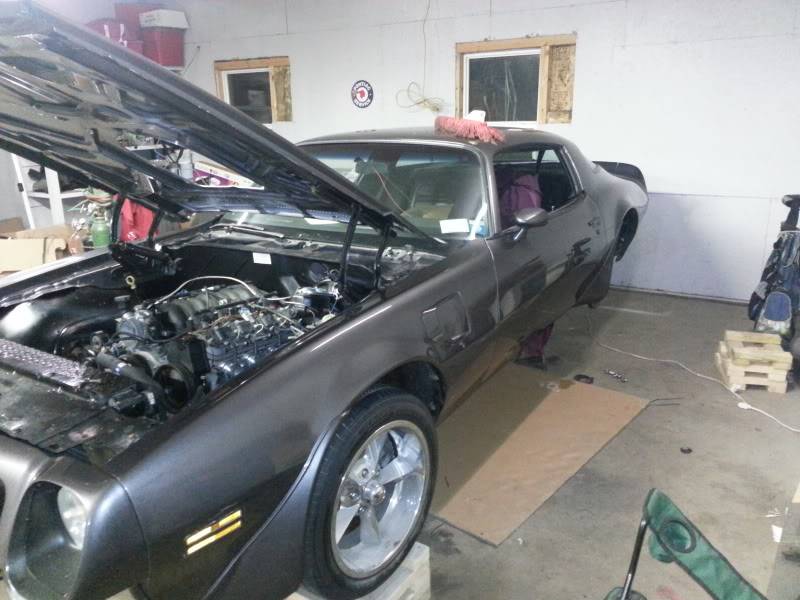
. Now, let me get to the pictures. I was confident that everything was finished on the passenger's side. Time to mount the fender and inner fender. It is starting to look like a car again.


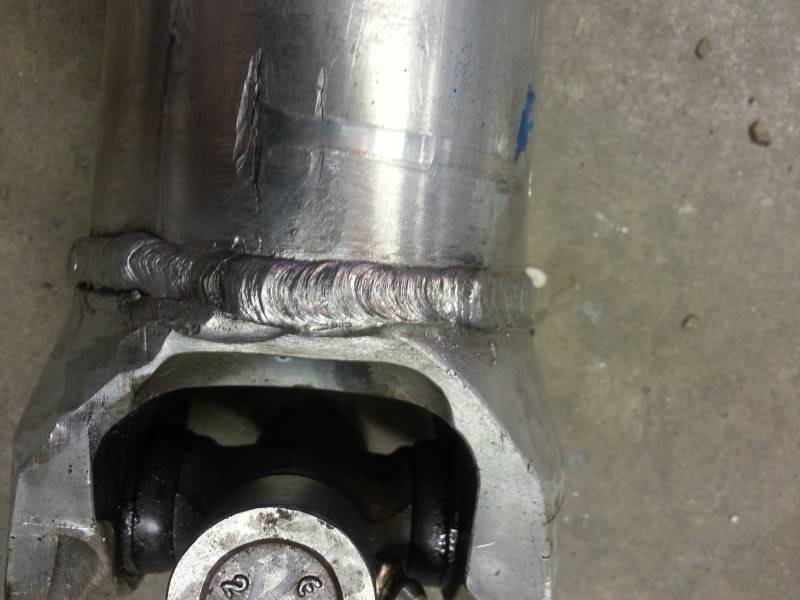
After a few attempts, I finally got my driveshaft back from the local shop. I took it to them with the measurements they asked for, and it was an inch too long. So, back to the shop and they took another 1" off of it and now it fits perfectly. It also too me a long time to find some place that carried a 1310 to GM 3R U-joint, but finally tracked one down. I got this driveshaft down in Carlisle for $35, Cut and balance $77, new U-joint $12. Grand total for an Aluminum driveshaft that will handle 600-700 HP, $124 bucks. NICE :cool:


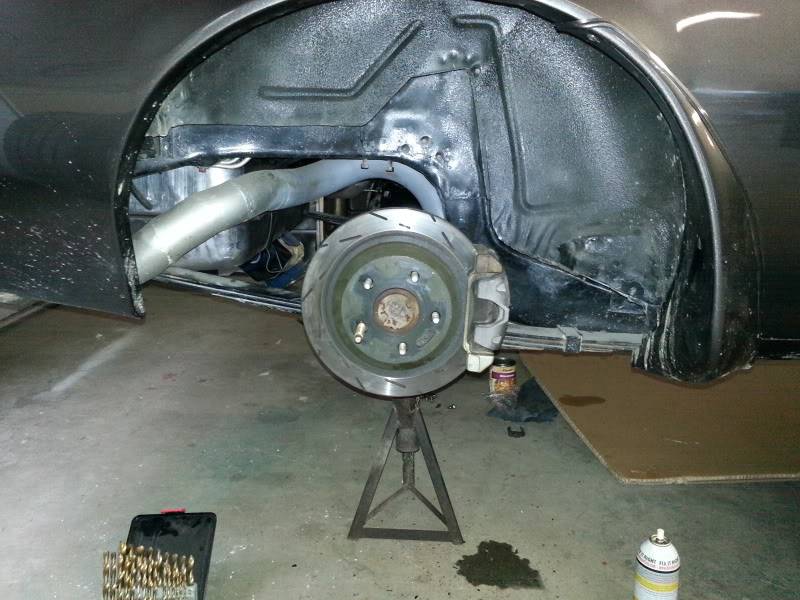
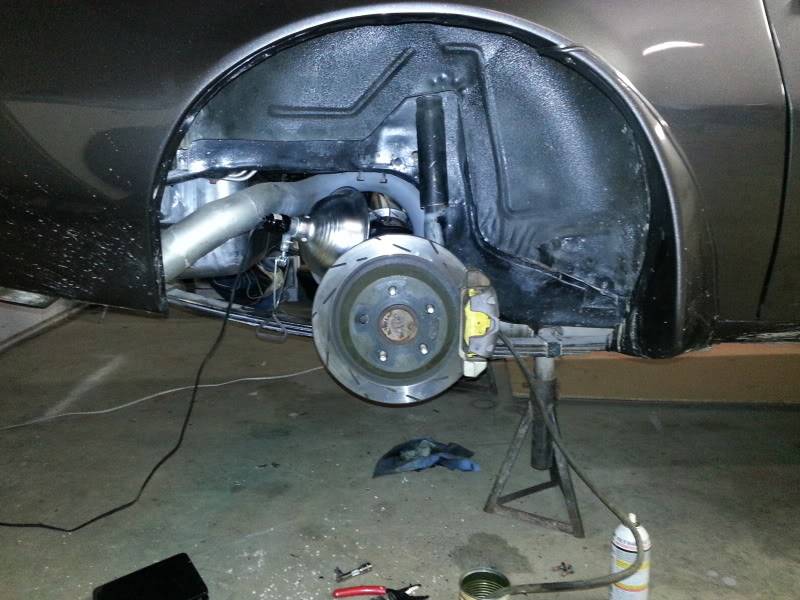
I started working on the brakes. They were the biggest thing I was putting off. I didn't grab any pictures, but I had to "gut" my stock proporting valve, which turned it into a distribution block. Essentially it is just removing the valving and springs inside that restrict the rear brakes at a hard stop. Not too difficult to do, just time consuming. Once that was done, I installed the inline adjustable proportioning valve right below where the rear hose connects to the hard line. Real easy and very accessable. Then ran the lines and installed the rear backing plates and brackets. Once, they were intalled I test fit the passenger's side shock and drilled a hole to relocate it to clear the caliper. It was about 1 1/2" rearward that I relocated. Very easy and thanks to Eroc022, I didn't need to do the swap with two left sides. Now both calipers face the front. I like when things are symetrical. Once, the shock was relocated, I bolted everything down and tested the wheel. No clearance issues at all. Repeat on the other side, and bleed the brakes. DONE.


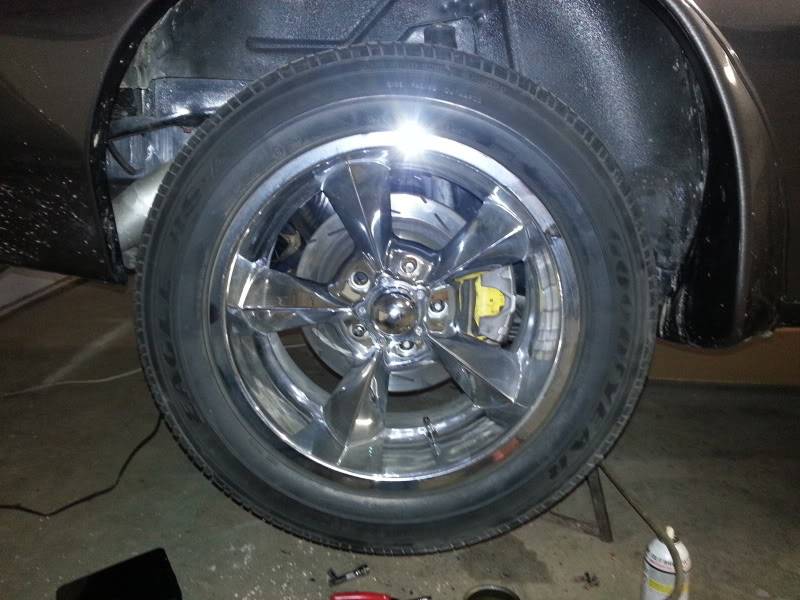
For those that may ask about E-brake cables, I haven't bought or installed those yet. I will be using the universal Lokar cables when the time comes. For now, its leaving it in gear. That will change shortly.

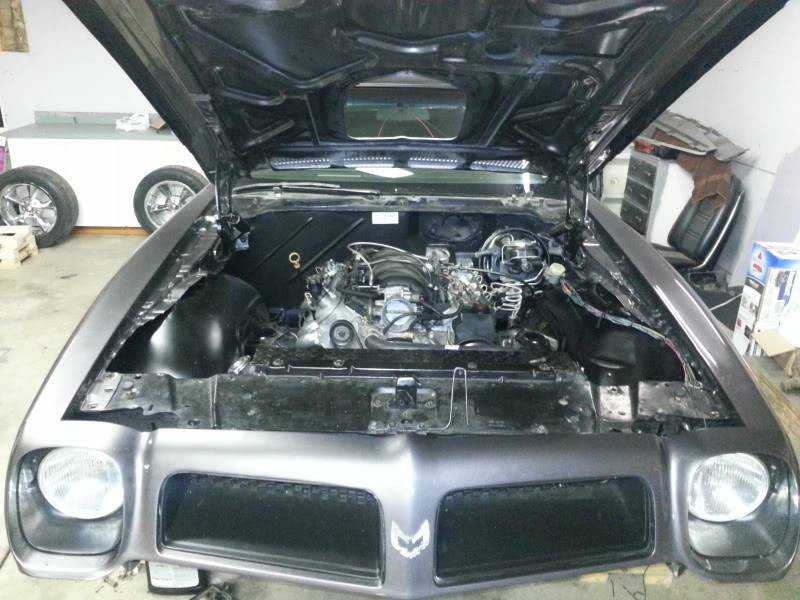
Once, the brakes were done, it was time to put the other fender on and the front nose. Because I was thinking ahead, I saved the shims and adjustments for all the body panels. I recommend this to anyone because everything fell into place. This is after about 15 mins of adjusting.


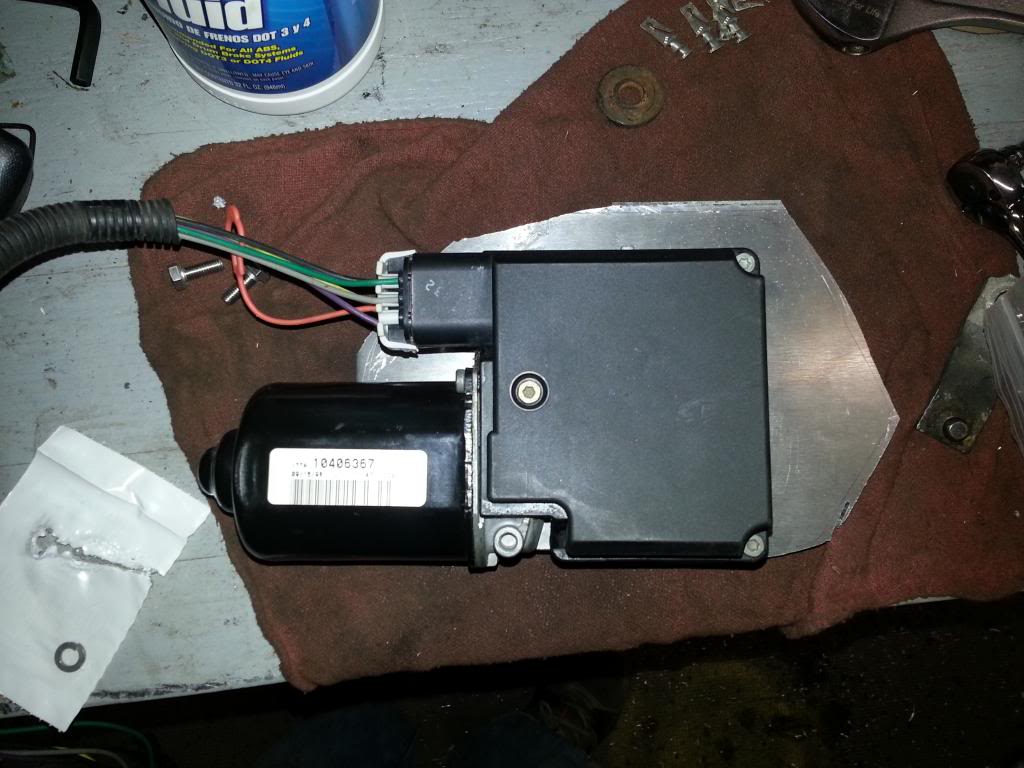
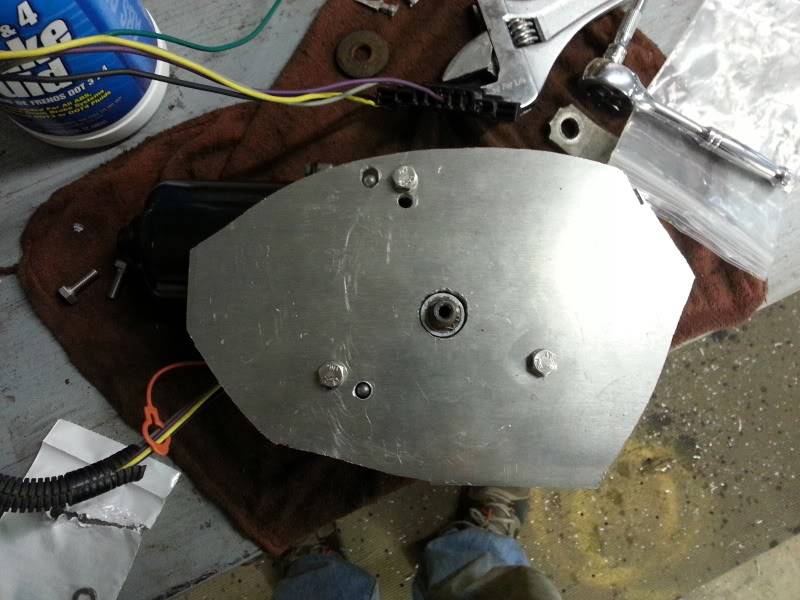
I changed pace, and decided to work on my wiper motor upgrade. Here is what I came up with so far. I made this bracket out of 1/4" aluminum plate, and drilled holes for the motor to mount to, and then I will drill holes in the plate and the firewall to attach the plate to the firewall. pretty simple, and at this point it is crude, but I will smooth off the edges and finish the wiring on it. All in good time.


After that, my father-in-law stopped by and we installed the hood and nose piece. Even with all the same shims in place the hood still too us an hour to fit properly.  :? Anyway, its done now and I can worry about other things.


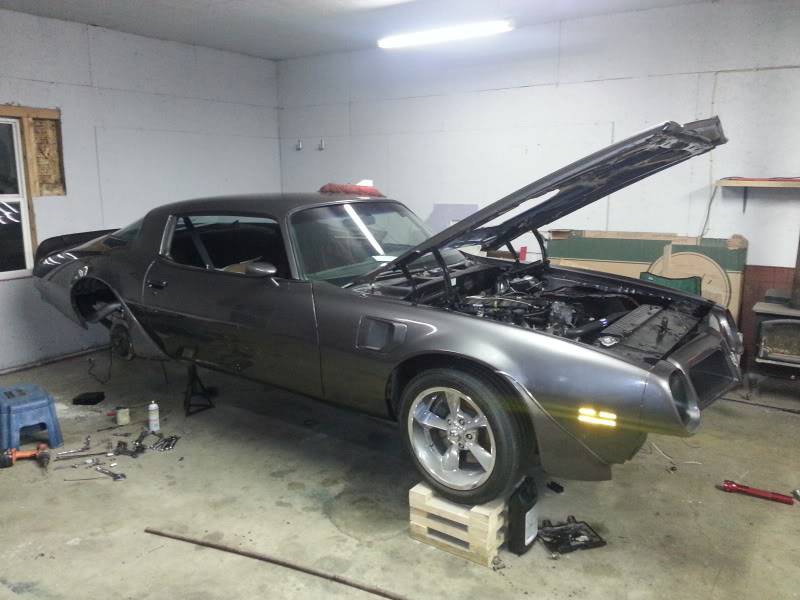
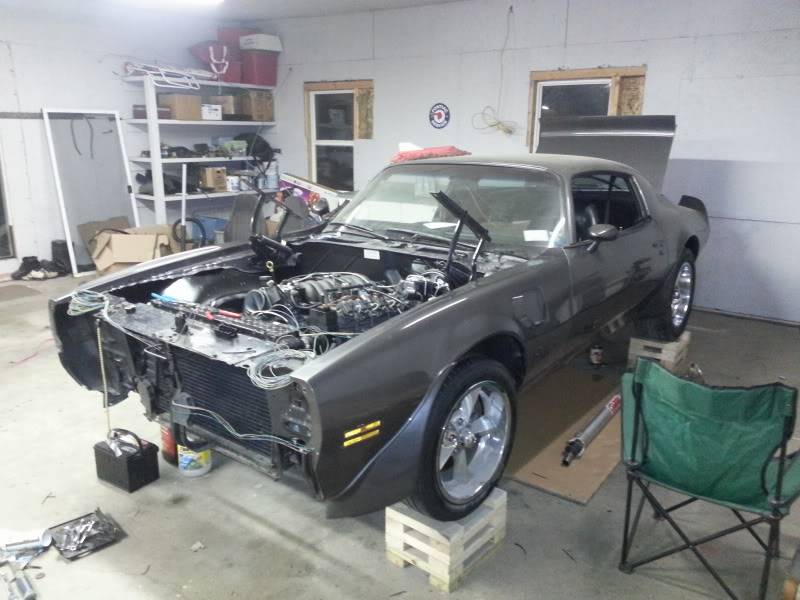
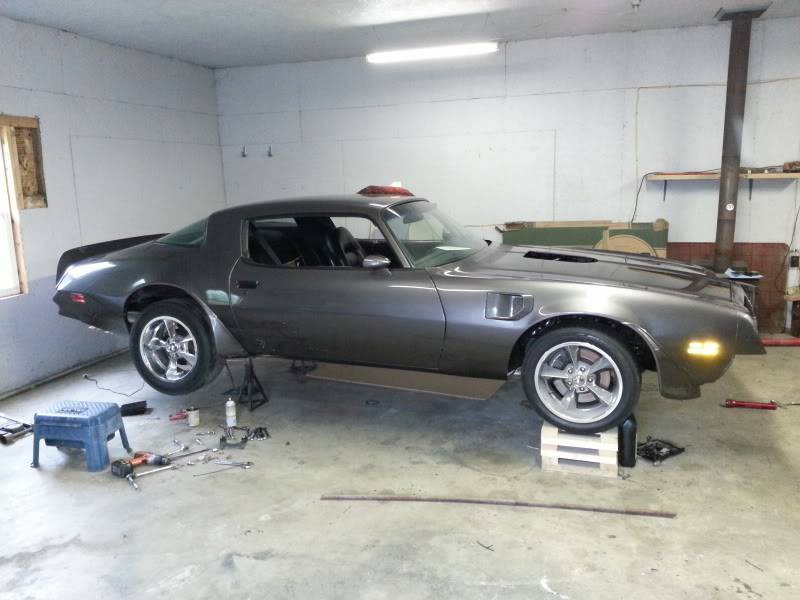
Here is the car this morning. As you can see I didn't quite finish last night. I was able to borrow a car for today to get to work, but after tonight it will be all ready. I still need to finish a few little bits of wiring, such as the headlights, marker lights, and the cooling fans. Once those are done, I just need to fill the transmission with fluid, put the ont bumper on and take it for a spin!


That's all for now. Should have some more pictues and maybe a video later tonight.

Thanks,
Ryan

1976 Trans Am LS1 and much more...SOLD
1968 Camaro LSA, T56 Magnum, and much more...SOLD

Current Project: 1955 Nomad LC9, 4L80e, C5 brakes and etc...

Re: 1976 Trans Am Resto-Mod; Rebuild Thread
« Reply #79 on: January 27, 2023, 08:10:28 AM »
You can help support TAC!


You can help support TAC!