Recent Posts

Pages: [1] 2 3 ... 10
1
Number Crunching / Re: 400 casting code
« Last post by rkellerjr on Today at 01:27:59 PM »
Just an FYI, I am running a 500557 block in my car, runs like a banshee, bored .040, forged pistons, roller tip rockers. Used existing crank. Engine was built back in 2009, still running strong! Depends on what you want to do with it. On paper, motor is pushing 400 - 450hp.
2
Tires, Brakes & Suspension / Re: 1981 Rear Disc Brake Parking Brake
« Last post by roadking77 on Today at 01:13:11 PM »
Not sure why my writing did not show up, But I am having a hard time getting my rear calipers hooked up. I have hard lines on the axle and the connection to the caliper is with a banjo bolt. The hard lines DO NOT connect directly to the caliper. In the top pic above you can see the new banjo bolt. In the second pic with the red caliper you can see a 'block' screwed in where the banjo bolt is that accepts the hard line. What is this special fitting called and where can I get a couple?
3
Tires, Brakes & Suspension / Re: 1981 Rear Disc Brake Parking Brake
« Last post by roadking77 on Today at 01:10:44 PM »
Ok.  This is stupid. I spent about 6 weeks fiddling with the stupid parking brake.  Spoiler Alert...It still aint right.
But all the parts are together and they should pass the PA State inspection.

Anyway, I figured I'd close the loop on this thread.

I finally found a picture of an actual marked, LH Caliper:

GM Left Rear caliper by Tom Sherer, on Flickr

I am having a hard time figureing out my rear brakes!! I have hard lines on the axle to the caliper, BUT in the pics shown it looks like instead of a banjo bolt there is some kind of banjo bolt with a square block with threads to accept the hard brake line? Is this a special part/fitting and where can I find one.

  As I suspected, the unmarked caliper on my left rear is wrong. You can see in the pic above how the park brake lever is up around 1 O'clock vs. 7 O'clock on the unmarked caliper I got when I ordered Ames PN FR218EB (now discontinued). 
Untitled by Tom Sherer, on Flickr

The orientation of the lever is determined by a metal 'stop' on the back side of the caliper + the hole that mounts the spring retainer.

Reviewing old GM Parts catalog info, combined with some notes I think came from a pre-crash TAC post from someone more familiar with these parts, I found the GM PN's for these calipers are:
18006748 Caliper Rear(LH)
18006749 Caliper Rear(RH)
And, These calipers were also used on Cadillac Seville's and El Dorado's of the era.

So, to have a properly installed and fully functional e-brake, I need to replace my LH caliper with the correct one.

Finally, I wanted to try to write something about adjusting the parking brake.  'Cause the instructions and video's I found seemed contradictory in some places.  Maybe its just how my brain works.  Here's how I'd describe the adjustment process:

Caliper is on the car.  Pads installed. 
When turning the post/actuator via the inner hex shape, the post will move in and out. There is some sort of ratcheting/clutch voodoo going on inside there.  While the post can push on the piston, it is not directly connected to it.

Because of the way the post moves in and out, you need to install the lever retaining nut onto the post while turning it with an open-end wrench.  The nut prevents the post from pulling too far in so you can't reach the inner hex shape...Like my first problem in this post.

Untitled by Tom Sherer, on Flickr

Turning the post clock-wise pushes the piston outward, clamping the pads to the rotor / actuating the brake.  Keep turning Clock-wise and eventually, the piston will clamp the pads on the rotor.  It'll get tight and wont turn Clockwise anymore.

Turning the post counter Clockwise backs the post off the piston. but, remember it's not connected.  So...it doesn't actually pull the piston back in.  Turning Counter clock-wise works the adjustment mechanism. Because of magical, self-adjusting clutch/ratchet in there, a person could spin and spin and spin Clockwise and not notice any change.  But, there's some sort of ratchet that is the key to adjusting the park brake actuator/lever. 

OK, so...With the nut installed on the post, put a wrench on the inner 9/16 Hex and turn clock-wise until it wont turn anymore. 
Here comes the 'trick'.  The lever needs to fit onto that inner hex shape in a position that leaves no more than 1/8" gap between the lever and the stop on the caliper.   Tighten down clock wise, then turn the post counter clock-wise.  Just a 1/4 turn or so.  You will feel the post try to pull in (but it can't 'cause you have the nut on there) you'll feel some resistance..push past it. That's the magical adjuster doing its job.  Now...turn back CLOCKWISE.  You should notice that your wrench doesn't return quite as far as where you started at before you feel it back to that tight position. 
Repeat this...Turn to tight...Turn 1/4 counter clock-wise...then back to tight. 
This ratcheting action moves the inner hex around. Repeat until is it clocked at the EXACT point where the lever will fit on with no more than 1/8" movement off the stop before it feels tight.

Good Luck!

-Tom
4
Number Crunching / Re: 400 casting code
« Last post by 70_71_78 on Today at 07:33:08 AM »
I have not looked up the block codes, but there were 455 blocks with four bolt main caps that may not have been documented, therefore, few would know about. I bought a thrashed '70 455 auto Bonneville for a 455 to build back in the mid 1980's. Block and engine codes both indicated a standard low performance 4bbl 455. I drove it home and removed the engine and 400 auto trans. Sold the turbo 400, junked the body and frame after removing other usable parts. I started disassembly by removing the entire top end, nothing special there. Rolled it over and pulled the oil pan to find 4 bolt main caps and a nodular iron HO crankshaft! It did not appear that the engine had ever been removed from the car or even opened up for service for that matter. I can only assume that when being built those parts were on the shelf so they used them and assume other anomalies may also exist from that time period. A quick bore size measurement may be in order before passing on it as a builder. I couldn't have been happier with the way mine performed.
5
I’m not sure what I could have put in that caliper with a nipple on it to Receive hoses.
That Teflon tape was a tight fit.

The threads took a 3/8 coarse thread bolt.

I think that caliper was pulling in air through the e brake. I’ll know more when I put the new caliper on there.
6
Projects & Restorations / Re: 81 T/A restoration
« Last post by 5th T/A on May 01, 2024, 04:57:45 PM »
Ambitious project and impressive repair work.

Thanks for posting.
7
Projects & Restorations / Re: 81 T/A restoration
« Last post by 81Resto on May 01, 2024, 03:01:00 PM »
I noticed that too Luke.  In the videos linked he was repairing a '71 Camaro I believe and those holes weren't correct for that year either.  They are also not in the correct spot on the seat pan also.
They will be relocated. 
I do need to clean up and weld the e brake brackets back on still in addition to relocating the hole.  I do have the correct position marked out just need to finish.
8
Number Crunching / Re: 400 casting code
« Last post by 81Resto on May 01, 2024, 02:56:06 PM »
Thanks for the reply. I think I am going to steer clear of this one.  I got another picture with 500813 code which is for a 455 with 2 bolt mains, but it is being represented as a 400 with 4 bolt mains.
With all the conflicting info I am getting, I think my best option is passing at this point.
9
Number Crunching / Re: 400 casting code
« Last post by wheels78ta on May 01, 2024, 12:09:26 PM »
Not sure where they got that casting number from but it is not for a later built pontiac 400.

The 400 block you want is casting number 481988.  You can use the 568577 or 500557 block but it's not as strong as the 481988. 

The 557 block is good for 450-500 hp.......still usable if it's the only thing available.
10
Interior / Re: Rear armrest opening cover plates ?
« Last post by Wallington on May 01, 2024, 05:51:08 AM »
Thanks Willie. The rear pressings also differ ever so slightly between early and midyears. A few angles look like the covers plates may also differ but not clear enough to be sure. The vague photos I've seen seem to match roughly the change in interior plastic armrest panels change, so 70-72 and 72-up, with cover plates used until perhaps 1975.

The guy I got these plates off thought they were off a 75 or 76, but they are also the earlier red primer of 70-73 or so, not the brown shade so that guess is not one to base much on. I haven't seen recent pics of other years to see which still used them or had holes or not.

Anyway, some newer pics just because. Guys are bored with the topic so this is perhaps more to do with going off photos to match red primer.

This is the plates as removed, interior side showing. Black brush-on goo for sticking of wheelarch insulation next to it.

Firebird 70-75 rear interior armrest cover plates unwashed (2) by Ben, on Flickr

As removed, inside body faces, grey primer/blue paint overspray from door jamb opening areas. The staining is likely from the interior side seeping through, rather than these being sealed to body.

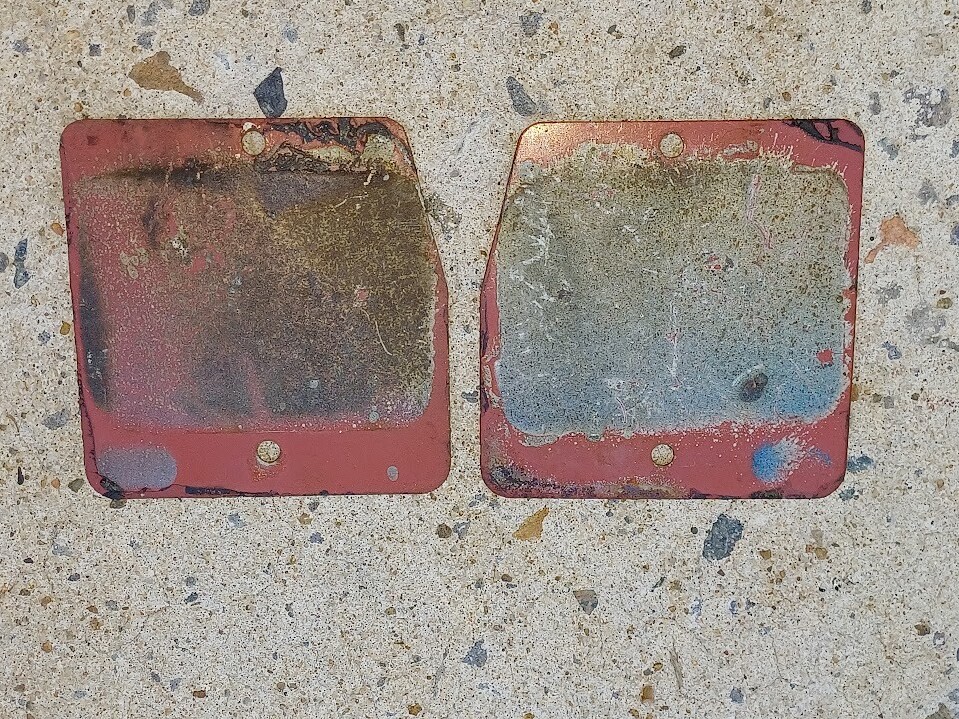
Firebird 70-75 rear interior armrest cover plates unwashed (1) by Ben, on Flickr

Cleaned-up and using garage lighting only, no flash.

Firebird 70-75 rear interior armrest cover plates washed (1) by Ben, on Flickr

Same again but using flash inside house. Much more of an orange look that is not accurate.

Firebird 70-75 rear interior cover plates washed flash lighting (1) by Ben, on Flickr

Scanned pic using printer scanner, and using the two best sides for recording the colour or red primer.

Firebird rear interior armrest panel covers 70-75 red primer scanner by Ben, on Flickr

I considered even sending one off to paint shop to get some primer matched for future use, but mine uses the later brown primer, nor is it worthy of even touching up in this way so won't bother now.

Of interest also is that the plates are completely covered both sides evenly. So being an early red primer, it is Norwood dip and the plates must have been only loosely attached by the screws a few threads for complete coverage and only marks from clamping over the paint, not bare areas where sealed onto body when screwed tightly. Van Nuys were still spraying grey primer and black overcoat during these years before swapping to the red-brown primer for roughly 74-78.
Pages: [1] 2 3 ... 10
You can help support TAC!