Author Topic: Madaguy 1955 Nomad Build  (Read 16576 times)

FormTA

  • Oracle Forum Member
  • *
  • Posts: 5574
  • Life is short, have fun, Drive a T/A
Re: Madaguy 1955 Nomad Build
« Reply #40 on: February 13, 2023, 06:32:42 PM »
Ah, gotta love rust, yuck. I am not looking forward to the F1 sheet metal. Looks like you are making headway. You are planning to run a back seat for the kiddos, right?
79 Trans am low buck LS swapped
79 Formula 301 (Work in progress)
67 RS Camaro (waiting it's turn)
69 Dodge charger on late model charger chassis
49 Ford F1 on a 2003 Chevy ZR2 Chassis (current project)
Names, Luke. If I hear anyone telling me they're my father....

ryeguy2006a

  • Oracle Forum Member
  • *
  • Posts: 6040
Re: Madaguy 1955 Nomad Build
« Reply #41 on: February 14, 2023, 07:41:09 AM »
Ah, gotta love rust, yuck. I am not looking forward to the F1 sheet metal. Looks like you are making headway. You are planning to run a back seat for the kiddos, right?

I picked up a 2019 2 door Jeep Wrangler rear seat that has the LATCH hooks for rear car seats, and I'm planning to run that in the rear. It should work perfectly once the wheel wells are 3" wider on both sides. It folds down flat and is really compact.

1976 Trans Am LS1 and much more...SOLD
1968 Camaro LSA, T56 Magnum, and much more...SOLD

Current Project: 1955 Nomad LC9, 4L80e, C5 brakes and etc...

FormTA

  • Oracle Forum Member
  • *
  • Posts: 5574
  • Life is short, have fun, Drive a T/A
Re: Madaguy 1955 Nomad Build
« Reply #42 on: February 14, 2023, 07:58:54 AM »
Oh, that's cool. I love adapting things like that. Real hot rodding.
79 Trans am low buck LS swapped
79 Formula 301 (Work in progress)
67 RS Camaro (waiting it's turn)
69 Dodge charger on late model charger chassis
49 Ford F1 on a 2003 Chevy ZR2 Chassis (current project)
Names, Luke. If I hear anyone telling me they're my father....

kentucky yeti

  • Jedi Council
  • Oracle Forum Member
  • *
  • Posts: 13363
  • located in western Ky
Re: Madaguy 1955 Nomad Build
« Reply #43 on: February 15, 2023, 06:10:13 AM »
Really liking watching this build.  P.S.  you are going to have to update your signature. Bye-bye  Camaro and Hello Mad Nomad!
Mike (aka Yeti)

1977 Y82 W72 Auto
2015 F-150 Lariat 4x4 (twin turbo)
2016 Explorer Limited
2012 Mustang

ryeguy2006a

  • Oracle Forum Member
  • *
  • Posts: 6040
Re: Madaguy 1955 Nomad Build
« Reply #44 on: February 20, 2023, 10:53:04 AM »
Really liking watching this build.  P.S.  you are going to have to update your signature. Bye-bye  Camaro and Hello Mad Nomad!

I know, you are right Mike!

Another weekend and some more progress and parts. I worked more on getting my floor pan section modified and trimmed up to get a better mock up. The fit up is really looking great, and it will only need a little more trimming to be in it's final place. I'll need to make a few small pieces to go around the wheel wells, but I'll need other panels in place before that happens.


Body mounts are now able to be centered in the frame mounts. Once I'm happy with the fitment, I'm going to take some sheet metal screws and secure it all before I start welding.


As I usually do after the kids go to bed at night, I was cruising FB marketplace and came across a guy selling a 55 2 door handyman wagon for parts. He was selling it as a whole car, but asked him if it had a rear seat and if he would sell separately. To my surprise he said it did have a seat and that he would sell separately with the brackets. After he sent me the pictures, the seats were in very good condition and very complete. Best part is his price was about 1/4 of the going rate for rear seats, plus it came with the brackets!


When I got there he had a few other parts, but ended up only buying the spare wheel well. It's very solid everywhere but where all the spot welds were drilled out. I'll have to replace some of the sections, but for the most part is in great shape. Love using original parts when I can.


I got to talking with the guy and he ended up giving me some end mill bits and a hood ornament too! Car people are the best kinds of people!! Love this community.


I got sick of looking at the wheel wells and decided that it was time to get them removed. As I was cutting away I kept wondering why they did a lot of the things that they did. First up was cutting one of two large stitch welds that connected these two panels after chipping away the bondo that filled the 1/4" gap. So much wrong about that last sentence...


Oh, what's this? A little hidden compartment for body filler to go.


If you look closely you can see the rings of body filler that were used in apparently different stages. Almost like the rings of a tree.


Same on both sides.


This is where I left it for the day. While scary, it looks way better to me than before. The good news to come of all this destruction is they did leave the stock outer wheel wells intact as well as some of the stock wheel wells which will make my job a little easier. I'm hoping that I can just cut what's left of the inner wheel wells and see what's there to work with.


With the wheel tubs all removed, I was able to start checking things out. I knew that with the cargo area, it would lay flat all the way to the rear floor pan section. So eyeballing it with the section I cut out mocked up, it looks very flat. The rear floor panel may need to come up just slightly, but is a really good place to start.


Now for the next few pictures, if you squint it really looks like something.


The FedEx guy had impeccable timing, as the rear cargo area that I ordered was delivered! I ordered the flat section and the inner braces separately because I wanted to weld them in myself, but also prime /paint the inner sections to prevent future corrosion, but also separately qualified for free shipping through Jeg's! The cargo panel with braces welded together has to be shipped oversized. Anyway I couldn't help myself and took it out of the box to give myself some motivation. I need to clean off all of the remaining pieces of the wheel wells so that the panel will sit flat against the rear brace, but it looks great. Very pleased with my progress this weekend. Hopefully I can work for 15-20 mins here and there this week to continue to peal back the layers of what the PO did. Once I get to some solid metal I can hopefully start test fitting more panels.


1976 Trans Am LS1 and much more...SOLD
1968 Camaro LSA, T56 Magnum, and much more...SOLD

Current Project: 1955 Nomad LC9, 4L80e, C5 brakes and etc...

Re: Madaguy 1955 Nomad Build
« Reply #44 on: February 20, 2023, 10:53:04 AM »

ryeguy2006a

  • Oracle Forum Member
  • *
  • Posts: 6040
Re: Madaguy 1955 Nomad Build
« Reply #45 on: February 27, 2023, 09:22:10 AM »
Thanks Steve!

So my plan this time around was to buy a car that was painted, and didn't need a whole lot of repairs. I'd say the plan failed, but in my defense the previous owner hid the "repairs" very well. Seems like I just keep cutting deeper and deeper, but thankfully I came to the end of the covered up rusty metal. It's disappointing to see when people just layer new metal over rusty metal then cover it with body filler. I kept going on the driver's side and finally hit the original metal.


That panel above the wheel well will need some patches, but thankfully I have extra from the wheel wells that I bought. Glad that the window channels are in good shape. Out comes that outer wheel well.


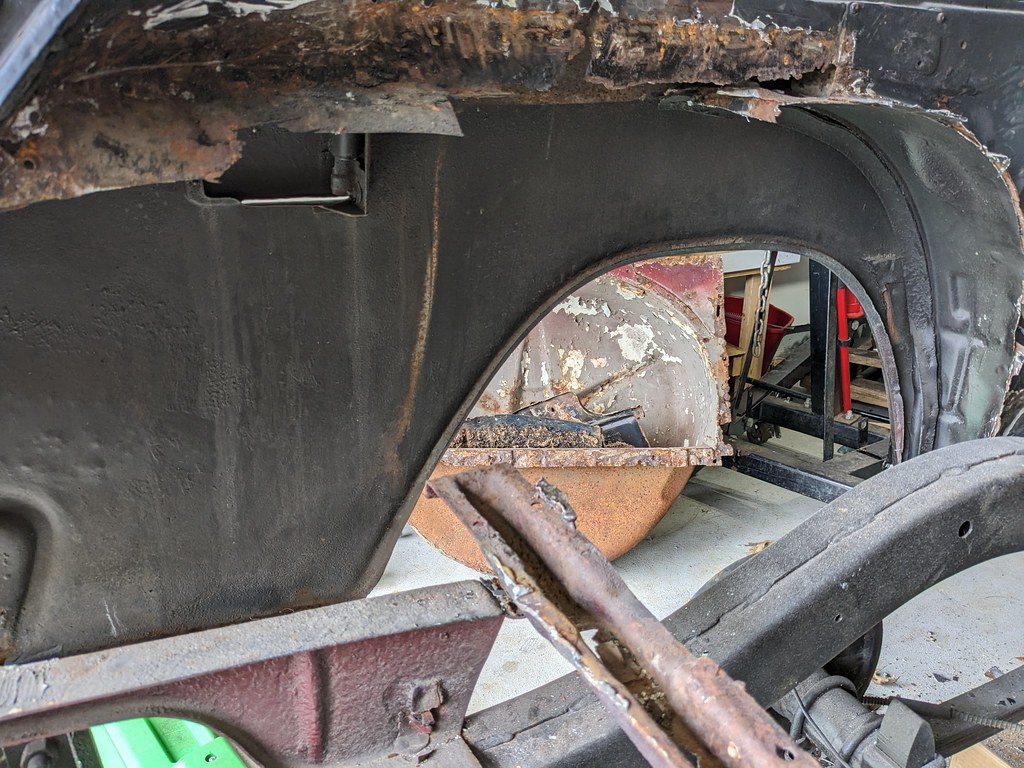
It's easy to see now, but when I was looking under the car it all looked minty. Here you can see the bottom looks great, but the top had another secret. More new metal layered over rusty metal.


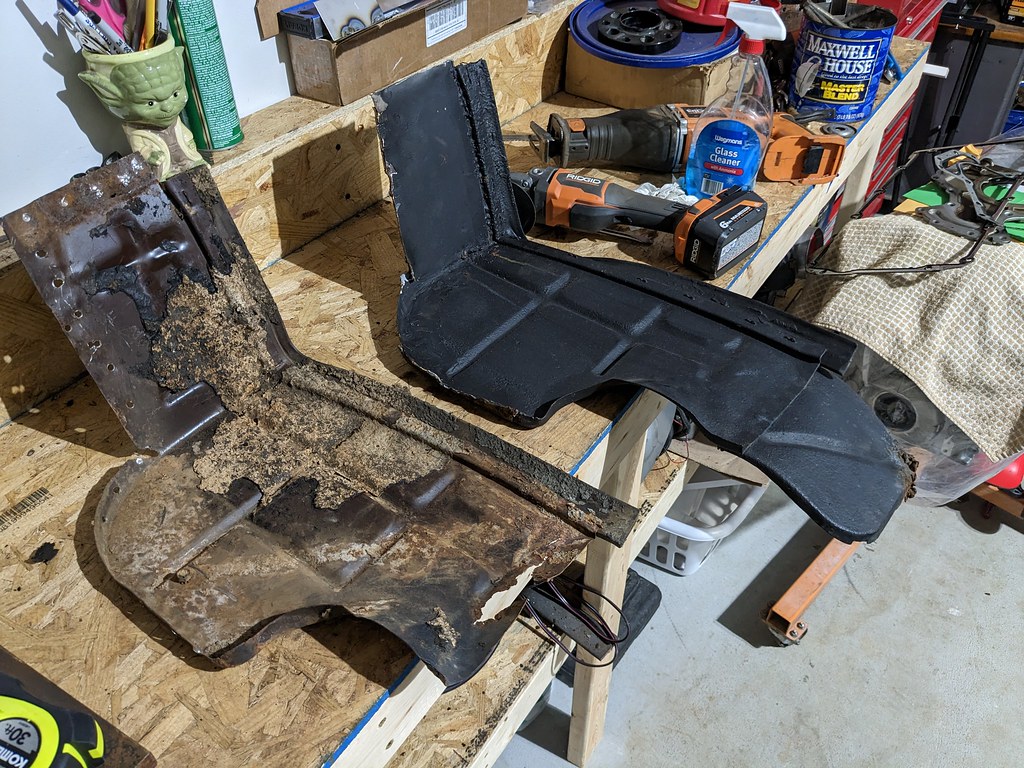
I'm glad when I pulled the wheel houses out of that 9 passenger wagon that it came with the outer wheel houses because they are in pretty good shape with just some small patches needed. The lower section of the wheel house is in good shape, so I can section off what I need and splice it to the one in good shape.


Did a little measuring, then just cut it. It lined up nicely, and after I tacked it in place fits just like the one that came off the car.


Finally broke out my new welder. Everlast MTS 225, and the MIG Function works great. I should have ground back the metal more, but the kiddos were sleeping and didn't want to be too loud.


The front outer wheel house is actually in great shape, but I'll need to weld on a new tab that attaches the rear/upper panel that I just repaired.

Here's just another example of what not to do. If you have weak stomach's, scroll quick.


After all of that cutting I decided to get some motivation and roughly mocked up the wheel wells again. To get a better idea of how they will sit, I needed to trim off the little dip from the 9 passenger cargo panel. Just needs to be straight across, so painters tape did the trick.


What I'm coming to realize is that the rear section of the wheel house is much different on the Nomad vs the other tri5 wagons. I could see that the angle was different, but that also makes the top section too long so I'm going to need to do some cutting. I made one big cut, then was able to get the panel to sit down nicely where it will eventually go. It's a bit unconventional, as there is usually just a flange left that welds to the upper structure, but since mine is so rusted in spots, I'm going to be doing a little of both and left the top tab attached. I'll spot weld that to the upper channel, then left the flange for the rest of the wheel house. I'm going to use some sheet metal screws when the time comes to secure it all, and tack weld the whole wheel well together once it's all fitting great. Then I can remove it and weld into a solid piece on my bench.


Really happy with that fitment. Once I get the panel all patched up, it will fit really well.


Then one thing that kept bothering me was that middle brace seemed to be shifted towards the driver's side. It wasn't allowing the wheel well to go straight back, then I threw a tape measure on it and it was about 3/8" towards the driver's side. With that information, it changes the game. I needed to see what was going on with the passenger's side too so that I can make sure that it's square. Time to cut up the passengers side. I was hoping to leave it and get the one side mocked up to give the body more rigidity. Nope...

I'll spare the details, but it's the same story on this side as well.


This is why we can't have nice things.


I don't like leaving the car like this, but it gives me the motivation to get it back together.


I'm going to pick up some weld-through primer very soon and get some panels welded back into the car shortly. Another panel that I need to replace which is going to be a huge PITA will be the heavy steel panel where the tailgate mounts. That was spliced and cut up over the years, so it just needs to be completely cut out and a new one welded in. I need to replace that panel before I do a final weld of the wheel wells because it attaches to almost everything in the rear of the car. I also need to figure out how to brace it all from moving when I replace that panel. That's one of the next items on my list to address, so stay tuned.

Cheers,
Ryan

1976 Trans Am LS1 and much more...SOLD
1968 Camaro LSA, T56 Magnum, and much more...SOLD

Current Project: 1955 Nomad LC9, 4L80e, C5 brakes and etc...

Jack

  • Oracle Forum Member
  • *
  • Posts: 12429
  • 1971 Esprit TA Clone W72 1972 Formula 68 350 HO
Re: Madaguy 1955 Nomad Build
« Reply #46 on: February 27, 2023, 08:17:29 PM »
Looks like you got your hands full this time but doing great work as usual.


Regards, Jack

FormTA

  • Oracle Forum Member
  • *
  • Posts: 5574
  • Life is short, have fun, Drive a T/A
Re: Madaguy 1955 Nomad Build
« Reply #47 on: March 02, 2023, 11:21:51 AM »
Oh wow Ryan! That is nuts! Well, it will be better in the end!
79 Trans am low buck LS swapped
79 Formula 301 (Work in progress)
67 RS Camaro (waiting it's turn)
69 Dodge charger on late model charger chassis
49 Ford F1 on a 2003 Chevy ZR2 Chassis (current project)
Names, Luke. If I hear anyone telling me they're my father....

ryeguy2006a

  • Oracle Forum Member
  • *
  • Posts: 6040
Re: Madaguy 1955 Nomad Build
« Reply #48 on: March 02, 2023, 02:08:55 PM »
The funny thing is I usually have a good eye for when work has been done. They did a great job covering up the patch panels on the pro-street tubs.

1976 Trans Am LS1 and much more...SOLD
1968 Camaro LSA, T56 Magnum, and much more...SOLD

Current Project: 1955 Nomad LC9, 4L80e, C5 brakes and etc...

roadking77

  • Oracle Forum Member
  • *
  • Posts: 13245
Re: Madaguy 1955 Nomad Build
« Reply #49 on: March 03, 2023, 06:33:58 AM »
I think what you have, is a car that 30 years ago was not worth the effort to restore as easily as it was converted to a drag car. Although Nomads have always been desirable (heck I wanted one when I was 10 years old, but I had to fight off the dinosaurs).
It was easier to quickly cover the rust, make a racer and run the heck out of it. I really think you found a diamond in the rough. To  me it doesnt look that bad, just cut out the bad and weld in good :grin: Youre going to have a great, desirable auto when you are done!
Finished!
77 T/A - I will Call this one DONE!
79 TATA 4sp-Next Project?
79 TATA - Lost to Fire!
86 Grand Prix - Sold
85 T/A - Sold
85 Fiero - Sold
82 Firebird - Sold
'38-CZ 250
'39-BSA Gold Star
'49-Triumph 350
'52-Ariel Red Hunter
'66-BSA Lightning
'01-HD RoadKing

kentucky yeti

  • Jedi Council
  • Oracle Forum Member
  • *
  • Posts: 13363
  • located in western Ky
Re: Madaguy 1955 Nomad Build
« Reply #50 on: March 03, 2023, 06:48:23 AM »
There is no doubt that when you finish it, it will be 10x better than the day it was new.  :-D
Mike (aka Yeti)

1977 Y82 W72 Auto
2015 F-150 Lariat 4x4 (twin turbo)
2016 Explorer Limited
2012 Mustang

ryeguy2006a

  • Oracle Forum Member
  • *
  • Posts: 6040
Re: Madaguy 1955 Nomad Build
« Reply #51 on: March 06, 2023, 11:45:46 AM »
Thanks Kerry! I feel the same way. I'm sure most people are looking at it and think I'm crazy, but I really don't think it's that bad. I'm just taking my time now getting the rear panel reinstalled and leveled so that the tailgate fits right.

Thanks Mike, I'm not sure about the day it was new, but definitely better than the day I bought it. :cool:

1976 Trans Am LS1 and much more...SOLD
1968 Camaro LSA, T56 Magnum, and much more...SOLD

Current Project: 1955 Nomad LC9, 4L80e, C5 brakes and etc...

ryeguy2006a

  • Oracle Forum Member
  • *
  • Posts: 6040
Re: Madaguy 1955 Nomad Build
« Reply #52 on: March 13, 2023, 07:58:45 AM »
With all the old wheel wells cut out, the next project was to cut out and replace the rear brace where the tailgate mounts. It had been repaired over the years (poorly) and needed to completely cut out and replaced.  I had been thinking about how I wanted to replace this panel over the last several weeks and while crude, I found the best way to approach this panel replacement was to prop up the rear of the roof. It would be held up in place, but allow me to work around the panel. What I learned in hindsight is that this panel is the only thing holding up the rear of the car. More on that later. So I bought some fresh cut off disks and got right to work.


After about 30 mins of carefully cutting off the rear panel, this is when I realized that it is the main support for the rear of the car. In a panic I quickly got it all removed, and the new panel in place and clamped with multiple vice grips.


I grabbed some really nice weld-through primer at my local auto paint store. They recommended this over the copper weld as they said the body guys love this now because it gives great coverage and is half the cost. Figured they would be the best guys to learn from so I grabbed two cans. Also some Trim black paint for the firewall when I get to that point.


There was some fitment required to get that new panel to fit nice and tightly to the rest of the panels. Once I was happy with the fitment I got the fronts and backs all painted with the weld-through primer.


I was able to get the screws that had rusted off long ago removed so I could fit up these hinge covers. I need to clean it all up with a flap disk, but for now it's ugly and the covers fit nicely. I'll clean them up later after the support panel is welded back in.


Then I coated the support panel to get it all fit up.


At this point, I was happy with the rear support panel fitment against the body. But after I rebuilt the rear hinges with the new panel in place, I tried to re-fit the rear tailgate without success. Whatever I did the tailgate was still tight at the top left, and loose bottom right just the same as when I bought the car. It then dawned on me that the rear of the car had possibly shifted when they previously installed those big wheel tubs. This is a picture of the tailgate fitment when I bought the car. It was actually touching and overlapping at the top left side.


So what I did was with the tailgate in place, I left the support panel clamped to the body and unclamped it from the body mount supports. The rear of the car could be shifted a bit left and right. I pushed it towards the passenger side about 3/8" and to my surprise the tailgate fit almost perfect. Definitely within the factory tolerances back in 1955. I couldn't believe it was really that simple. Before I did this, I also checked the body vs. the frame alignment. Best I could do was a frame to pinch weld and it came up that the body was shifted about 1/2" to the passenger side.


With that problem solved, I attempted to center the body on the frame, but wasn't able to with my current toolset. So instead I made sure that the rear body mount supports were both shifted to the passenger side, and matched the rest of the body. That way when it's centered, the rear mounts will be too. Time to weld it back together!


My new Everlast welder does a good job. I still need to dial in the settings, but that had solid penetration on both panels.


I'm very happy to get rid of that wooden support and have the body being supported by the mounts again. I measured many times during the process as well as taped around the board top and bottom to ensure that it hadn't moved. Next up, parts updates!

1976 Trans Am LS1 and much more...SOLD
1968 Camaro LSA, T56 Magnum, and much more...SOLD

Current Project: 1955 Nomad LC9, 4L80e, C5 brakes and etc...

ryeguy2006a

  • Oracle Forum Member
  • *
  • Posts: 6040
Re: Madaguy 1955 Nomad Build
« Reply #53 on: March 13, 2023, 08:42:22 AM »
I'm always on the look for parts and came to realize that the M-Parallel wheels that I bought just don't go with the style on this car. So I posted them online and was able to sell them and then picked up a set of Boyd Coddington wheels that need some polishing. They are double staggered 17x8 fronts and 18x9 rears. Really happy with this style. They need new tires that are a much larger diameter, but otherwise love the style. I'm going to try to get away with using the tires that are on it at least for a little bit. Probably not though since I  change my mind frequently haha.


Next up was probably the best deal that I'll get on this car. I saw an ad for a pair of front grills that weren't in great shape, but came with the trim that goes around the opening which I didn't have. I chatted with the guy a bit and he said that he had some Nomad parts in his attic. So I went that next morning to see what he had. When I got there he had some side and rear windows that were in good shape that also had some trim I didn't know I was missing and the side window latches. Perfect! I also mentioned to him that I was missing the interior window garnish moldings and he said that he thought he had them, but wasn't sure where they were. So after building a little rapport with the guy, I joked that I would be willing to go up and look if he didn't mind even though he didn't know me from Adam. To my surprise he said yes, so up I went. It was actually very well lit, and after about 5 mins I saw them. I was stoked, but then my heart sank because I didn't know what he was going to ask for them so I asked him. He said he wasn't sure, so I said, How's $100 bucks and to my great surprise he said yes! If you don't know, take a minute and search Nomad Garnish Mouldings on eBay. I almost felt guilty buying them for that price, but so happy to have them. :woot: Sometimes you just have to ask!

Here they are!


Got home and saw this tucked in-between the bundle of moldings. Wonder what shop these came from?


Here's the other parts I got too. I couldn't stop smiling the whole way home.


Then before I left we were talking and he said that he had a bunch of emblems he wasn't going to ever use and that I could have them if I wanted. Yes Sir!


Now that the rear support panel is final welded in, I was looking at what my next steps were. I needed to weld the middle support back in and squared up with body. After looking at that panel a bit, it was too rusty for re-installation. The good news is that the 9 passenger cargo/floor panel that I cut out had one that was in fantastic shape. So, broke out the spot weld driller again. It took me about an hour to get it all broken loose, plus I like re-using original metal vs. buying a new one.


This panel is in really good shape, just needs to be cleaned up before I weld it in the car. It's hard to believe this car sat in a field for 40 years!


That brings the build up to date. Hoping to get the inner panels cleaned up so that the inner wheel wells can be re-installed very soon. I can't wait to test fit the rear seat!

Cheers,
Ryan

1976 Trans Am LS1 and much more...SOLD
1968 Camaro LSA, T56 Magnum, and much more...SOLD

Current Project: 1955 Nomad LC9, 4L80e, C5 brakes and etc...

roadking77

  • Oracle Forum Member
  • *
  • Posts: 13245
Re: Madaguy 1955 Nomad Build
« Reply #54 on: March 13, 2023, 08:47:00 AM »
Excellent!  I think I like the cut out the bad stuff and weld in new about as much as anything. I suppose that comes with the territory of me restoring houses for the last 40 years. Seeing the work you are doing has me itching to get my next project started. Yours looks like your starting with new compared to mine, LOL.
Finished!
77 T/A - I will Call this one DONE!
79 TATA 4sp-Next Project?
79 TATA - Lost to Fire!
86 Grand Prix - Sold
85 T/A - Sold
85 Fiero - Sold
82 Firebird - Sold
'38-CZ 250
'39-BSA Gold Star
'49-Triumph 350
'52-Ariel Red Hunter
'66-BSA Lightning
'01-HD RoadKing

Re: Madaguy 1955 Nomad Build
« Reply #54 on: March 13, 2023, 08:47:00 AM »

FormTA

  • Oracle Forum Member
  • *
  • Posts: 5574
  • Life is short, have fun, Drive a T/A
Re: Madaguy 1955 Nomad Build
« Reply #55 on: March 13, 2023, 10:37:36 AM »
That is how it used to be done. Word of mouth and meeting over a common interest. One guy wants to help the other out an both get something out of the deal. No one really in it for the money. That's how i got a 69 road runner for $200. Great scores man!
« Last Edit: March 13, 2023, 10:40:35 AM by FormTA »
79 Trans am low buck LS swapped
79 Formula 301 (Work in progress)
67 RS Camaro (waiting it's turn)
69 Dodge charger on late model charger chassis
49 Ford F1 on a 2003 Chevy ZR2 Chassis (current project)
Names, Luke. If I hear anyone telling me they're my father....

rkellerjr

  • Oracle Forum Member
  • *
  • Posts: 6721
  • When you turn your car on does it return the favor
Re: Madaguy 1955 Nomad Build
« Reply #56 on: March 14, 2023, 07:42:00 AM »
Wow, just wow.

5th T/A

  • Oracle Forum Member
  • *
  • Posts: 1394
Re: Madaguy 1955 Nomad Build
« Reply #57 on: March 14, 2023, 09:52:50 AM »
Your skills and ambition are blowing me away.

 I good friend used to say a coat of paint hides a multitude of sin. I guess you could add Bondo to that.
1980 T/A with a Pontiac 461

Gone but not forgotten;
1973 T/A 455
1975 T/A 400
1978 T/A W72
1982 T/A cross fire injected

Two wheel toys;
2014 Harley Ultra Classic Limited
2013 Honda CB1100
2010 Yamaha Vmax
1982 Yamaha Seca 750

ryeguy2006a

  • Oracle Forum Member
  • *
  • Posts: 6040
Re: Madaguy 1955 Nomad Build
« Reply #58 on: March 15, 2023, 10:25:58 AM »
Thanks guys! I'm hoping to get all the panels mocked by this weekend. Will be nice to not see the ground through the floor plans...


1976 Trans Am LS1 and much more...SOLD
1968 Camaro LSA, T56 Magnum, and much more...SOLD

Current Project: 1955 Nomad LC9, 4L80e, C5 brakes and etc...

ryeguy2006a

  • Oracle Forum Member
  • *
  • Posts: 6040
Re: Madaguy 1955 Nomad Build
« Reply #59 on: March 15, 2023, 10:28:47 AM »
Rich, hopefully we can meet up sometime this year at the Richmond Cars and Coffee. Hopefully I have my Nomad there too!

1976 Trans Am LS1 and much more...SOLD
1968 Camaro LSA, T56 Magnum, and much more...SOLD

Current Project: 1955 Nomad LC9, 4L80e, C5 brakes and etc...

rkellerjr

  • Oracle Forum Member
  • *
  • Posts: 6721
  • When you turn your car on does it return the favor
Re: Madaguy 1955 Nomad Build
« Reply #60 on: March 15, 2023, 10:52:56 AM »
Rich, hopefully we can meet up sometime this year at the Richmond Cars and Coffee. Hopefully I have my Nomad there too!

Sounds like a plan!

kentucky yeti

  • Jedi Council
  • Oracle Forum Member
  • *
  • Posts: 13363
  • located in western Ky
Re: Madaguy 1955 Nomad Build
« Reply #61 on: March 16, 2023, 06:25:30 AM »
Working on this house causes me to get behind on some of the threads here, like the projects threads.  Once again, your talent amazes me!
Mike (aka Yeti)

1977 Y82 W72 Auto
2015 F-150 Lariat 4x4 (twin turbo)
2016 Explorer Limited
2012 Mustang

ryeguy2006a

  • Oracle Forum Member
  • *
  • Posts: 6040
Re: Madaguy 1955 Nomad Build
« Reply #62 on: March 20, 2023, 11:16:49 AM »
All the work over the last several weeks getting the rear brace cut out and replaced has led up to the fitment stage which I have been looking forward to for so long. I've seen many shops these days use sheet metal screws instead of clecos, so I decided that I'd give them a shot. I started off by getting the driver's side wheel well in place, and the rear floor section. I made sure to offset the rear floor body mounts to the passenger side to copy the rest of the body mounts. With the new body mounts installed, (Thanks Zanie) and shifted all the way over to the passenger side, the wheel well lined up perfectly. So I got out a box of screws and went to town zipping them in every few inches, and it worked so nicely. Pulls the metal up tight to the body and will only leave a small hole when I remove them. I still have a bunch of metal that needs to be trimmed off this panel, but I'm very pleased with how it is fitting. There are also a few  spots that are pitted badly that I'll need to cut out, but I'll do that after the majority of the panel is welded in.


Next, I was able to get out the new cargo panel and do a real test fit. I was super excited because it dropped right in place which tells me that I'm right on the money! Always nice when a plan comes together. I found out that again, the 9 passenger wagon cargo panel is just a little bit different. It didn't have two little dips in the brace for the gas tank, so it's not going to work without some modifications, so I'll leave that for another day. Threw in the crusty one just to get everything mocked up.


Next I pulled out the passenger side wheel well, and got it trimmed up for installation. I copied what I did on the driver's side to make things easy. Once that rear upper section was cut out, I had to trim the back slightly and it went right in. Held it in place with sheet metal screws and it really almost fell into place. Very happy with how everything is fitting up. Not sure if it's because they are original parts, or what but I'm not complaining. All the work to get them cut out and trimmed up has really paid off.


The daylight showing from the underside is quickly shrinking! The passenger side wheel well piece will need to be fabricated as it was cut out before I got the panel. I bought a shrinker/stretcher kit from harbor freight so I should be able to knock those out pretty quickly. What's most important to me is how nicely the wheel wells are fitting up to the outer wheel wells, inner structures, cargo area and rear floor pans. Now that it's all fit up I can leave the panels in place and build all my patch panels now that I know it all fits so nicely.


And here's the shot I've been waiting so long to see. It's really coming together nicely, but now that 80/20 rule kicks in. All the little details, patch panels and etc are what is going to take up the majority of the time before I can final weld them in. Hoping that I can put in a few minutes here and there over the next several weeks and get it all welded together.


1976 Trans Am LS1 and much more...SOLD
1968 Camaro LSA, T56 Magnum, and much more...SOLD

Current Project: 1955 Nomad LC9, 4L80e, C5 brakes and etc...

FormTA

  • Oracle Forum Member
  • *
  • Posts: 5574
  • Life is short, have fun, Drive a T/A
Re: Madaguy 1955 Nomad Build
« Reply #63 on: March 20, 2023, 12:01:25 PM »
Looking good Ryan! I have always used sheet screws but I placed an order for cleco the other day. I thought I would try them out as it doesn't distort the metal. I don't know, maybe I'll go back to screws but I thought I would try them as I see a bunch of guy using them.

Anyway, glad you are moving forward and making progress with your ride!
79 Trans am low buck LS swapped
79 Formula 301 (Work in progress)
67 RS Camaro (waiting it's turn)
69 Dodge charger on late model charger chassis
49 Ford F1 on a 2003 Chevy ZR2 Chassis (current project)
Names, Luke. If I hear anyone telling me they're my father....

roadking77

  • Oracle Forum Member
  • *
  • Posts: 13245
Re: Madaguy 1955 Nomad Build
« Reply #64 on: March 20, 2023, 03:53:22 PM »
Being a carpenter that has spent more than my share of time screwing together metal framing, screws are all I have used when doing patch work. After they're out, a quick hit with the mig and they disappear.
Finished!
77 T/A - I will Call this one DONE!
79 TATA 4sp-Next Project?
79 TATA - Lost to Fire!
86 Grand Prix - Sold
85 T/A - Sold
85 Fiero - Sold
82 Firebird - Sold
'38-CZ 250
'39-BSA Gold Star
'49-Triumph 350
'52-Ariel Red Hunter
'66-BSA Lightning
'01-HD RoadKing

Re: Madaguy 1955 Nomad Build
« Reply #64 on: March 20, 2023, 03:53:22 PM »

ryeguy2006a

  • Oracle Forum Member
  • *
  • Posts: 6040
Re: Madaguy 1955 Nomad Build
« Reply #65 on: April 03, 2023, 12:31:06 PM »
I wasn't able to get anything done last weekend as my parents came down to visit from NY. I was able to get a little done through the week last week and this past weekend. The biggest thing was getting the car cleaned up and cleaned out in the interior to start work on welding in the panels. I had been sweeping all the dust, rust and little pieces of metal and body filler into a pile under the car. I was pretty shocked when I saw how large that pile was. About 3' in diameter!


I got the car centered up and up on my tried and true wheel stands. I built these over 10 years ago when I was building my first car and have kept them around as they come in handy.

After I bought the Boyd Coddington wheels, I had been going back and forth with them because they were going to need a lot of elbow grease to bring the shine back, needs 4 new tires and the fronts may or may not be able to fit the C5 front brakes. But I bought one of those powerball polishers and wanted to give it a go. It turned out decent for just a little polishing with a red scuff pad and about 10 minutes with a powerball. There were some stubborn "dots" that weren't coming out so I'm not sure exactly what do with that situation.


Well this morning on my way to drop off my son to a spring break camp, I saw a set of what looked like enlarged rally wheels on the side of the road. I turned around and they were Vision 55 wheels in 17x8" and 18x8.5" with good tires. I called the guy and couldn't believe when he said $400 for the set. I couldn't get to the ATM and back quick enough. When I got home I confirmed that not only will the C6 base brakes fit, but the Z51 brakes should also work with a small spacer or grinding on the caliper. I really love the way that they look and are very period correct. They were off of a truck, so they have 27" tires which work perfectly in my wheel wells. Couldn't be happier as these were a set of wheels that I had originally considered if I couldn't find any used.


Love the way they fill out the wheel wells, just needs to be lowered slightly in the front and rear. 


I have also been considering my options for gauges, and I'm going to attempt to retrofit this 99 Buick LeSabre speedometer into my stock dash cluster. The sweep is very close the 55-56, and it should have the same 4k PPM signal that I'd need from the transmission. I tore it apart and am trying to figure out how to get it all to work together.


Once my younger son woke up from nap, I was able to get the jig saw and grinder out so that I can start butt welding the rear floor pan section to the existing floor pan. It took a while to get the rhythm, but once I did, it started going pretty quickly. Had to stop for for Sunday dinner, but I'll hopefully get to plug away at it a few minutes here and there throughout the week. There are a few spots that have deeper pits, so the plan is to get the panel tacked in along the entire perimeter, then go back and cut out the bad spots and replace with good solid metal. That hopefully reduces the amount that the panel is distorted.


Another thing that is very common with Nomad's is that the rear lift gate can become distorted and twisted over time due to the torsion rods that help assist with lifting it. Mine is twisted, but not nearly as bad as some that I've seen online. So the best thing that can be done at this point is to remove the rods. I talked with the owner of Mad Mooks who is one of the few go to guys for repairing the liftgates, and he suggested just cutting out the rods. They are such problem that they aren't really worth anything, so that's what I did. I noticed that for some reason I wasn't able to lift the gate up past about level with the roof, but it should lift much higher. Well it was the rods that were holding it back.


Now it lifts all the way up! They make gas struts, but the liftgate really isn't that heavy so I'm not going to worry about it.


Cheers,
Ryan

1976 Trans Am LS1 and much more...SOLD
1968 Camaro LSA, T56 Magnum, and much more...SOLD

Current Project: 1955 Nomad LC9, 4L80e, C5 brakes and etc...

5th T/A

  • Oracle Forum Member
  • *
  • Posts: 1394
Re: Madaguy 1955 Nomad Build
« Reply #66 on: April 03, 2023, 03:04:48 PM »
You are certainly an ambitious man. Nice find on the "Rally Wheels". Not that my opinion counts for anything, but I like they look much better.
1980 T/A with a Pontiac 461

Gone but not forgotten;
1973 T/A 455
1975 T/A 400
1978 T/A W72
1982 T/A cross fire injected

Two wheel toys;
2014 Harley Ultra Classic Limited
2013 Honda CB1100
2010 Yamaha Vmax
1982 Yamaha Seca 750

ryeguy2006a

  • Oracle Forum Member
  • *
  • Posts: 6040
Re: Madaguy 1955 Nomad Build
« Reply #67 on: April 17, 2023, 09:50:19 AM »
Slow and steady I'm making progress. I was able to get the rest of the rear floor section butt welded together.


I ground down the spot welds then used a body hammer and dolly to level out the two panels to make for a flatter butt weld. Then I sprayed some black paint down because I was sick of looking at that rusty piece. I was able to get it fully welded and ready to install some patch panels.


I started to mock up the repair for the side of the floor that was cut off, but I realized that before I could build that piece I needed to repair the wheel well and inner structure prepped for welding. I used the original intact lower section as a template for the new piece.


Then the upper panel. Rinse and repeat.


Before I pulled off the mocked up wheel well, I marked it for the rusted inner section that I needed to cut out. I then cut out the section, drilled spot welds and then used my dolly and hammer to straighten out the flange.


I cleaned up this section and it's solid right above that rusty lower section and I've got a good upper piece that will give a clean solid repair for. Was glad that there wasn't anything crazy with this panel other than someone spread a layer of body filler over the tar undercoating


I put the wheel well back on as a test fit and I'm very pleased with how it's all lining up. Just needs a little trimming and it will make a very clean repair.


Then another bad/good news situation. As I was grinding the inner structure to prep it for welding, I found some other bad repairs with body filler... I cut it all out and bought new panels to replace. The good news is that was the last of the bad repairs and it was all solid clean metal around it. I couldn't really go any further though since I have to wait for those panels to come in. I also ordered a new front wheel house section as these were in pretty bad shape as well.


I sold the motor and transmission to my friend Kerry a while back, but I held onto it for a while until we could arrange to meet up. I just left it installed in the car since it was pretty happy there and took up less floor space that way. Well I'm meeting him at Spring Carlisle next Saturday and that meant that I needed to get it out of the car. Really wasn't too bad as there wasn't that much holding it in the car. Just a few wires, hoses and bolts. I only had to remove the core support and radiator and then it cleared the grill. I forget how much iron block/head engines are! I'm definitely going to need to get new coils and/or cut a coil out to lower the front with the all aluminum engine going back in.


My new panels should be in today so I'm hoping to get them test fit and get them installed this week. I'd much rather be doing electrical or mechanical work over the body work. But thankfully it's just floor pan work and not exterior body work where I need to sand and prep panels. Things should go much quicker when I can just spot weld rather than butt welding.

Cheers,
Ryan

1976 Trans Am LS1 and much more...SOLD
1968 Camaro LSA, T56 Magnum, and much more...SOLD

Current Project: 1955 Nomad LC9, 4L80e, C5 brakes and etc...

MNBob

  • Oracle Forum Member
  • *
  • Posts: 2018
Re: Madaguy 1955 Nomad Build
« Reply #68 on: April 17, 2023, 10:32:29 AM »
A wagon is a ride with utility, a great way to go!  You have already accomplished a lot on the patching (and measuring).  Just getting that rear gate back in was a real milestone.
1979 TATA Extreme TKO .64
Hedman elite; Pypes 2.5; Borla XS; MSD 6A; Performer intake; open scoop; Sniper QJ;  110 Amp Alt; 4 core radiator/Mark VIII fan; RobbMc mini starter; subframe connectors; solid body mounts; fiberglass rear springs; poly sway bar and link bushings; 81 master; D52’s; Blazer disks; 225/60 & 235/60 17's TrueContact's; relays for PW, PDL, lights; keyless entry

ryeguy2006a

  • Oracle Forum Member
  • *
  • Posts: 6040
Re: Madaguy 1955 Nomad Build
« Reply #69 on: April 24, 2023, 09:54:46 AM »
Well after I was left with this large hole, I needed to find a way to fill it. I had started to make my own replacement panel, but I didn't have a proper metal brake so the panels turned out so so. Got to looking online and a guy actually makes a piece and sells them on trifive.com and eBay. So I grabbed two and they were just what I needed and they fit perfectly. Plus it came with the curved piece for the door jamb that would have been very difficult for me to create from scratch.


I got it all mocked up and the inner panel trimmed up on the car.


The panel was short by about 4.5" so I got a new piece and roughly cut it to fit, then installed it, used a sharpie to trace the hole outline, and then trimmed the panel to fit the contours.


Got the piece welded together and extended. Here's the last test fit before final welding.


That's as far as I got building the panel last week. I always try to go to the Spring Carlisle event as a kick off for spring. Great show and I love checking out the swap meet. I can usually pick up a bunch of good parts.


I had been communicating with a vendor Jay Hammond who has a huge supply of tri five parts. What caught my eye was a complete set of 1955 Nomad door panels he had with ALL trim including the 6 1955 only waffle pieces! The door panels were also in very good condition for being originals. I've got a plan for those as they do need to be reinforced and some TLC before they can be installed. More on that later.


Here's a close up of the waffle panel. It's a really cool pattern that is unique 1955 Nomad's only. Pretty happy to get my hands on a really good condition set of originals. They will polish up really nicely.


I also found that the 50's tech that they used was very fascinating. It's literally a nail spot welded to the trim!


I also found two pairs of coil packs for $30 bucks! Not sure which set I'm going to use, but I'm leaning towards the heat sync pair. The other set didn't come with the coil bracket, but are LS1 style.


Not sure what it came off of, but I also found this nice looking transmission cooler. It's made by Long and it appears to be really nice quality. I think that should be good enough to cool the 4l80e. I'll flush it before I use it to make sure that it's not full of junk.


Last thing I found was an electric wiper motor. For those that aren't aware, most tri five's came with vacuum powered wiper motors. The guy I bought the motor from wasn't sure if it worked, but when I got it home and bench tested it, it turned right on and operated very quiet and smooth. Very happy about that.


I had a great time and talked to a lot of great tri five vendors. I learned a lot about the differences between the years and how so many of the parts have very small variances between years. I'm hoping to get the lower patch panel welded together this week and get the wheel wells buttoned up soon.

Cheers,
Ryan

1976 Trans Am LS1 and much more...SOLD
1968 Camaro LSA, T56 Magnum, and much more...SOLD

Current Project: 1955 Nomad LC9, 4L80e, C5 brakes and etc...

ryeguy2006a

  • Oracle Forum Member
  • *
  • Posts: 6040
Re: Madaguy 1955 Nomad Build
« Reply #70 on: May 02, 2023, 10:23:25 AM »
I was able to get the inner panel patched up and a final weld done. I still need to knock down the welds then coat the entire inside of the panel. Now that this panel is welded in, I can get the rear floor pan patch panel made and welded in. I had my wire feed up a little to high on the spot welds, but they are all solid with penetration.


Then I turned my attention to the driver's side, with a very similar bad repair. It was the same style where they crudely threw a panel over the existing rust. You can see through that access hole where the panel was put over the original metal. No prep or seam sealer was used so the rust was left to thrive. Glad I caught it when I did. That inside panel went up to the red line...


For some reason when the floor was installed, they cut the rear flange off where it meets the lower pillar section. So I'm re-creating this panel so I have something to spot weld to. Needed to seek the help from a professional for this one though.


Once I get these panels welded I'll resume my work on the wheel wells and rear floor sections. I can't wait for the metal work to be over...

Seems to be a common theme here, but I have a really exciting parts update! I had been searching all around with vendors and even used, but came across a few Terminator X Max kits for sale at Summit. I wasn't sure if it was true or not, but they showed 4 550-933 in stock, so I bought one. Was very surprised when this showed up a few days later!! It was everything I needed other than the wrong injectors for me, but I had a buddy who had an EV6 set and we were able to swap, so it was a win win for both of us.


Then I was on FB marketplace and found a guy locally who was parting out a wrecked 2011 CTS-V. He still had the fuel pump assembly and got that for a really good price! Only had 66k miles on it.


I also was able to find a good used set of C5 Brake calipers with mounting brackets. They aren't in the best shape, but are good enough for what I need. I know the calipers are the same, but they are off of a real Z06, so they are factory powder coated red. I got a rebuild kit for them, Kore3 brackets, EBC Red pads, and will be ordering a new pair of rotors soon. I also picked up a pair of 66 Impala brake hubs which will give me a tapered roller bearing upgrade for my factory spindle. I'll need to turn the diameter down to work with the C5 rotors, but otherwise it's a very budget friendly big brake upgrade. Should work nicely with my Tesla Model S brake booster assembly too.


Hopefully I'll knock out some more metal work in the next few days. Only way to eat an elephant is one bite at a time...

Cheers,
Ryan

1976 Trans Am LS1 and much more...SOLD
1968 Camaro LSA, T56 Magnum, and much more...SOLD

Current Project: 1955 Nomad LC9, 4L80e, C5 brakes and etc...

5th T/A

  • Oracle Forum Member
  • *
  • Posts: 1394
Re: Madaguy 1955 Nomad Build
« Reply #71 on: May 02, 2023, 01:32:31 PM »
Ryan, I can’t imagine taking on a project of this magnitude. Certainly your sheet metal and fabrication skills are a plus. Also it seems you are really good at finding parts for this Nomad, I don’t know how you find this stuff. Great that your little guy is helping you out.
1980 T/A with a Pontiac 461

Gone but not forgotten;
1973 T/A 455
1975 T/A 400
1978 T/A W72
1982 T/A cross fire injected

Two wheel toys;
2014 Harley Ultra Classic Limited
2013 Honda CB1100
2010 Yamaha Vmax
1982 Yamaha Seca 750

roadking77

  • Oracle Forum Member
  • *
  • Posts: 13245
Re: Madaguy 1955 Nomad Build
« Reply #72 on: May 03, 2023, 06:06:14 AM »
Ryan, It may have been said here before, but I like how you take an 'old school' hot rodding approach to building this and even the previous Camaro. Your way of finding parts through swap meets, fb and word of mouth. Getting good deals on the stuff you find etc. Doing the research to find what is compatible with what. You truly have a gift when it comes to building a car. I believe you could run a successful shop with you being the brains and having a couple of guys putting stuff together.
Finished!
77 T/A - I will Call this one DONE!
79 TATA 4sp-Next Project?
79 TATA - Lost to Fire!
86 Grand Prix - Sold
85 T/A - Sold
85 Fiero - Sold
82 Firebird - Sold
'38-CZ 250
'39-BSA Gold Star
'49-Triumph 350
'52-Ariel Red Hunter
'66-BSA Lightning
'01-HD RoadKing

ryeguy2006a

  • Oracle Forum Member
  • *
  • Posts: 6040
Re: Madaguy 1955 Nomad Build
« Reply #73 on: May 03, 2023, 07:45:17 AM »
Ryan, I can’t imagine taking on a project of this magnitude. Certainly your sheet metal and fabrication skills are a plus. Also it seems you are really good at finding parts for this Nomad, I don’t know how you find this stuff. Great that your little guy is helping you out.

Thank you, that means a lot. I've been doing it a long time and I've always been around people doing metal work like my Dad. I spend more hours looking for parts and researching than I do working on the car. I also find myself thinking about how I'll build whatever the next task I need to do in my mind. I'll do that probably a dozen times before I actually get the tools out. I think I have a problem haha :shock:

Ryan, It may have been said here before, but I like how you take an 'old school' hot rodding approach to building this and even the previous Camaro. Your way of finding parts through swap meets, fb and word of mouth. Getting good deals on the stuff you find etc. Doing the research to find what is compatible with what. You truly have a gift when it comes to building a car. I believe you could run a successful shop with you being the brains and having a couple of guys putting stuff together.

Thanks Kerry, I'm so glad that you recognize the theme that I'm generally going for. With all the parts that you can buy out there online, it's so easy to just add parts to the cart and buy them. But I'm constantly on a budget, and not in a position that where I can whip out my wallet so I'm constantly on the hunt for good deals. And many times it's to my own detriment because I'll almost always find good deals when I'm looking... I love going to swap meets and junk yards to hunt down the parts that I need. I also love finding something that is underpriced and getting a deal. 

I'd be lying if I didn't think about starting my own business to build cars, but I'm not at a point where I could make an honest go at it. Once I get my Nomad running/driving, I'm going to keep an eye out for a cheaper car that I can buy, fix and sell as a test. If I can get good at it, I may try and churn out cars as a side hustle. If it gets successful, I may go all in. Although ChatGPT says that hot rods will be banned in 2045, so maybe that's a bad idea haha :?


1976 Trans Am LS1 and much more...SOLD
1968 Camaro LSA, T56 Magnum, and much more...SOLD

Current Project: 1955 Nomad LC9, 4L80e, C5 brakes and etc...

jonathonar89

  • Oracle Forum Member
  • *
  • Posts: 2508
    • Mark's Cars Inc.
Re: Madaguy 1955 Nomad Build
« Reply #74 on: May 03, 2023, 09:44:39 PM »
You will be great at flipping rides if you go for it.  You have great skills financially, mechanically and you’re motivated.
Mark's Cars Inc.

https://markscarsinc.com

ryeguy2006a

  • Oracle Forum Member
  • *
  • Posts: 6040
Re: Madaguy 1955 Nomad Build
« Reply #75 on: May 08, 2023, 07:51:15 AM »
Here's another tedious and boring metal working update. I continued on adding a flange to the rear floor plan section for whatever strange reason the previous person working on the car cut off. I got it trimmed down and fit up so that I could spot weld the new lower panel to it.


As I was test fitting the panel, I noticed something off about the rocker panel and as I hit it with the wire wheel I found another bad repair covered with body filler. That rusty piece was tack welded into place with no prep (weld through primer) and then smoothed over with body filler. Prime spot for rust to thrive...


Whipped up this cardboard template pretty quickly and then transferred it to steel. Lots of bending, trimming and tweaking before it fit really nice.


Before I welded it in, the back of the panel was coated in weld through primer. Carefully tacked it all in and tapped it back into place as I was going.


Then I decided it would be a good idea to get the flange and lower panel mocked up before I final welded the panel in place. It's always a good idea to do that so that you aren't surprised later on with bad news if it doesn't fit. It only took about 5 extra minutes, but could have saved me hours later down the road. I also coated both sides of the flange piece with the weld through primer.


Once it all fit together really nicely, I burned it all in and hit it with a flap disk. Once I'm done welding I'm going to go back through and coat the back sides of where I welded the panels with some oil based brush on paint. Where the rocker panel meets the panel I repaired will be addressed at another time. It's not perfect, but way better than before.


Now, I can get back to the repair on the lower interior panel. I used my wire wheel to clean off all of the body filler that was left over so that I could make good clean welds on the new panels. I got busy welding and working along and didn't get any pictures of the progress. I discovered that there weren't as many spot welds as I would like on the braces under the floor pans as well as some undesirable gaps so I worked on locating them from the underside with self tapping screws, then drilling some holes in the sheet metal from the top.


Now that the lower interior panel is repaired, I could get a good and true mock up of the panels. Everything is fitting together really well. Now I need to make some patches on the inner wheel wells and a small patch on the rear floor pan section that is missing.


Then I needed to remove the section all the way up to the window channel. The flange is pretty solid, but unfortunately I did find some rust that was through on the outer section of the window channel. I'll have to remove the rear windows to fix that panel.


Next task at hand was figuring out what to do about this little pass through panel that also acts as a brace for the outer front wheel house. That is what attaches the upper window channel to the outer wheel house. Mine were in pretty bad shape, and with some brand new front outer wheel houses, I wasn't going to re-use those crusty pieces. They are not reproduced, so I'm left to fabricate them.


Not too bad for some hand tools and cardboard.


Next up was getting the outer wheel houses prepped for installation. I got the ends sprayed with weld through primer, and the middle section sprayed with an etching primer.


That was as far as I got on Saturday. Some more parts came in and then I'll be able to start actually installing some of these panels!

First up was getting the outer wheel well seals. They need to be glued onto the outer wheel houses, and then can be installed once dried.


I also received my 61-68 full sized drum hubs which is an upgrade for earlier cars to a tapered roller bearing. These will be used for when I upgrade to my big front brakes. They need to be turned down to accept the C5 rotors, and install new bearings/longer wheel studs.


Also my buddy Ian helped me out big time and had an EV6 injector harness that he traded me for the EV1 harness that came with my Terminator X Max kit. After talking with him, he also had a Vaporworx fuel pump ring! Thanks again man.


Lastly, I found a guy selling a brand new Holley Transmission harness a big discount since he wasn't able to use it. That is the last piece that I needed for my wiring, so I should be all good to go when it comes to that point.


I need to keep my head down now and get some work done on cargo area of my car and let my wallet cool down. I should have all of the sheet metal I need now, so I just need to keep plugging away whenever I have a few minutes to do something. Really motivated to get this car back together.

Cheers,
Ryan

1976 Trans Am LS1 and much more...SOLD
1968 Camaro LSA, T56 Magnum, and much more...SOLD

Current Project: 1955 Nomad LC9, 4L80e, C5 brakes and etc...

5th T/A

  • Oracle Forum Member
  • *
  • Posts: 1394
Re: Madaguy 1955 Nomad Build
« Reply #76 on: May 08, 2023, 11:31:10 AM »
I can't argue that it looks like a lot of tedious hard work. I have to believe you are getting satisfaction out of transforming rust holes into solid Sheetmetal. I'm impressed!
1980 T/A with a Pontiac 461

Gone but not forgotten;
1973 T/A 455
1975 T/A 400
1978 T/A W72
1982 T/A cross fire injected

Two wheel toys;
2014 Harley Ultra Classic Limited
2013 Honda CB1100
2010 Yamaha Vmax
1982 Yamaha Seca 750

roadking77

  • Oracle Forum Member
  • *
  • Posts: 13245
Re: Madaguy 1955 Nomad Build
« Reply #77 on: May 08, 2023, 01:13:56 PM »
Do you have a shrinker/stretcher for the metal. If not you may want to look into one. I almost bought one when I was doing the 77 and after spending way too much time fabbing stuff wish that I had. I plan on getting one when the next project starts as I believe I will have a bit of metal work to do, LOL. Mine makes your car look like a rust free car from the desert :shock: A small break will be nice as well. I have a large one for doing house aluminum which is rarely done now, but its not built for sheet steel.
I enjoy doing the metal work, taking a rusty hole and patching back to new, but after awhile like you know all too well, enough is enough.
Finished!
77 T/A - I will Call this one DONE!
79 TATA 4sp-Next Project?
79 TATA - Lost to Fire!
86 Grand Prix - Sold
85 T/A - Sold
85 Fiero - Sold
82 Firebird - Sold
'38-CZ 250
'39-BSA Gold Star
'49-Triumph 350
'52-Ariel Red Hunter
'66-BSA Lightning
'01-HD RoadKing

ryeguy2006a

  • Oracle Forum Member
  • *
  • Posts: 6040
Re: Madaguy 1955 Nomad Build
« Reply #78 on: May 09, 2023, 06:19:26 AM »
I think what has frustrated me most on this car is the amount of repairs that were covered up with body filler. When I thought I had found it all, I run into other poor repairs. I think that I've found all of the repairs that have been covered up at this point, so I know in my mind the total amount left to do. That timeline kept getting pushed out and then I had to re-strategize. I like to have parts in advance of when I need them, so when I find a bad outer wheel house for example, it takes time to research the best price and get it shipped to me.

Kerry, I do have a shrinker/stretcher but haven't found a need to open them up yet. I could have used them for the pass through panels that I made, but didn't feel like getting them out haha.

1976 Trans Am LS1 and much more...SOLD
1968 Camaro LSA, T56 Magnum, and much more...SOLD

Current Project: 1955 Nomad LC9, 4L80e, C5 brakes and etc...

FormTA

  • Oracle Forum Member
  • *
  • Posts: 5574
  • Life is short, have fun, Drive a T/A
Re: Madaguy 1955 Nomad Build
« Reply #79 on: May 09, 2023, 08:24:53 AM »
Great work Ryan! I finally made a stand for my shrinker/stretcher and converted them to foot operation.  I also just purchased an English wheel and I'm currently on the hunt for a bead roller. I figured since there are not many reproduction panels for my 49 truck I'll have to make a bunch. I've always been really good with sheet metal and fabbing pieces like you did by hand but having the right tools should speed things up.

Anyways, it's nice to see a great update on your car. Thanks for posting!
79 Trans am low buck LS swapped
79 Formula 301 (Work in progress)
67 RS Camaro (waiting it's turn)
69 Dodge charger on late model charger chassis
49 Ford F1 on a 2003 Chevy ZR2 Chassis (current project)
Names, Luke. If I hear anyone telling me they're my father....

Re: Madaguy 1955 Nomad Build
« Reply #79 on: May 09, 2023, 08:24:53 AM »
You can help support TAC!