Author Topic: Madaguy 1955 Nomad Build  (Read 17248 times)

ryeguy2006a

  • Oracle Forum Member
  • *
  • Posts: 6043
Re: Madaguy 1955 Nomad Build
« Reply #120 on: August 14, 2023, 09:06:13 AM »
Thanks Willie! That's a really cool magazine. Dated 1980 too!

Thanks! I'm having a lot of fun building this car.

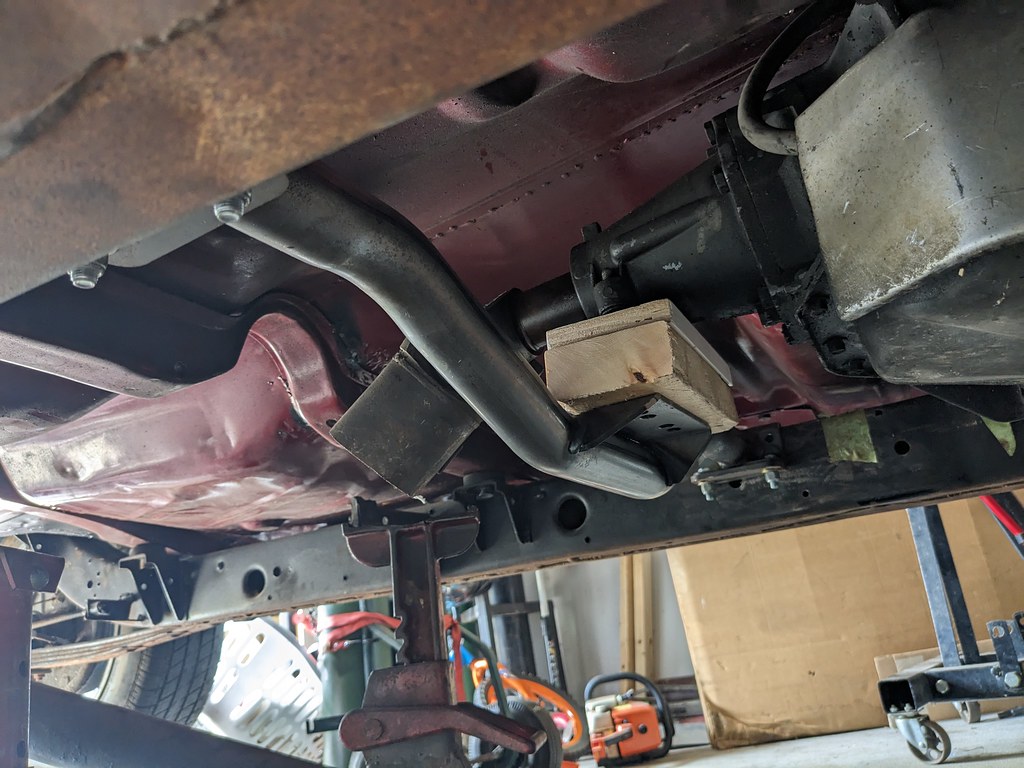
Moving forward, I was able to get the transmission crossmember mocked up and it's going to work great with the right driveline angles. It does still need to be tilted up about a 1/2" more, but there is a lip in the tunnel that needs a little BFH work.


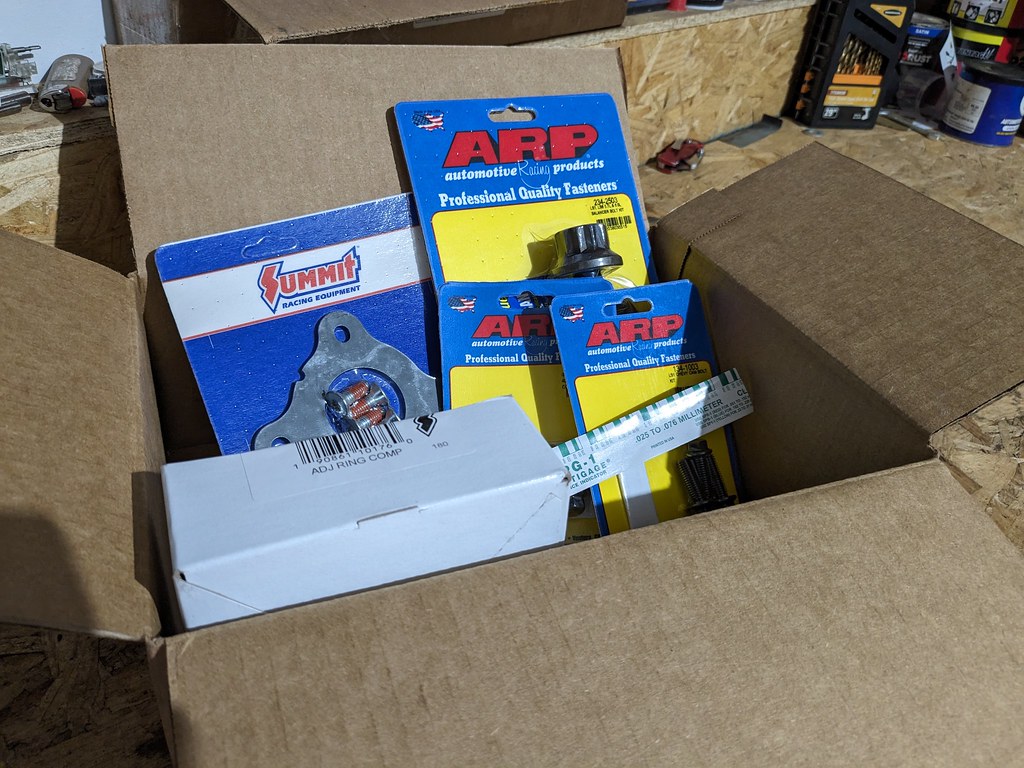
I placed an order from Summit and got the rest of the bolts, gaskets and a new piston ring compressor to get the short block finished up. I'm going to be gapping the rings for boost because down the road I'll be adding a turbo, or possibly an LSA supercharger. I've got a buddy doing an LSA swap right now and it's making me want to put on on this car too...


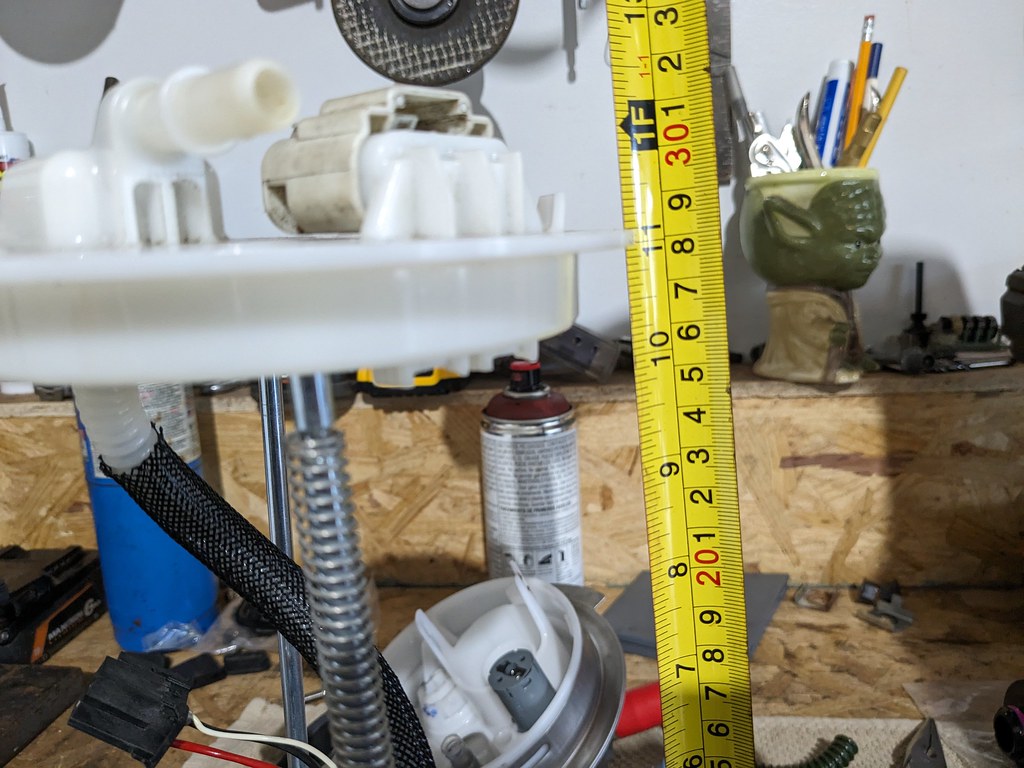
Since the engine is still mocked in the car, I was side tracked with my fuel system. My plan from the beginning was to use a stock fuel pump to have the most reliability, and my experience with the 10-15 Camaro SS fuel pump was fantastic. Vaporworx sells a conversion kit to allow them to run at a fixed 58 or 43 psi with a kit. So that was my plan, but after I decided to use the wagon fuel tank that pump is way too short. The CTSV and SS Camaro fuel pump assemblies only go to about 7.25" tall and my tank with a recess panel for the pump needs to be about 11" tall. After some thought, I decided that I'd buy an SS pump and build my own pump using other parts I have acquired. I've nicknamed this the "Frankenstein Pump" since it will be made using so many different parts. CTS-V fuel hat, Silverado rods/springs, SS Camaro fuel pump lower section and 4th gen Camaro fuel pressure regulator.

Now, before someone chimes in and says I should have just bought the PWM kit to control the fuel pump that did cross my mind. However, I've still got so many other parts to buy and that money could be used for other things right now and I already had the fixed pressure adapter. Plus I like a good challenge and if it keeps me on track with my budget, it's a win-win.

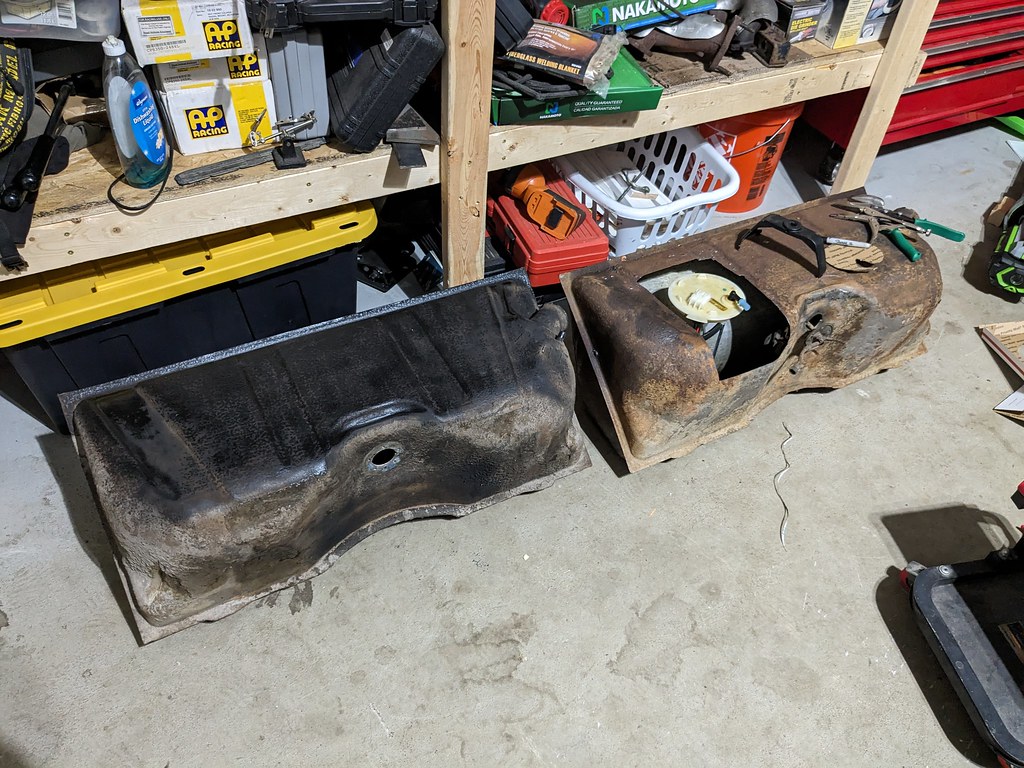
I did this several weeks ago, but I started off with the first wagon tank that I picked up for really cheap and used that as my test tank. I cut a hole in it where I new I wanted the fuel pump and made sure that this whole project would even be possible. It's a very tight spot where the fuel pump fits flush on the bottom of the tank, but it fits and that's what's most important. Time to collect parts.


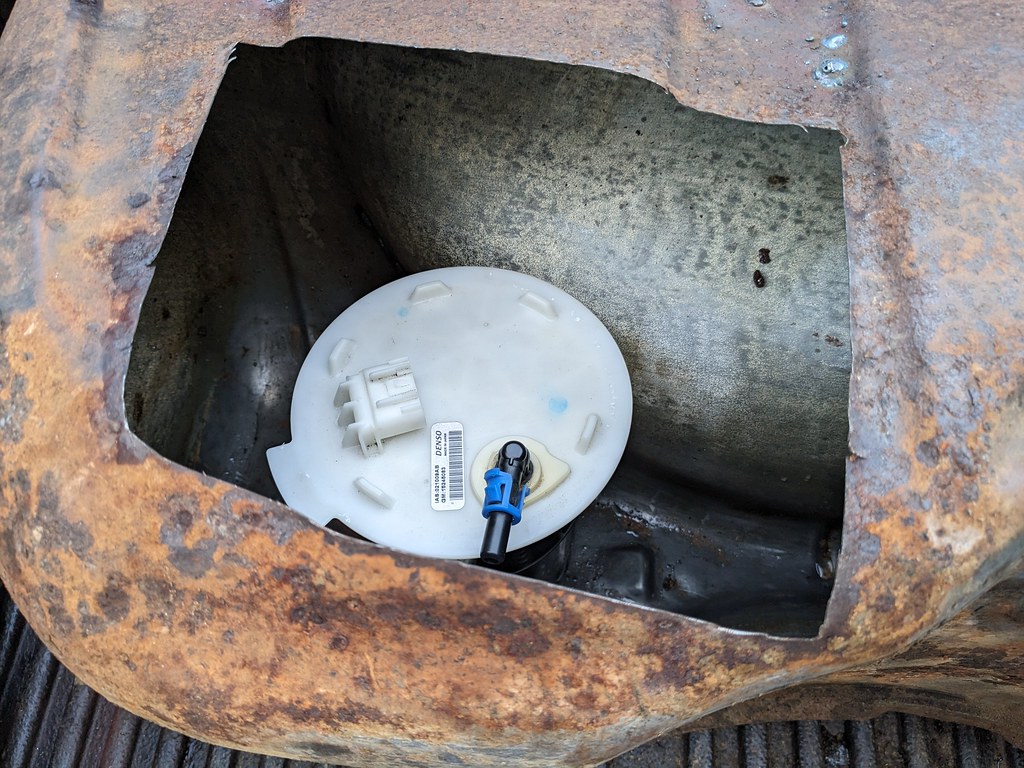
While I was figuring out what rods to use for when I extended the SS fuel pump, I came across a new Delphi pump out of a 09-13 Silverado for crazy cheap on eBay. It also came with a new green seal, so I picked that up for $35 bucks.


Also on eBay I found a wrecking yard selling a 13 SS fuel pump with 40k miles and they accepted my offer for $45 bucks. I now had all the parts for my "Frankenstein Pump".


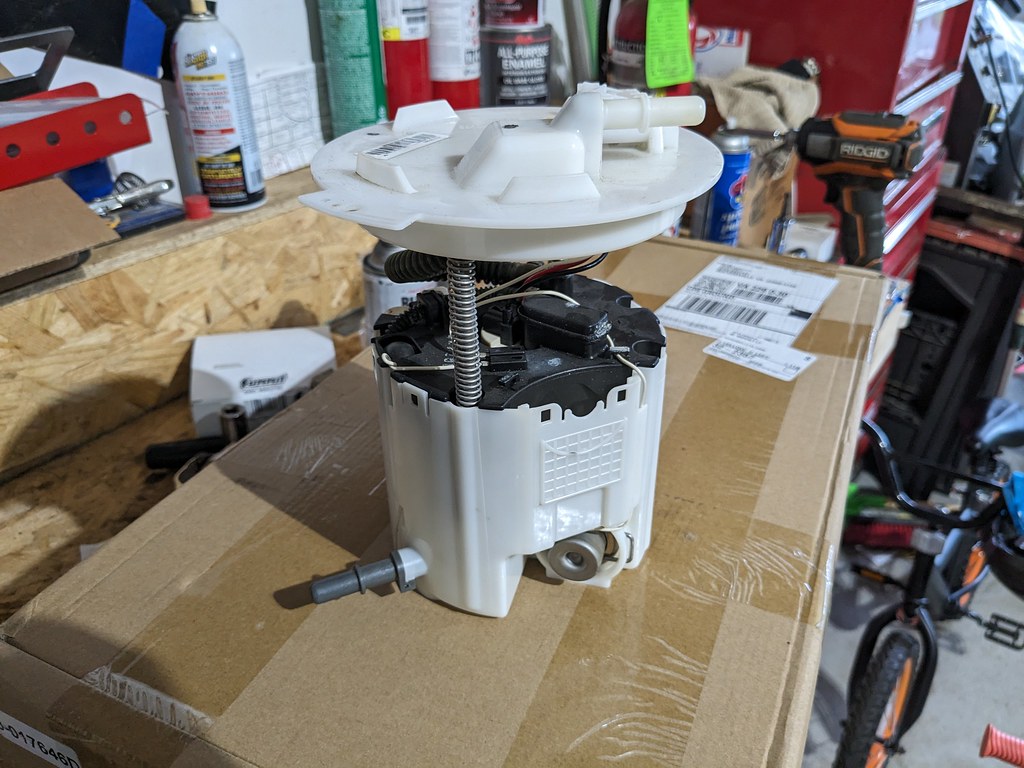
First step was to disassemble the two pumps. First up was the SS fuel pump. There is an inner assembly that is held in with some clips that had to be popped out to remove the clips for the top lid to come off.


After I robbed the rods from the Silverado pump, I did a quick test fit using the SS Camaro top fuel lid and it gave me the height that I needed at full compression. I bought a new 10mm corrugated hose a while ago because I was pretty sure I was going to be doing this project at some point. It fits perfectly for this application.


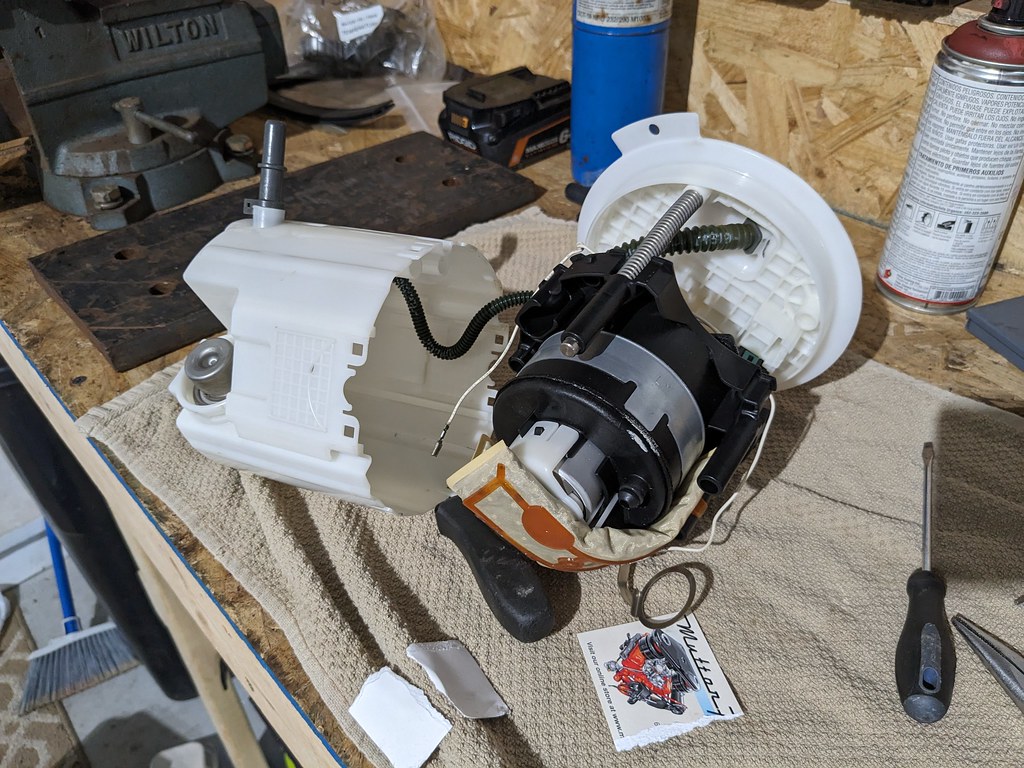
While I liked the SS fuel hat better, where the rods are held in was a press fit and too loose to fit the longer rods. I had a spare CTSV fuel hat from my Camaro and that was a perfect fit. And there were slots in the SS pump lower section for the rods to go since the rod spacing is different between the SS and CTSV.


Now that it's all fitting together nicely, it's time to work on the fitment into the fuel tank. Glad that I had a spare tank to play with since I cut this one too far on the vertical side. Perfect for getting me measurements though.


I also wanted to make sure that there would be enough room for me to get a tool around the fuel pump ring.


At this point, I'm completely satisfied with the fitment of this pump in the tank so I took some measurements off the test tank and transferred them to my good tank. I made sure that my cuts were way smaller than needed to be so that I could creep up on the final cut lines.


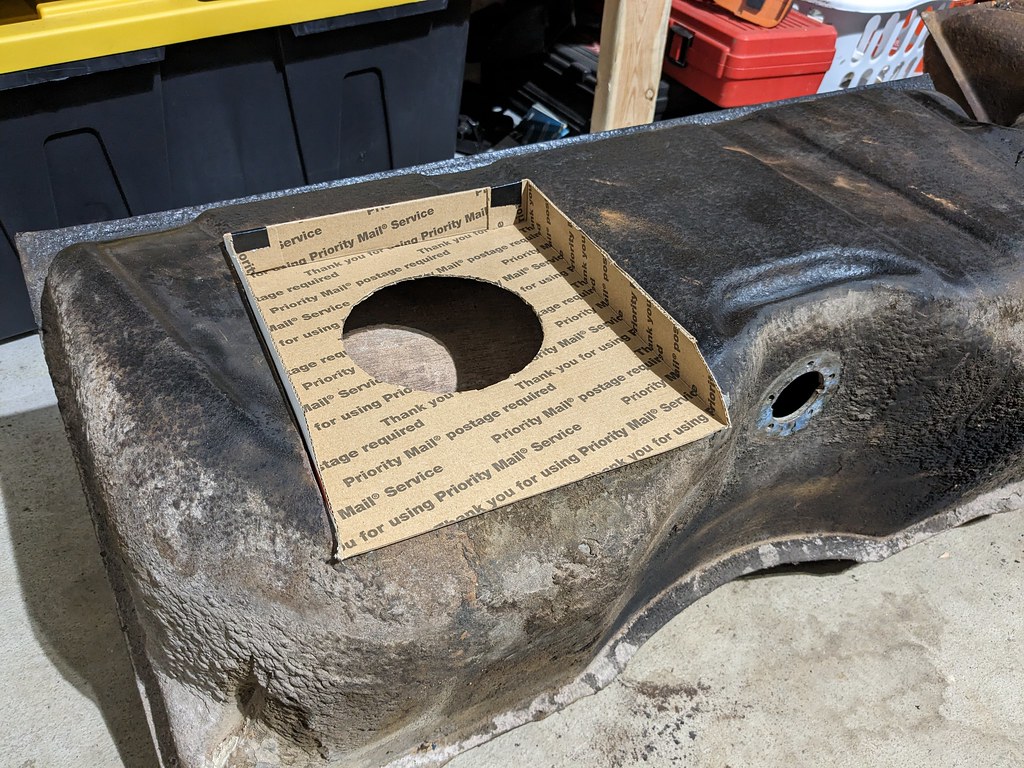
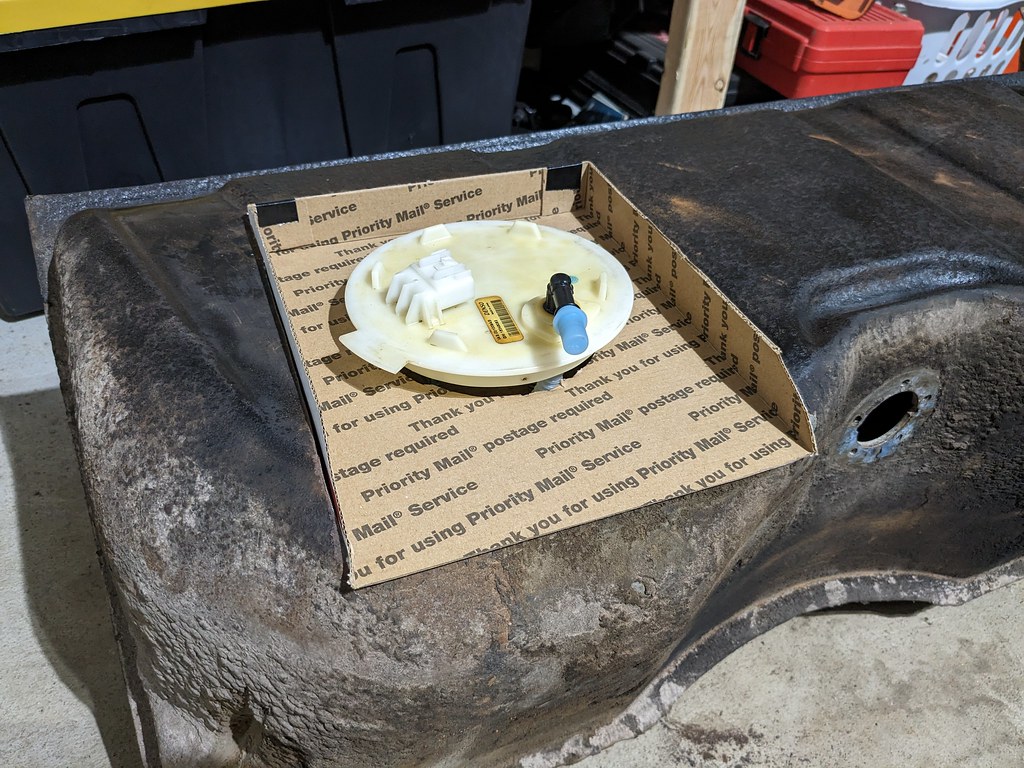
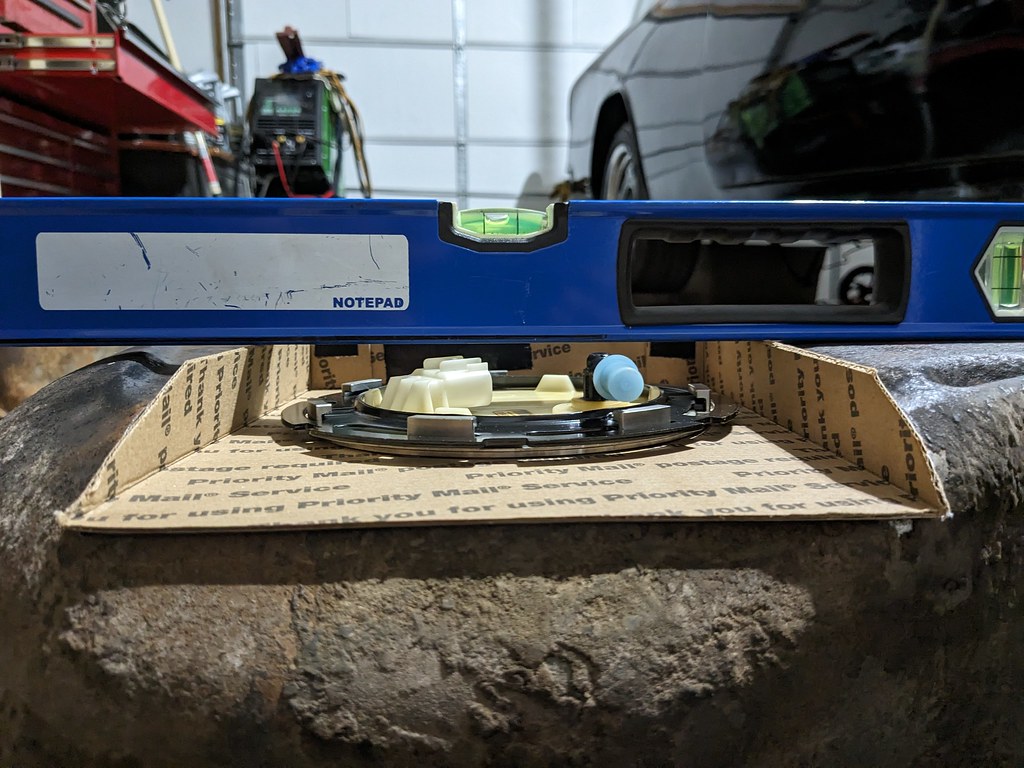
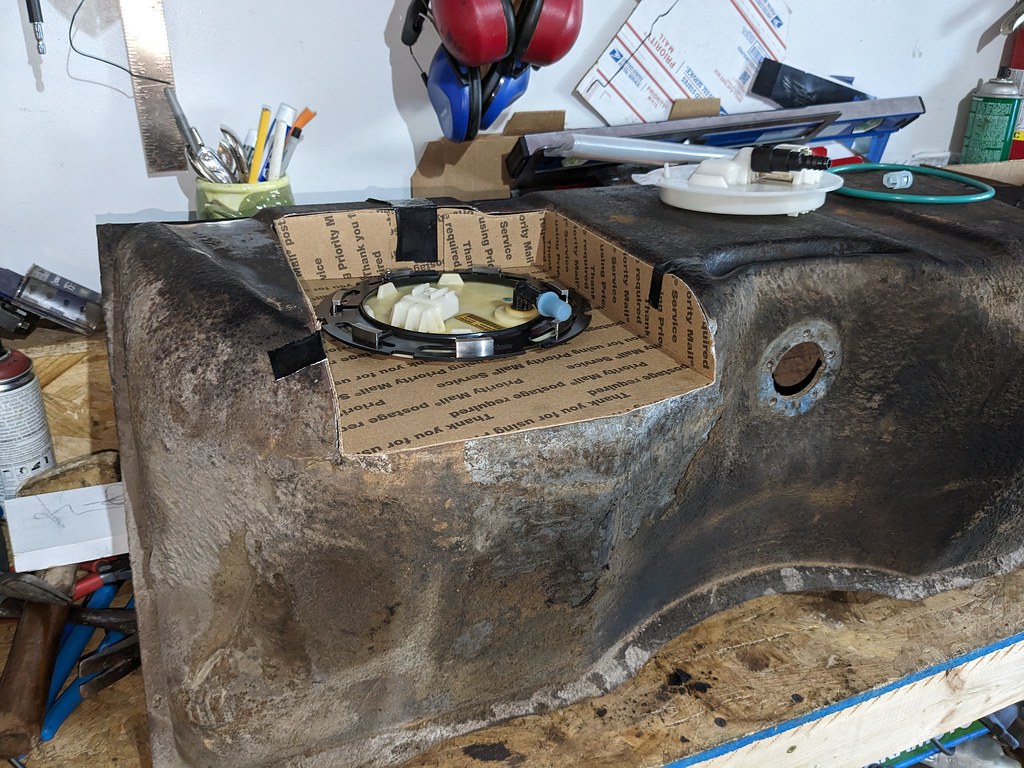
I wanted to play around with some cardboard to see what the recess panel will look like and fit. Now because there was such a tight fit for where the fuel pump had to be placed, I wanted to make sure that the recess panel was centered as perfectly as I could get it. I build the recess panel template and used the inner inner diameter of the locking ring for my initial hole. With the template fitting snuggly on the top of the fuel pump hat I placed the pump in the exact spot it needed to be in the fuel tank. That centered up the template and allowed me to make some marks for my final cuts.


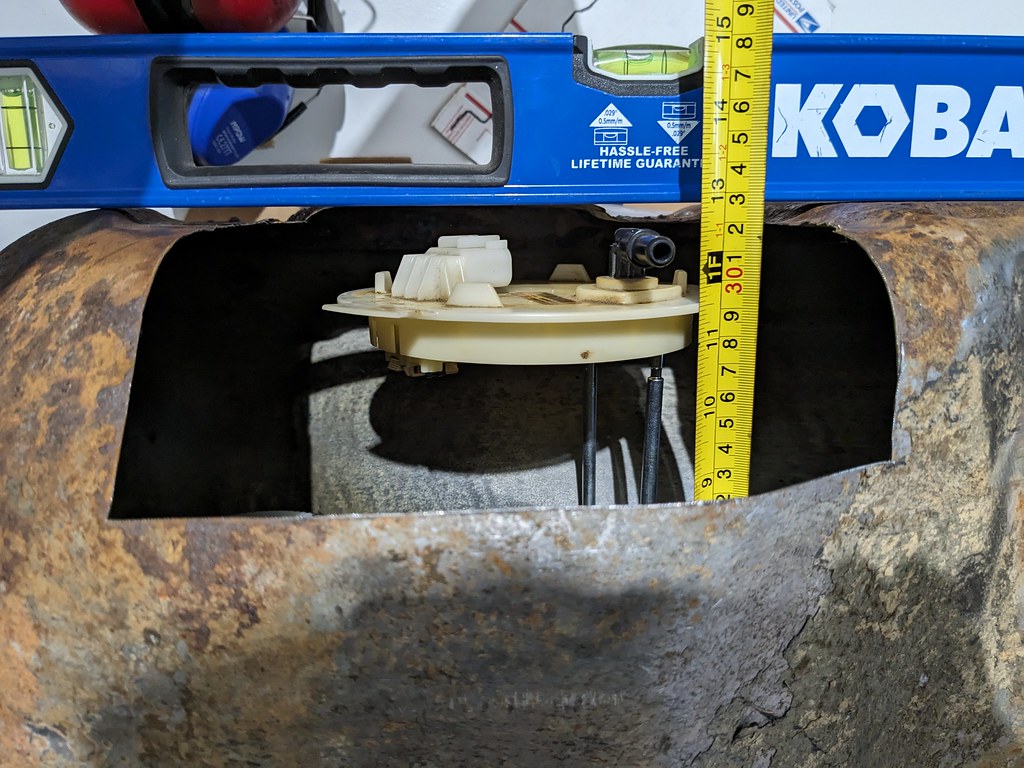
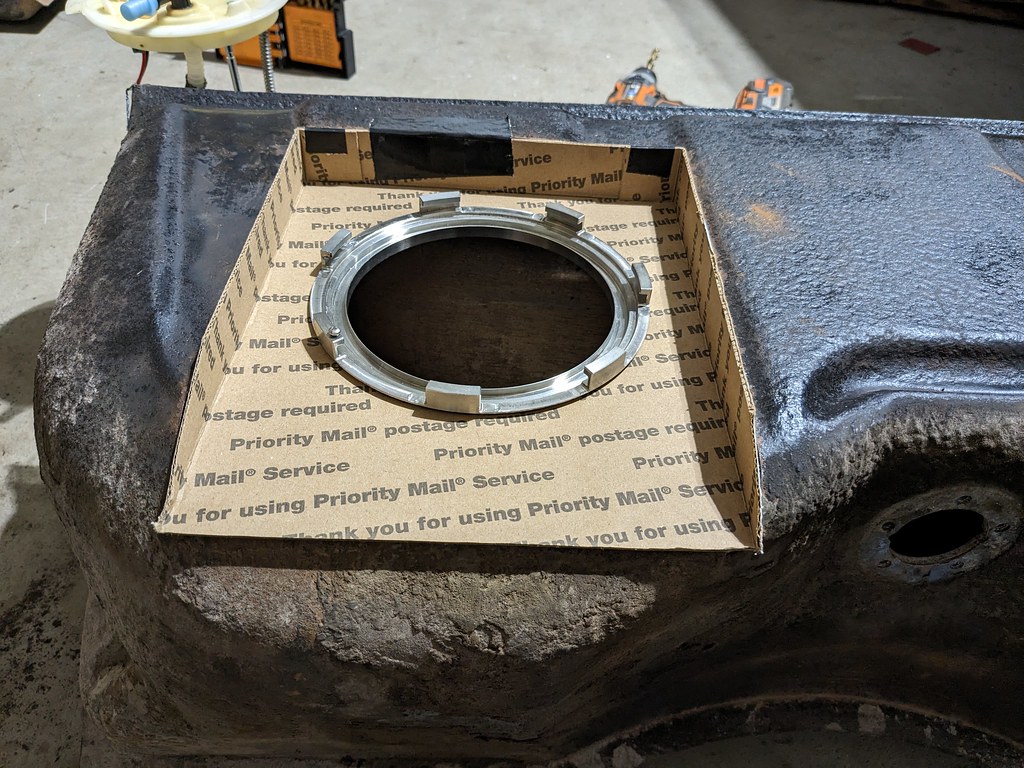
Now that I confirmed the fuel pump is exactly where I wanted it, I cut the hole larger to test fit the actual fuel pump ring I'll be using and once again checked the fitment.


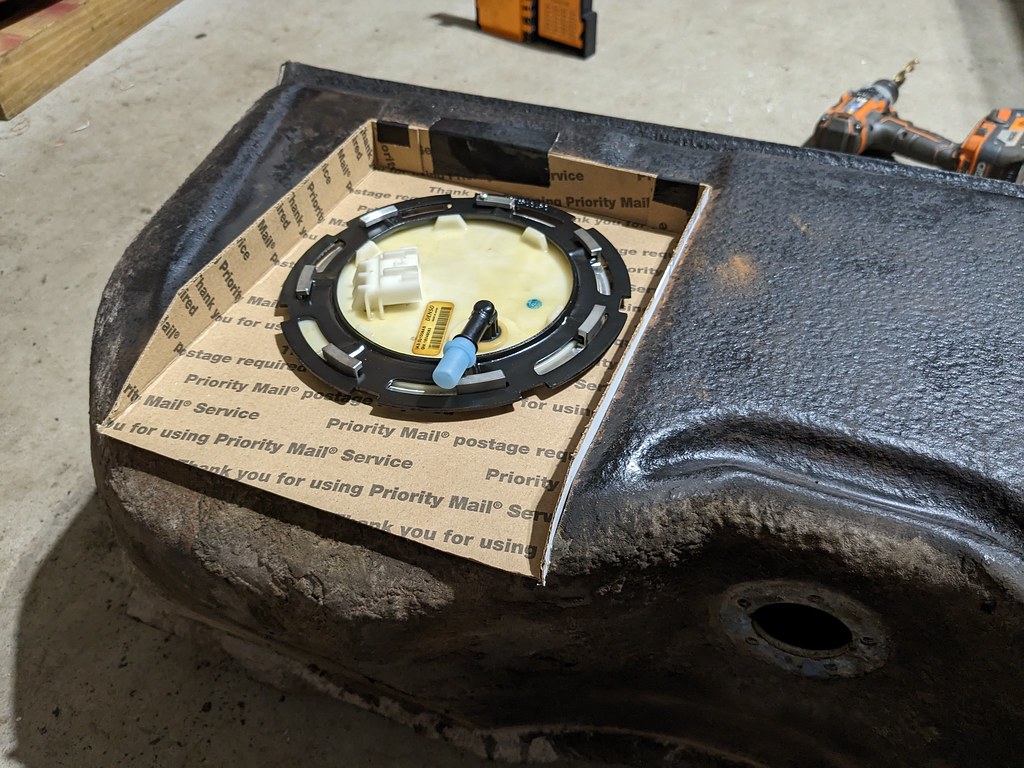
I'm very pleased with the fitment and there should be plenty of clearance above the fuel pump. With it all in place, it was now time for the first test fit in the car.


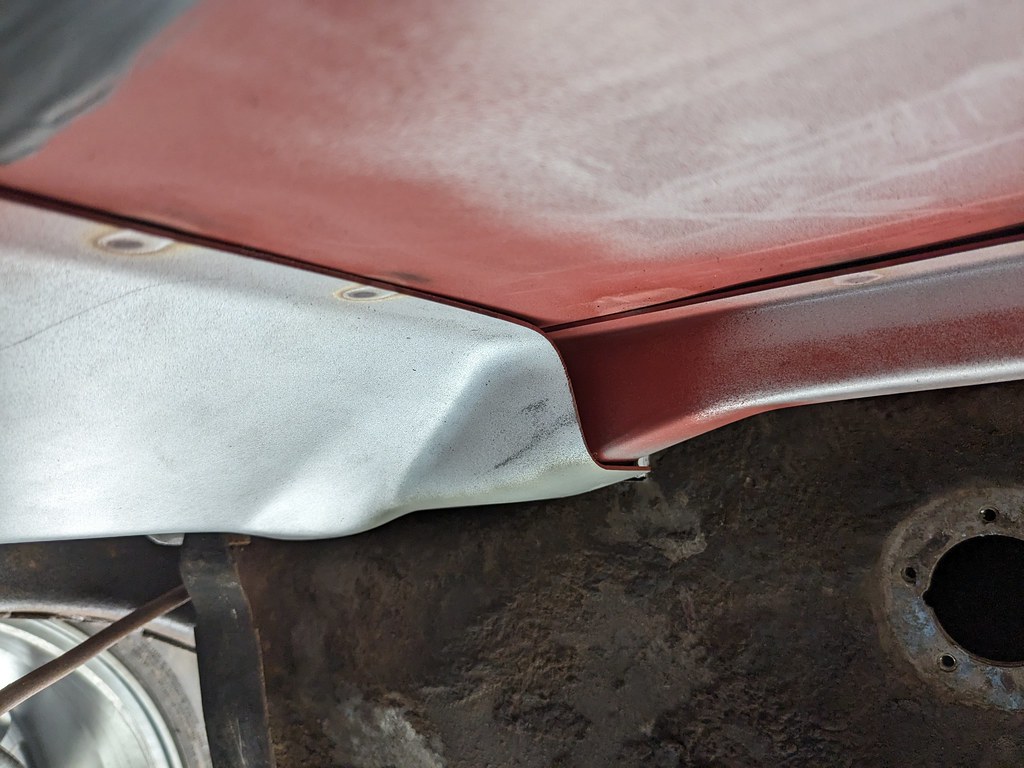
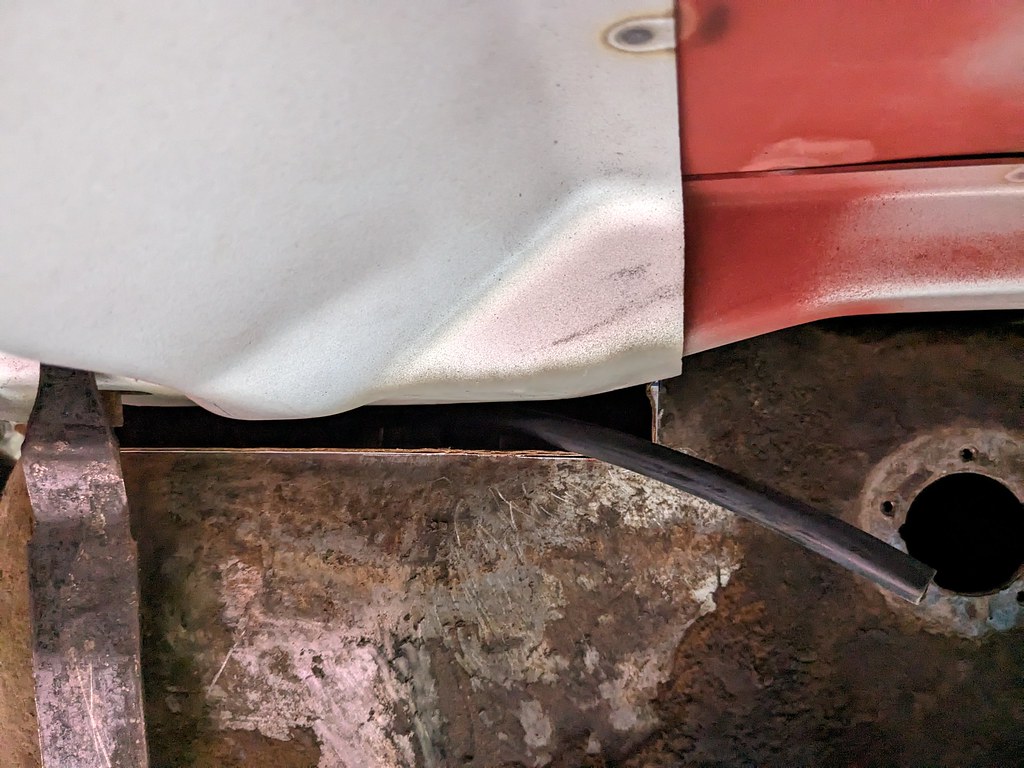
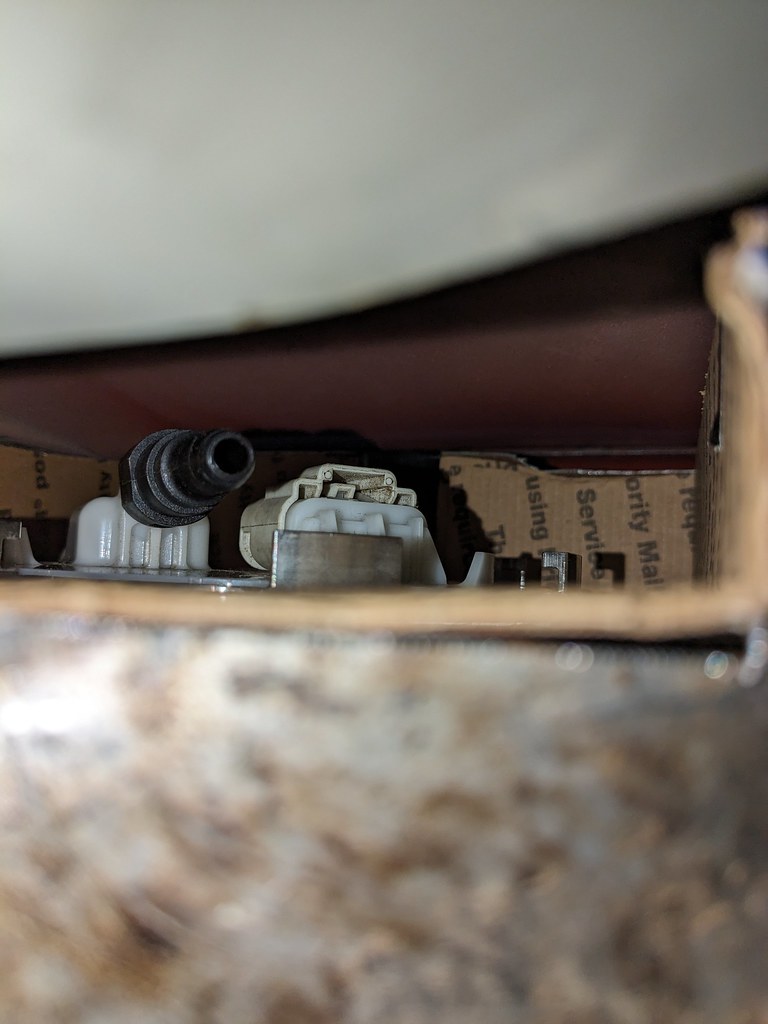
Huge fail!! But this is why I've come to realize that test fitting parts before a final weld or assembly is so important. While there is plenty of space above the fuel pump, there isn't anywhere for the fuel line to go.


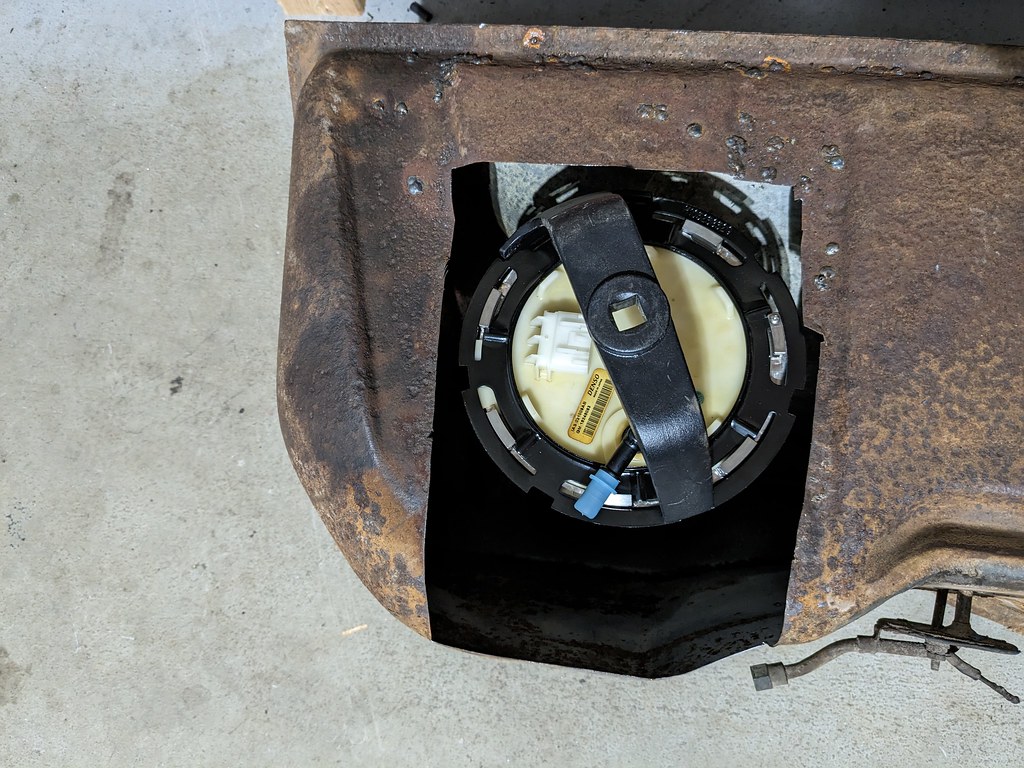
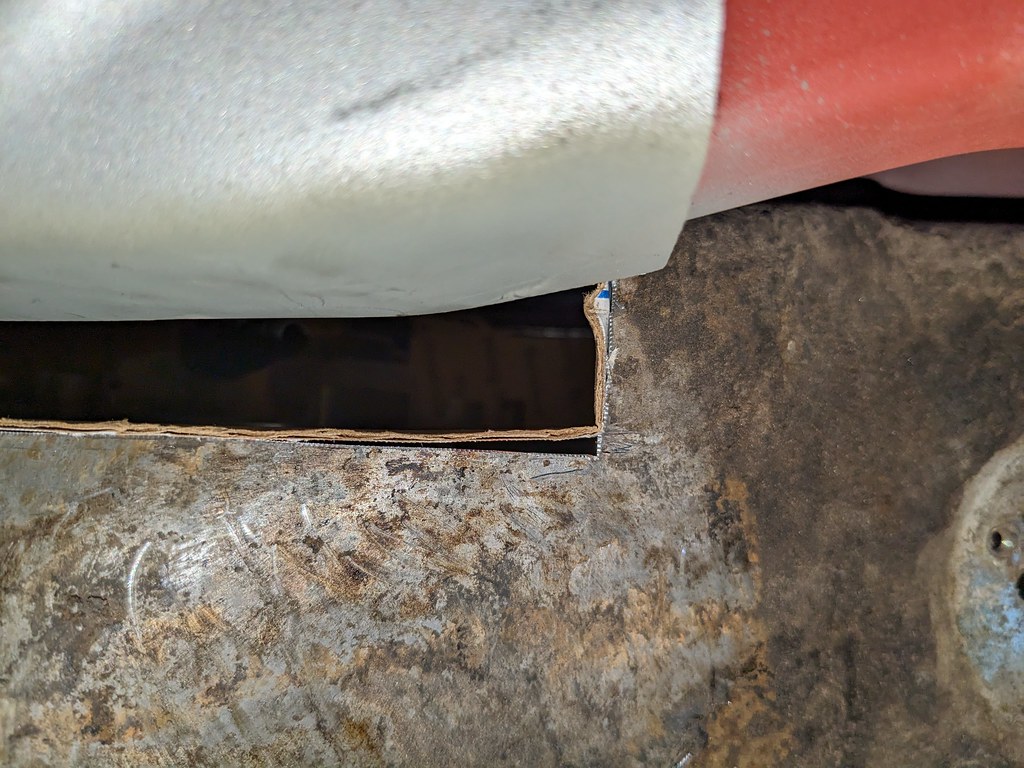
I marked where it needed to be for a fuel line to be, then pulled it out and started over. I had to make a new template because the old one wasn't long enough on the sides. trimmed the tank about 3/4" lower then reinstalled for a second test fit. It's perfect now and I'm very pleased.


Miles of room above the fuel hat.


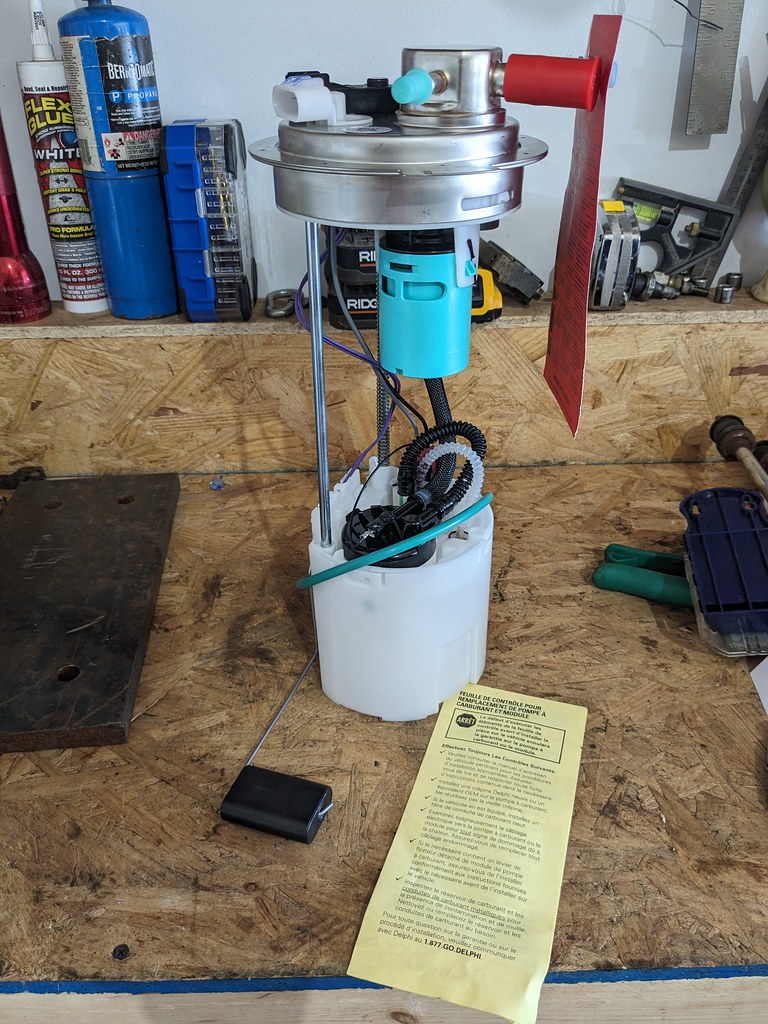
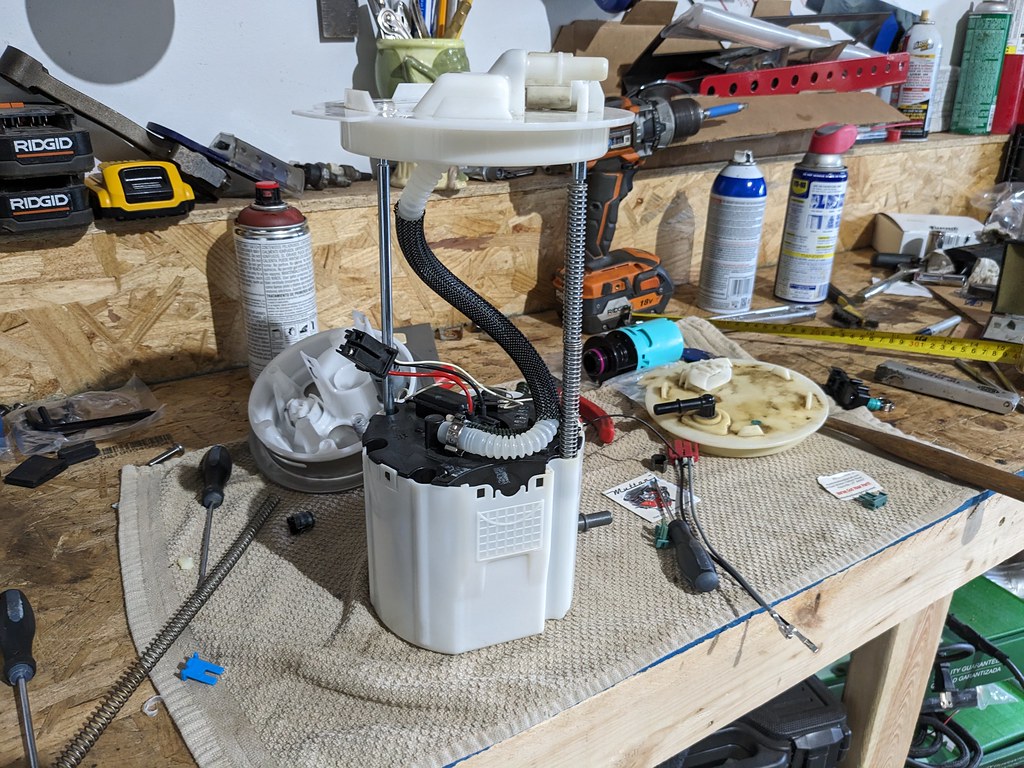
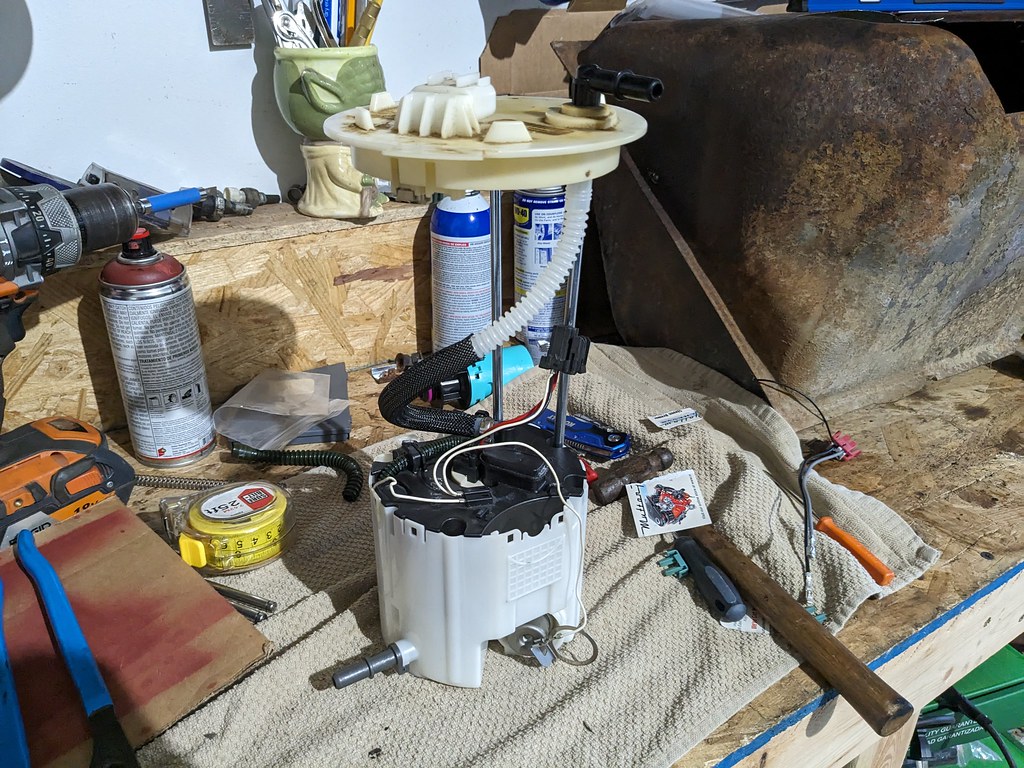
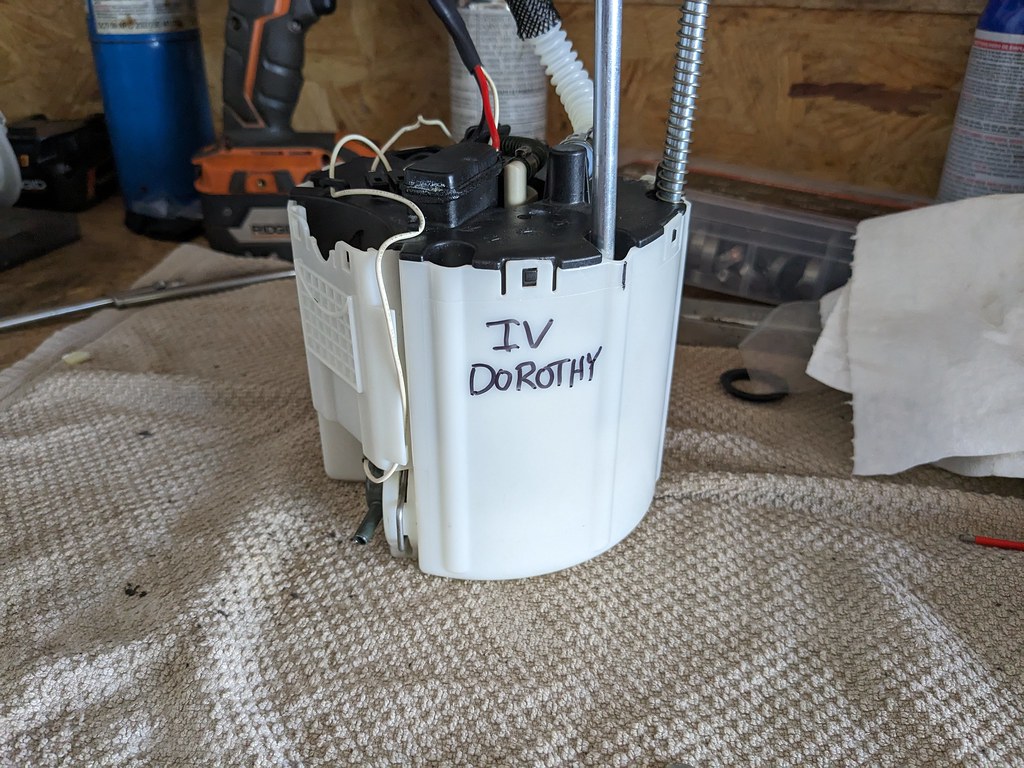
Here's the final mock up. One minor adjustment I'll need to do is shorten the rods just slightly because they are just a touch too long now that I had to lower the recess panel. That will be a very quick process, but here's the completed fuel pump. Next up will be transferring my template to metal and getting it welded in place.


My buddy Jonathan said that my fuel pump looks a lot like the tornado machine from Twister. So I added a mark for Dorothy IV haha


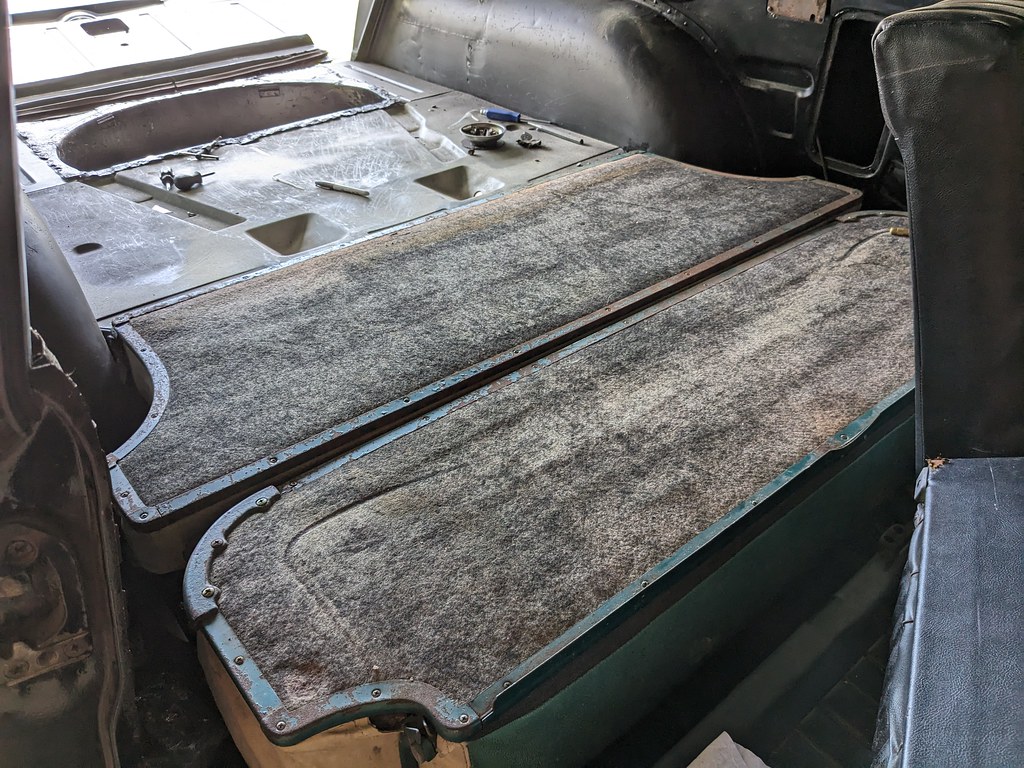
I was also tinkering around with the seat bracket placement and think that I've nailed down the seat bottom, but need to finalize the location for the upper hinge brackets. I drilled the lower brackets with self tapping screws to tighten it to the floor and the seat flips up and down nicely. The upper will be more difficult because it needs to pivot at the right location to both hit the upper latches and lay flat and not too far forward in the down position.


I sharpened all my tig tungsten, so hopefully I'll get the recess panel built and welded in this week.

Cheers,
Ryan

1976 Trans Am LS1 and much more...SOLD
1968 Camaro LSA, T56 Magnum, and much more...SOLD

Current Project: 1955 Nomad LC9, 4L80e, C5 brakes and etc...

roadking77

  • Oracle Forum Member
  • *
  • Posts: 13263
Re: Madaguy 1955 Nomad Build
« Reply #121 on: August 14, 2023, 02:07:50 PM »
Again, always impressed with your engineering skills.
Finished!
77 T/A - I will Call this one DONE!
79 TATA 4sp-Next Project?
79 TATA - Lost to Fire!
86 Grand Prix - Sold
85 T/A - Sold
85 Fiero - Sold
82 Firebird - Sold
'38-CZ 250
'39-BSA Gold Star
'49-Triumph 350
'52-Ariel Red Hunter
'66-BSA Lightning
'01-HD RoadKing

5th T/A

  • Oracle Forum Member
  • *
  • Posts: 1401
Re: Madaguy 1955 Nomad Build
« Reply #122 on: August 14, 2023, 04:47:36 PM »
With the back seat in its starting to look like a car.

I am more than amazed by your fuel system fabrication. When I did my car, I cheated with an off the shelf fuel tank set up for an electric pump. Fabricating hard fuel lines was enough work for me.

I am trying to recall if it was you or another member who put an access panel in their Camaro trunk for easy fuel pump access without dropping the tank? I thought it was a great idea!
1980 T/A with a Pontiac 461

Gone but not forgotten;
1973 T/A 455
1975 T/A 400
1978 T/A W72
1982 T/A cross fire injected

Two wheel toys;
2014 Harley Ultra Classic Limited
2013 Honda CB1100
2010 Yamaha Vmax
1982 Yamaha Seca 750

ryeguy2006a

  • Oracle Forum Member
  • *
  • Posts: 6043
Re: Madaguy 1955 Nomad Build
« Reply #123 on: August 15, 2023, 06:24:13 AM »
Thanks guys! Yes, that was me with the access panel. I'll likely do that with the Nomad as well, however, there's a brace right above where I'm mounting the fuel pump. My long term plan is to run an aftermarket frame and will need a custom fuel tank, so I'll just hold off on the access panel until I have a custom tank in place.

1976 Trans Am LS1 and much more...SOLD
1968 Camaro LSA, T56 Magnum, and much more...SOLD

Current Project: 1955 Nomad LC9, 4L80e, C5 brakes and etc...

MNBob

  • Oracle Forum Member
  • *
  • Posts: 2018
Re: Madaguy 1955 Nomad Build
« Reply #124 on: August 22, 2023, 06:06:16 AM »
That cargo area is starting to look very good.  Nice job on mounting the fuel pump.  The access panel is a nice to have, but now that i have dropped the tank on mine, I view it as pretty easy.
1979 TATA Extreme TKO .64
Hedman elite; Pypes 2.5; Borla XS; MSD 6A; Performer intake; open scoop; Sniper QJ;  110 Amp Alt; 4 core radiator/Mark VIII fan; RobbMc mini starter; subframe connectors; solid body mounts; fiberglass rear springs; poly sway bar and link bushings; 81 master; D52’s; Blazer disks; 225/60 & 235/60 17's TrueContact's; relays for PW, PDL, lights; keyless entry

Re: Madaguy 1955 Nomad Build
« Reply #124 on: August 22, 2023, 06:06:16 AM »

FormTA

  • Oracle Forum Member
  • *
  • Posts: 5587
  • Life is short, have fun, Drive a T/A
Re: Madaguy 1955 Nomad Build
« Reply #125 on: August 22, 2023, 06:15:25 AM »
Nice work with the fuel pump. Not sure I follow I all but none the less, it looks cool and if it works, great!
79 Trans am low buck LS swapped
79 Formula 301 (Work in progress)
67 RS Camaro (waiting it's turn)
69 Dodge charger on late model charger chassis
49 Ford F1 on a 2003 Chevy ZR2 Chassis (current project)
Names, Luke. If I hear anyone telling me they're my father....

ryeguy2006a

  • Oracle Forum Member
  • *
  • Posts: 6043
Re: Madaguy 1955 Nomad Build
« Reply #126 on: August 22, 2023, 08:30:10 AM »
Luke, basically the SS fuel pump can be easily modified to run at a fixed 58psi and internally returns the fuel, so it uses one fuel line from the pump to the rail. But because stock it has a max height of 7" I had to modify it to be 11" tall.  :cool:

1976 Trans Am LS1 and much more...SOLD
1968 Camaro LSA, T56 Magnum, and much more...SOLD

Current Project: 1955 Nomad LC9, 4L80e, C5 brakes and etc...

FormTA

  • Oracle Forum Member
  • *
  • Posts: 5587
  • Life is short, have fun, Drive a T/A
Re: Madaguy 1955 Nomad Build
« Reply #127 on: August 22, 2023, 09:16:36 AM »
Oh, ok, I get it. So it eliminates using the corvette fuel filter thingy like I did. Plus you don't need to buy an expensive efi fuel tank with pump. I see it's fat, is that like a self contained baffle system or do you need to make baffles too?
79 Trans am low buck LS swapped
79 Formula 301 (Work in progress)
67 RS Camaro (waiting it's turn)
69 Dodge charger on late model charger chassis
49 Ford F1 on a 2003 Chevy ZR2 Chassis (current project)
Names, Luke. If I hear anyone telling me they're my father....

jonathonar89

  • Oracle Forum Member
  • *
  • Posts: 2508
    • Mark's Cars Inc.
Re: Madaguy 1955 Nomad Build
« Reply #128 on: August 23, 2023, 05:26:43 AM »
Dorothy is ready to send all the fuel into the turbo vortex.  Nice!
Mark's Cars Inc.

https://markscarsinc.com

ryeguy2006a

  • Oracle Forum Member
  • *
  • Posts: 6043
Re: Madaguy 1955 Nomad Build
« Reply #129 on: August 23, 2023, 06:21:07 AM »
Luke, Yes, it's all self contained and the fuel actually returns into that fuel bucket, so that it always stays full. No need for baffles! I used this same pump on Version 1 of my 68 Camaro when it still had the LS1.

1976 Trans Am LS1 and much more...SOLD
1968 Camaro LSA, T56 Magnum, and much more...SOLD

Current Project: 1955 Nomad LC9, 4L80e, C5 brakes and etc...

ryeguy2006a

  • Oracle Forum Member
  • *
  • Posts: 6043
Re: Madaguy 1955 Nomad Build
« Reply #130 on: August 28, 2023, 08:17:33 AM »
Been busy working on the car, but have been sidetracked practicing my TIG welding. My plan is to weld the 304 SS fuel ring to my mild steel fuel recess panel and what a great opportunity to get better with the TIG. I first wanted to practice on some coupons and scrap pieces I had so that the finished product would be at least halfway decent. I practiced a while and then did a test run on the outside corner joints, and that's when I realized that I needed a lot more practice. Then I went down a bit of a rabbit hole and was practicing TIG in pretty much all my free time.


While the weld is solid and won't leak, it needs a lot more attention to cleanliness, consistency and better pedal/filler control. Now that the corners were welded and the recess was built, I was able to confirm the pump will work like I need it to. I need to practice more with my TIG before I attempt the final weld on this piece.


Other than practicing my TIG welding, I did get the rear seat locations finalized. I thought the upper seat would be the easy part, but I was very wrong. It took way more effort than I realized to locate the lower hinges, since they need to match up with both the rear cargo surface and the lower seat mount. After lots of choice curse words and lots of extra holes in my newly welded in wheel wells, I found a location that I'm happy with. Now that it's final, I'll need to build some reinforcement plates for the hinges that will weld in from the inner wheel well.


A few weeks ago I was talking to my father-in-law about how I was disappointed that my 302-2 oil pan didn't fit and that I needed to buy a 302-1 pan. Well a few days later a 302-1 pan showed up on my doorstep! What a nice surprise! Thanks Bern! Before I removed the motor to tear it down, I wanted to confirm that it would fit in the current location or if I'd need to adjust the engine mounts forward or back. Thankfully, I made a good guess when I installed the mounts and it all fits really well. 302-1 pan has all the clearance where I need it!

My boys are always in the garage helping me out. You can see his crocs in this picture.


Now that everything fits like it needs to, I pulled the motor/trans and got the engine torn down. I'm only pulling the pistons/rods so that I can gap the rings for when I add a turbo down the road. All the bearings looked good, so I'll reinstall them once carbon buildup is cleaned off the pistons and the ring gap is opened up. I'm planning on .030" on both top and second ring.


I deglazed the cylinder walls and restored the cross hatching. Now I'm ready to start cleaning up the pistons and gapping the rings one by one.


That's all for now. I'm hoping to get to a point this week where I'm happy with my welds so that I can weld up the modified fuel tank. Then I'll order the rest of my engine parts and get that put back together.

Cheers,
Ryan

1976 Trans Am LS1 and much more...SOLD
1968 Camaro LSA, T56 Magnum, and much more...SOLD

Current Project: 1955 Nomad LC9, 4L80e, C5 brakes and etc...

FormTA

  • Oracle Forum Member
  • *
  • Posts: 5587
  • Life is short, have fun, Drive a T/A
Re: Madaguy 1955 Nomad Build
« Reply #131 on: August 28, 2023, 09:49:10 AM »
Great progress man. TIG welding is fun for sure. The nice thing is you are almost guaranteed no leaks. The nature of this type of welding really lends itself to leak free joints. Still pressurize and check with simple green or soapy water.
79 Trans am low buck LS swapped
79 Formula 301 (Work in progress)
67 RS Camaro (waiting it's turn)
69 Dodge charger on late model charger chassis
49 Ford F1 on a 2003 Chevy ZR2 Chassis (current project)
Names, Luke. If I hear anyone telling me they're my father....

5th T/A

  • Oracle Forum Member
  • *
  • Posts: 1401
Re: Madaguy 1955 Nomad Build
« Reply #132 on: August 29, 2023, 08:47:48 AM »
Nice father in-law Ryan!

You have welding and fabricating skills I could only dream about. I thought about taking some welding classes at my community college. At this point I don't think I would do enough to be proficient.
1980 T/A with a Pontiac 461

Gone but not forgotten;
1973 T/A 455
1975 T/A 400
1978 T/A W72
1982 T/A cross fire injected

Two wheel toys;
2014 Harley Ultra Classic Limited
2013 Honda CB1100
2010 Yamaha Vmax
1982 Yamaha Seca 750

jonathonar89

  • Oracle Forum Member
  • *
  • Posts: 2508
    • Mark's Cars Inc.
Re: Madaguy 1955 Nomad Build
« Reply #133 on: September 01, 2023, 06:18:37 PM »
Dorothy is looking settled in nice.  Good work man!
Mark's Cars Inc.

https://markscarsinc.com

ryeguy2006a

  • Oracle Forum Member
  • *
  • Posts: 6043
Re: Madaguy 1955 Nomad Build
« Reply #134 on: September 05, 2023, 10:16:26 AM »
After practicing on many coupons, I felt comfortable enough to start welding my Stainless ring to the mild steel fuel recess panel. Then I went to find the fuel pump ring and it was no place to be found. My youngest son (4 YO) loves being in the garage with me and will take things from my bench regularly. I asked him and he had taken it off my bench and he had no idea what I was talking about. Well after pulling my hair out for 15 mins looking, I finally found it. Now, I don't remember putting it on the power washer haha.


Now that the ring was located it was time to weld. The welds were pretty ugly, but they are solid penetration and if anything maybe a touch too hot. I started by tacking the ring to the panel and did one more test fit before final welding.


After I confirmed that the recess was still were I wanted it to be in the tank, I flipped the recess over and welded everything from the bottom side. I figured that my welds will be much better hidden where no one can see them haha. I welded about 1.5" at a time and then moved to the other side of the ring and let it cool. One thing I read about stainless is that it has a tendency to warp when it's being welded. So I wanted to minimize that as much as I could. Once it cooled, I test fit another time just because.


I started on the front and rear of the tank and tacked them in a few spots. The open side did warp up slightly, but I was able to tack in the center and bring the sides down flush.


The entire perimeter of the recess is now fully welded! What I love about TIG welding is that I was able to weld a lot of this panel with no filler wire, just melted it together with the existing materials. Very pleased with the results, but the real test was whether it leaked!


I didn't have a good way to seal off all of the ports in the tank, so I tipped it on the side with a spare fuel hat I had and looked for any leaks. Unfortunately I had a pin hole leak in the fuel ring area. I wasn't sure how I was going to fix that, but after some thought, I taped up the front of the recess and filled with water up to the ring. Worked like a charm and I found the little pinhole from the inside. I was able to stuff my TIG torch into the tank and welded it from the bottom with a mirror. There was more than enough filler, so I just had to create a puddle around the pinhole to fill it. Retested and no leaks! Left it for about 15 mins and still dry as a bone. WIN!


Once I confirmed no leaks, I got it all painted up and ready to install. Dorothy is home!!


Glad that project is behind me. Moving on, I wanted to get the rings gapped and reinstalled. While the pistons were out, I also cleaned them up with some Seafoam and a scotchbrite pad. Worked much better than purple power that I had used in the past. Then one by one I pulled the top and bottom rings off the pistons to first measure them. Most of them came in around .023 top and .025 second ring. Interesting because the guy I bought the motor from said they were gapped for N/A..., but I have a feeling that it may have been boosted at some point. Regardless, I gapped them to .028 top and .030 second ring. I did have to consult with my resident expert. Here he is explaining to the neighbor kid how to use the ring grinder haha. I built him a workbench last year and it works great for me too. I just have to move his tools off of it before I use it.


After I confirmed I was doing it right, I reinstalled the pistons/rods and got them all torqued down.


I reinstalled the pan just to keep the dust out, but I'll need to pull it back off to install the oil pump, windage tray and pick up tube.


Overall pretty productive weekend. I ordered some engine parts that are supposed to be here today. Once those are here, I can get the cam installed and the heads back on once I clean those up. I'll also need to get the fenders pulled off so that I can paint the firewall before I put the motor back in.

Cheers,
Ryan
« Last Edit: September 05, 2023, 10:20:23 AM by ryeguy2006a »

1976 Trans Am LS1 and much more...SOLD
1968 Camaro LSA, T56 Magnum, and much more...SOLD

Current Project: 1955 Nomad LC9, 4L80e, C5 brakes and etc...

Re: Madaguy 1955 Nomad Build
« Reply #134 on: September 05, 2023, 10:16:26 AM »

FormTA

  • Oracle Forum Member
  • *
  • Posts: 5587
  • Life is short, have fun, Drive a T/A
Re: Madaguy 1955 Nomad Build
« Reply #135 on: September 05, 2023, 11:11:47 AM »
Nice! I have used sea foam as a cleaner before too. It worked extremely well. Great job on the gas tank. I really wish I new how to tune so I could boost an engine. Great job Ryan!
79 Trans am low buck LS swapped
79 Formula 301 (Work in progress)
67 RS Camaro (waiting it's turn)
69 Dodge charger on late model charger chassis
49 Ford F1 on a 2003 Chevy ZR2 Chassis (current project)
Names, Luke. If I hear anyone telling me they're my father....

ryeguy2006a

  • Oracle Forum Member
  • *
  • Posts: 6043
Re: Madaguy 1955 Nomad Build
« Reply #136 on: September 05, 2023, 11:26:00 AM »
Nice! I have used sea foam as a cleaner before too. It worked extremely well. Great job on the gas tank. I really wish I new how to tune so I could boost an engine. Great job Ryan!

Let me know if you decide to. I know a guy.  :cool:

1976 Trans Am LS1 and much more...SOLD
1968 Camaro LSA, T56 Magnum, and much more...SOLD

Current Project: 1955 Nomad LC9, 4L80e, C5 brakes and etc...

ryeguy2006a

  • Oracle Forum Member
  • *
  • Posts: 6043
Re: Madaguy 1955 Nomad Build
« Reply #137 on: September 14, 2023, 01:08:14 PM »
Only thing left for the shortblock to be finished is flipping it over and doing a final torque on the rods. They all have one ugga right now :) Next up was getting the heads disassembled and inspected. Thankfully the valves were all straight and in great shape. The seats all looked great, but I lapped a few of them that had a little pitting on the exhaust valves. Overall very pleased with the condition. Once I got a bare head, I started to clean them up with some purple power.


The purple power did a great job on most of the grime, but inside the intake ports and a little around the valve in the combustion chamber was a thick tar like carbon build up. The purple power didn't do a good job of cleaning it. Then I tried some Seafoam, which did an ok job, but dissolved it quite slowly. I had a bottle of this stuff called LA Awesome that I had read about on a forum and picked it up a year and a half ago. I tried some of that in a spray bottle and WOW what a difference. The tar practically melted off when used with my brass scrub brush. LA on the left and purple on the right. I'm sold on the stuff.


I cleaned up 90% of the carbon and called it good. It's going to get gummed back up so I'm not spending more time on it. Since I'm going budget on this build, I found a set of LS3 valve springs from my Camaro, and decided to use those. I also soaked the intake and exhaust valves to clean them up and the LA did a fantastic job of melting off the grime. It all went together pretty quickly.


I didn't get any pictures, but the driver's side head went together just as nicely and the heads are back together. I've got a set of ARP head bolts on the way and will hopefully get this engine back together this weekend. Since the engine is going to be done soon, it was time to address the firewall and get that prepped. At some point in it's life, someone painted the firewall a nice red color. It's nice, but not with a black car, so I pulled the fenders off to get it prepped for some satin black.


I'm not spending a ton of time here, just scuffing it down and primed black.


There were a few pinholes that I welded shut at the top of the cowl. Hit with a flap disk and good as new, then a second coat of primer.


I masked up the rest of the car and hit everything with a scotch brite pad for good adhesion.


After it was all prepped, I sprayed with a light coat of SEM Trim Black, then went back with a medium-heavy coat. I'm very pleased with how it turned out for the amount of time I have in it. I have to keep reminding myself that I'm not doing a full on restoration. I just want to clean it up to be presentable with my main focus on getting it to be a functional driver. I put my Camaro up for the winter in 2021, and then sold it in 2022, so it's been almost two years without something cool to drive! Way too long.


Well now that I've got everything I need for my engine to run, I need to focus on my brakes. I placed an order with Summit earlier in the week and they got my parts to me in 2 days! Very quick. Wilwood proportional valve, drum brake 10 lb residual valve, rear differential brake hose, and Summit Brand line lock. Also have the remaining gaskets and seals for my engine.


I've also pulled out my Tesla Model S iBooster to see what it's going to take to get this mounted to my firewall. I'm likely going to go in the same direction Andrew did and modify the brackets I have to work.


I'm getting very excited about this next stage in the project. My goal is to mount the engine/trans in place and get it all back together by the end of the weekend. I still need to clean up and paint the frame sections that are exposed, and get the side mounts bolted down for good. If I can get that done and lay out the Terminator X, I just might have a chance of firing the motor by the end of next week or next weekend!

Cheers,
Ryan

1976 Trans Am LS1 and much more...SOLD
1968 Camaro LSA, T56 Magnum, and much more...SOLD

Current Project: 1955 Nomad LC9, 4L80e, C5 brakes and etc...

ryeguy2006a

  • Oracle Forum Member
  • *
  • Posts: 6043
Re: Madaguy 1955 Nomad Build
« Reply #138 on: September 18, 2023, 09:26:04 AM »
After looking at the brackets and thinking on it for a few nights and looking at Andrew's swap, I was going to mount the brackets to the booster. Then I'll figure out how to get them attached to the car. I drilled a new hole on each of the brackets to match the iBooster bolt pattern. With everything loosely tightened up, the brackets have enough room to bolt up. I think I'm going to attempt to bent the brackets slightly in each direction so that the rear bolt pattern matches the stock Bel-Air pattern. I just wanted to get it mounted up to see if I liked the look, or if it needs to be angled up.


I really like the way that it's fitting, but I think that it needs to be tilted up slightly. I'm not sure if I'll attempt to make my own brackets, or modify the ones that I have. I need to think on it more. Great news it that it lines up with the brake pedal perfectly!


As I usually do, I was checking FB marketplace and found a guy giving away a DFP delete pipe for a 2011 F250. I know that I wanted a 4" pipe for when I swap on the turbo, so this will work perfectly. It's 409 SS so it does have some slight surface rust, but I should be able to clean that up. Now I'll keep an eye out for a turbo log manifold and downpipe. If I can score a deal on them in the next month or so, I'll make turbo placeholder pipe and plumb it all together. That way when I'm ready I'll just swap out the "fake turbo" for a real one haha. No point in spending money for a full dual exhaust when I'll be replacing it in the short term.


I received the last bolts that I needed to assemble the engine, so I got back on that. Head bolts and lifter retainer bolts. Got a deal on a set of once torqued ARP head bolts from an engine that was disassembled before it ran.


My plan all along has been to put this engine together on a fairly tight budget, and I had been planning to install a stock LS1 cam that I picked up from a buddy. In the end I just couldn't do it. I started looking for some low lift cams and stumbled on the SDPC LS6 Powermax PLUS Cam. It works perfectly with the LS3 springs I have as it's a fairly low lift cam at .570" . It's a 220/222 on a 112 LSA. While this cam won't make the most HP out there, it was only $269 shipped and worked with springs that I already had. Should make a nice street cam.


I started by installing the rear cover and gasket. I put a new main seal in and then got it centered on the crank. Once it was aligned, I torqued it all down and installed the flexplate. I'm using the 4L80e so I had to install a flexplate spacer with the appropriate ARP crank bolts. I had to get the engine off of the stand to get everything torqued, so I had my assistant give me a hand.


Once the rear was buttoned up, I spun it around to install the front side of the engine. I made sure to clean up the cam really well and glad that I did, because the hollow core of the cam had a lot of trash in it. Although they are brand new, it's a good idea to always clean up and inspect new parts. I followed up with the cam retainer, damper, and sprocket with new ARP bolts.


Next up was the oil pump. Now I've read mixed reviews on whether or not you need to center the oil pump on the crank, but given how easy it is to do, I feel like it's worth while. You basically install three shims around the drive which centers the housing and should make for a smoother operation. While I had it open, I put assembly lube on everything to hopefully help prime the engine faster/easier. Once the housing was torqued, I reinstalled the cover and torqued to 106 in/lbs.


While I had the engine off of the stand, I took the opportunity to clean up the 4L80e. Used more of the LA Awesome and some scrub brushes. Cleaned up very quickly, and I'll spray it quickly with some black or aluminum color. I want to let it dry for a few days.


Now here's where I hit a little snag. I have a dial indicator and figured it wouldn't take more than a few minutes to just check my cam end play. It seemed tighter than the other engines that I've assembled. When I got it set up and measured, it was measuring a .002" and then when I did a final torque on the cam bolts, it tightened up to .001". After a making a few calls to some buddies, I determined that it was too tight. I pulled the new cam retainer plate off and it was actually .003" thicker than the OEM piece that I removed. So given that the tolerances that I could find were .003" - .008", I think I found why it was too tight.


So for now I'm at a stand still. I need to reach out to Summit and see what they will do for me. I feel that the parts are not the right tolerance, so something needs to be addressed. If I were to run the engine as is, I feel that it will "self-clearance" and cause me a lot of issues.

Hopefully I'll have an answer by the end of the week and can get the motor/trans bolted together and re-installed.

Cheers,
Ryan


1976 Trans Am LS1 and much more...SOLD
1968 Camaro LSA, T56 Magnum, and much more...SOLD

Current Project: 1955 Nomad LC9, 4L80e, C5 brakes and etc...

TATurbo

  • Active Forum Member
  • *
  • Posts: 819
Re: Madaguy 1955 Nomad Build
« Reply #139 on: September 25, 2023, 08:07:26 PM »
Some very cool stuff on this 'Nomad already.   Sorry if I missed it, but...Why the Telsa brake booster?  Is it just to avoid using a vacuum canister?  Do you anticipate a really low vacuum signal with the engine setup?
Or, just 'cause it's cool?

I've been planning a bit more seriously for the turbo setup I want to get in my TA.  Your assistants are now more experienced at gapping rings for a boosted application than me.  Maybe I could get some pointers from them?

Thanks for sharing your progress.  Interesting stuff!
Tom
King of Prussia, PA

1981 Turbo Trans-Am
Build thread - http://transamcountry.com/community/index.php?topic=83354.0

ryeguy2006a

  • Oracle Forum Member
  • *
  • Posts: 6043
Re: Madaguy 1955 Nomad Build
« Reply #140 on: September 26, 2023, 06:17:59 AM »
Thanks Tom! I could have used a traditional vacuum booster, but wanted to try something different. The turbo swap down the road was definitely a consideration since it will see boost rather than vacuum, but mostly wanted to try it out. I got a pretty good deal on the unit, so I thought what the heck, why not. Plus I think that it looks really cool. Almost like an experimental booster that could have been made in the 50's.

1976 Trans Am LS1 and much more...SOLD
1968 Camaro LSA, T56 Magnum, and much more...SOLD

Current Project: 1955 Nomad LC9, 4L80e, C5 brakes and etc...

ryeguy2006a

  • Oracle Forum Member
  • *
  • Posts: 6043
Re: Madaguy 1955 Nomad Build
« Reply #141 on: September 27, 2023, 08:56:03 AM »
I love building cars, but wow they can really put you on a roller coaster ride of emotions! I'll get more into that in a bit, but where I left off was making sure that my cam end play was right before I moved forward with the final torque specs. I assumed that the reason for the endplay being so tight was the cam retainer plate, so I called Summit and they promptly send me a new one and had that in less than two days! Thanks Summit! I quickly got that new one installed and took the measurements and again came up with .002" so I was quite bummed about that. So my next call (which should have been the first) was to Scoggin-Dickey who made the cam. I talked to the parts guy and asked him what they recommend for end play, and went back to talk to the guy who actually makes the cams! He came back and said that they recommend a .002-.004" of clearance on their cams, so I'm right where I need to be. What a huge relief, so thanks to both Summit and SDPC! So I figured that since Summit had sent me a second plate that I'd just put that new one back on a box and keep it for my next build. Well glad that I had it because when I went to install the first one that I bought, I got to the bottom bolt and hear a loud snap. I'd read this happening on a few of the reviews other people posted, well the bottom of the cam plate cracked in half! So it all worked out that I had a spare. I removed and replaced with the new one and now I have a short block!


So glad that it spec'd out for me, so I quickly moved on to get my long block back together so that I could get it installed in the car. I have everything to get this engine to fire up and run, so I'm getting really excited now. I ran a thread cleaning bolt that I have in and out of all the threads to clean out the trash. Some of them had a lot of junk in them. I picked up the ARP head bolts and followed the instructions to a T, and then followed the torque spec sequences. Got the driver's side done, then moved to the passenger side. On the third pass torqueing the second to last head bolt, all of a sudden the bolt felt spongy and my heart sank. I removed the bolt and I saw some threads...


I walked out of the garage and just went to bed. I tried searching for a solution and everyone seemed to say that a threadsert was the best repair when this happens. Was not thrilled to find that the kits were about $700 bucks! I started looking around for some used kits when I stumbled on a site called Huhn Solutions with a product called NS300L. It started off as an alternative to the Time Sert repairs for Northstar engines, and they developed a kit for LS engines. I really liked everything about the kit and it had really good reviews on other sites. I really liked that the insert was much stronger looking than the Time-Sert kits. His kits for LS included enough to do all the head bolts, but I really just wanted to repair the one with pulled threads. He said that he could put together a kit with 11 inserts, and knock some money off of the total cost. His kit is about half the cost of the Time-Sert kit so I ordered it.

Now that I had a solution, I just continued on and got the motor/trans ready to install. Knowing that I wanted to add a turbo down the road, I drilled/tapped the oil pan for a 1/2 NPT fitting and added the only fitting I had. I taped the barb closed.


I'm sure I've seen others do the same thing, but I had to grind down the back side of the engine mount because it was not allowing the mount to sit flush with the setback plates.


The last thing that I wanted to do before I reinstalled the motor/trans is to remove the tailshaft to understand why my yoke would only go into the trans about 2". When I removed it became clear that this sleeve was stopping it. After a little research this is simply a sleeve with a seal for a van specific transmission. I can just remove this and then I'll be able to run the yoke that I have.


With that finalized, I bolted the engine and transmission together and got it reinstalled. It went in nice and smoothly with no damage to my new painted firewall. It fits in there really nicely, but there's still the fact that the engine is hurt and I need to get it repaired.


I couldn't help myself and put the intake back on just to get some motivation.


Will have another update on Part 2

1976 Trans Am LS1 and much more...SOLD
1968 Camaro LSA, T56 Magnum, and much more...SOLD

Current Project: 1955 Nomad LC9, 4L80e, C5 brakes and etc...

ryeguy2006a

  • Oracle Forum Member
  • *
  • Posts: 6043
Re: Madaguy 1955 Nomad Build
« Reply #142 on: September 27, 2023, 02:00:32 PM »
While I was waiting for the Huhn Solutions NS300L repair kit to come in, I decided to make some more progress on my iBooster swap. Just so happened that I was on FB Marketplace and saw a hydraulic press pop up. I had a sandblaster that is the same value, and thought maybe they would be interested in a trade. Turns out that they didn't want the blaster, but were interested in trading for a few 4x4 boards that I had! I love trading for random stuff haha. Came home with this little 12 ton unit, but it should do everything I need. I decided to try and bend the brackets I have to work with the iBooster bolt pattern. Worked perfectly!


Once I got the engine back in and the brackets modified and in the right spot, I tried to install the coils. Unfortunately, the one plug wire was up against the iBooster. Luckily the bolt pattern on the booster is symmetrical, so I was able to flip it and gain the clearance. I sort of like this orientation better since it sort of looks like an experimental booster from the 50s haha. I have it mocked up right now with some nuts that are tilting it up a few degrees, so I still may need to go in and cut the bracket and weld to get the angle I'm happy with.


I also was thinking about my fuel tank and getting that finalized. I was thinking that I'd need to get a new fuel sender, but thought I'd try the one that came with the tank I picked up. After some trial and error with testing the sender, I was able to get the wiring right and was able to bench test with my cluster. Works perfectly in the stock location, I just had to bend it about 20* to avoid the fuel pump assembly and tweak the float lever.

Empty:


Half:


Full:


The guy from Huhn Solutions was great and he was able to get the repair kit right out to me. I ordered Friday about 5pm and it was at my door Monday afternoon! Very good news for me. The kit was very well packaged and came with excellent instructions with specific step by step for LS motors.


Before I started, I made sure to tape up every part of the exposed engine because chips will get everywhere.


First step was getting the alignment jig set up to drill the block. This was definitely the most scary part of the hole deal, but it was necessary if I wanted to get the bolt hole repaired. The jig comes with interchangeable spacers that are used in various steps of the process. This spacer is used to center the jig over the hole with an alignment pin, and also works to hold the drill bit at the perfect angle for a straight hole. I added a little sharpie mark around the jig to monitor if it moved at all.


The drill bit is modified to a neutral tip to avoid drilling the hole deeper than the factory hole. this also ensure that all of the factory threads are removed.


Once the hole was drilled out to the bottom, removed all of the chips. Then I removed the drill bit spacer for the spacer meant for the tap. This again provides a perfectly straight shot for the tap to ensure a nice straight cut. The kit also comes with two taps, one is a 3 flute made for the heavy cutting and a 4 flute that's more of a clean up tap and also cuts about 1/4" more threads.


Once the tap got deep enough, I was able to remove the jig.


Next up was a test fit of the insert. There is a provided "T" handle that fits into the little notches on the top of the threads that allows you to get it installed to the right depth. There is also a provided depth gauge with the correct specs for LS motors.


Once I threaded the insert into the new hole, I set it to the right height, and then compared it to the measurements of the untouched holes and it was spot on. It was then time to remove the insert and make it permanent. I used some red thread locker and remeasured to ensure that it was at the same location as the test fit. After that the repair was complete and I had to wait for the thread locker to fully cure 1-2 hours.


There really isn't anything for me to take a picture of, but I again went out last night and cleaned up all the threads in the block with my clean out bolt. Cleaned everything back up to reinstall the cylinder heads. I had also read a trick from Motortrend I believe that said to lightly sand the bottom of the washer that mates to the machined surface of the cylinder head. One of the issues that LS motors can have is that the machined surface of the washers and cylinder heads can actually spin while torqueing and can cause inaccurate measurements. So I tried that this time around and payed extra close attention to not having one bit of the ARP grease touch the machined surface of the head. I made it through all three stages of the torque specs with no issues! I was stoked that it was a perfect repair. Now I can focus on starting the wiring and fuel systems so that I can hear this beast come to life!

Cheers,
Ryan

1976 Trans Am LS1 and much more...SOLD
1968 Camaro LSA, T56 Magnum, and much more...SOLD

Current Project: 1955 Nomad LC9, 4L80e, C5 brakes and etc...

ryeguy2006a

  • Oracle Forum Member
  • *
  • Posts: 6043
Re: Madaguy 1955 Nomad Build
« Reply #143 on: October 04, 2023, 11:01:30 AM »
Mostly a parts update, but I'm very happy with some of the key pieces that I picked up. My family and I went back to NY to visit family and as I usually do, I was checking out a new area for parts. I found a guy selling a wagon rear bumper, and after talking to him a bit he ended up having 5 Nomads! He wasn't selling a lot of parts because he was in the process of restoring a 55 and 56 currently, but he was willing to sell me some decent tailgate bars and a rear bumper. The bumper isn't in the best shape, but it came with brackets and will look way better than no bumper at all.


Then after a little elbow grease, they look pretty darn good! I bought all 7 pieces from him, but the 7th tailgate bar was in significantly worse condition and decided to wait for one in better shape to come along.


So because the plan in the next year or so is to swap on a turbo, I am trying to plan ahead. I've been keeping my eyes out for some 4" sections of exhaust to build my exhaust. I found a guy selling a 4" downpipe from a 94-02 Cummins with the HX40 for really cheap.


I also picked up a 2011 Impala gas pedal for my Terminator X Max since I'll be running DBW this time. It mounts nice and flat against the firewall, so it should be very easy to make a mount for it.


I thought this was a pretty cool full circle moment. I've been building cars for a while and have hung onto parts thinking that I'll use them sometime down the road. Well the day has come that I'll be finally using these exhaust hanger mounts and heat wrap! I bought these sometime around 2009 when I was building my 1976 Trans Am. Pretty cool that I'll be able to use these in my current project.


Lastly, I was finally able to get the engine back in the car and able to check on the tie rod clearance. Thankfully the car gods were on my side and there is plenty of clearance against the oil pan on both sides lock to lock. That's a huge relief since I wasn't 100% sure.


I'm hoping that over the next few days the rest of my parts come in so that I can complete my exhaust. I'm going to start laying out the wiring and get the car ready to fire up. I can't wait to hear this car come to life!

Cheers,
Ryan

1976 Trans Am LS1 and much more...SOLD
1968 Camaro LSA, T56 Magnum, and much more...SOLD

Current Project: 1955 Nomad LC9, 4L80e, C5 brakes and etc...

5th T/A

  • Oracle Forum Member
  • *
  • Posts: 1401
Re: Madaguy 1955 Nomad Build
« Reply #144 on: October 05, 2023, 08:02:50 AM »
I don’t know how you manage to find things that I would think are unobtainable like the tail gate trim. Maybe you could sell your services as a parts locator for classic cars. Also I am amazed at how much progress you have made on the Nomad in a relatively short time period.
1980 T/A with a Pontiac 461

Gone but not forgotten;
1973 T/A 455
1975 T/A 400
1978 T/A W72
1982 T/A cross fire injected

Two wheel toys;
2014 Harley Ultra Classic Limited
2013 Honda CB1100
2010 Yamaha Vmax
1982 Yamaha Seca 750

Re: Madaguy 1955 Nomad Build
« Reply #144 on: October 05, 2023, 08:02:50 AM »

ryeguy2006a

  • Oracle Forum Member
  • *
  • Posts: 6043
Re: Madaguy 1955 Nomad Build
« Reply #145 on: October 06, 2023, 09:08:55 AM »
It's because I have a sickness and am obsessed with car parts haha :lol: Plus I'm constantly thinking of the next task that I need to do on the car, so I'm always building or fabricating parts in my head. I'll usually build or assemble something 10 times in my head before I get into the garage.

1976 Trans Am LS1 and much more...SOLD
1968 Camaro LSA, T56 Magnum, and much more...SOLD

Current Project: 1955 Nomad LC9, 4L80e, C5 brakes and etc...

jonathonar89

  • Oracle Forum Member
  • *
  • Posts: 2508
    • Mark's Cars Inc.
Re: Madaguy 1955 Nomad Build
« Reply #146 on: October 07, 2023, 01:48:56 AM »
I don’t know how you manage to find things that I would think are unobtainable like the tail gate trim. Maybe you could sell your services as a parts locator for classic cars. Also I am amazed at how much progress you have made on the Nomad in a relatively short time period.

This guy is a beast.  Should be in the industry full time.
Mark's Cars Inc.

https://markscarsinc.com

FormTA

  • Oracle Forum Member
  • *
  • Posts: 5587
  • Life is short, have fun, Drive a T/A
Re: Madaguy 1955 Nomad Build
« Reply #147 on: October 07, 2023, 10:58:35 AM »
Nice finds Ryan! I love the press! I built mine from an above ground swimming pool, ha ha. Your's is much nicer! That tail gate looks killer with the trim. 
79 Trans am low buck LS swapped
79 Formula 301 (Work in progress)
67 RS Camaro (waiting it's turn)
69 Dodge charger on late model charger chassis
49 Ford F1 on a 2003 Chevy ZR2 Chassis (current project)
Names, Luke. If I hear anyone telling me they're my father....

ryeguy2006a

  • Oracle Forum Member
  • *
  • Posts: 6043
Re: Madaguy 1955 Nomad Build
« Reply #148 on: October 12, 2023, 08:58:39 AM »
Thanks for all the encouragement guys!

My exhaust parts all came in and now I'm ready to get started on building the exhaust. First step was stepping back and looking at the freshly torqued long block. :)


Next was installing the balancer bolt. This thing had to be torqued to 235 lb ft! Marked it to have a quick reference in the unlikely event it loosened.


Then I did an initial test on my new passenger exhaust manifold! Unfortunately, it's going to have to wait for a while though until I can get the rest of the components to make the complete turbo kit.


But that didn't stop me from test fitting some components on the car! So far, it looks as if the full 4" exhaust will fit in there nicely. Although the placement of the pipe isn't that close to where the turbo will actually be.


I was very pleased with the test fit, so I decided to start cleaning up the casting flash. Not did the outside need to be cleaned up allow for better plug access, the inside needed to have the flash cleaned up in order to open up the ports. There were some that had flash closing the ports by 1/2" and almost cupping flow in the wrong direction.


Not the greatest picture, but that was the flash inside one of the ports. I used my carbide bits to get the smoothest transitions that I could from the primary ports to the main section.


I couldn't get very good picture of the cleaned up ports, but you get the idea. On the outside I knocked down all the flash and had to open up some spots for plug access and dipstick clearance.


I also noticed that while the machining on the flange was really flat where it bolts to the head, the outside flange where the bolt sits was very uneven. I decided to do something about that and spot face the sections where the flange bolts sit. Here you can see just how much it was off.


So glad that I found this Mill/Lathe a few months back.


Once I got the manifold bolts spot faced, I was much happier with the fitment, longevity and bolts not loosening up. I cleaned it all up and sprayed with some high temp paint.


While I was at it, I cleaned up the TBSS exhaust manifold I had for the driver's side.


After playing around with the placement of the exhaust I came to the conclusion that without actually having the turbo mounted, I'd be shooting in the dark trying to figure out the placement. I'd probably have more work into reworking the downpipe to fit when I'm ready to swap to the turbo, that I'd be saving doing it now. So I'm putting that manifold on the parts shelf and will move forward with the truck exhaust manifolds.

I decided to try and fit up my engine accessories. After bolting on the truck accessories and water pump, I was trying to figure out how to use what parts I have. After playing around for a while, I figured out a way to use the truck accessories with a new Fbody belt I had deleting PS since my box is manual. I robbed a tensioner pulley, idler spacer and one washer in the hole for the PS pump. Worked perfectly! The belt spacing is all at the same level so it should work perfectly for me.


Hoping to get the fuel tank installed this week and the fuel lines and wiring installed along with laying out the Terminator X Max harness.

Cheers,
Ryan

1976 Trans Am LS1 and much more...SOLD
1968 Camaro LSA, T56 Magnum, and much more...SOLD

Current Project: 1955 Nomad LC9, 4L80e, C5 brakes and etc...

ryeguy2006a

  • Oracle Forum Member
  • *
  • Posts: 6043
Re: Madaguy 1955 Nomad Build
« Reply #149 on: October 16, 2023, 02:19:21 PM »
This project is starting to wear me out, so I really need a pick me up. I decided to hold off on mocking up the turbo manifold and downpipe until I'm ready with the turbo that I plan to run. I think I'll end up with much less work down the road. I swapped it out for a stock truck manifold that I had on the shelf. I used some of the flanges from Summit and a basic universal 2.5" exhaust kit from eBay.


Was very impressed by the symmetry of the packaging on this kit. The pipes are nice too but just mild steel.


Then it was time to start bolting parts back on. Battery back on the firewall and started to layout some extra battery cables I've kept over the years to see what is going to work. Thankfully I found a few that will work perfectly for me.


With that all mocked up, it was time to cut the giant hole in the firewall for the EFI components. I removed the intake and covered all the ports before I started drilling. I just removed them all for the picture. I also made sure to center the hole from the inside to make sure that it would clear everything under the dash too. I'm very happy with that position and need to track down a nice grommet for it.


Then it was time to start getting an exhaust run so that I wasn't shooting flames out of the manifolds. I used the MIG to get a few tack welds on the flanges and the straight pipe, then pulled it off and finished the rest with my TIG. Trying to get better, so trying to get more seat time. I really need a proper welding table to do this at, but for now some jack stands worked ok. I'm starting to see some more consistency, but still need to move faster so have less heat.


When those two connections were welded up, I reinstalled to mark where the O2 sensor will live. Found a nice spot, marked it, and removed to weld it all up.


After this point, I was just busy bouncing around making connections, converting the Terminator X harness to LS3 MAP pigtail, tracking down wires (specifically a 12v switched that stayed on when cranking), making fuel lines, crimping wires, testing wires, and etc. With the goal being able to crank and fire the engine this weekend. I got so busy that I didn't take any pictures so these were taken this morning after I got my coffee.

I've used this method for every LS swap I've done. It allows me to check for leaks and wiring prior to installation.


Very crudely wired everything up. Lot's of crazy wires all over, but it was either taped up or away from anything hot.


All of my Terminator wiring spread out for easy access. You can also see my temporary mechanical oil pressure gauge.


After a lot of playing around with my start up tune, I was able to get the right combination and the TPS wizard was successful. Turns out I never added the DBW component to my tune, which is pretty important. Confirmed fuel pressure, then gave it a few cranks. It sputtered a few times, then fired off. Kept a close eye on oil pressure and within 5 seconds it was fluttering around 25, and then after about 10 seconds had full 50 psi. Sweet! I couldn't run the car very long at all since there was no radiator and the torque converter was disconnected, but it was a huge win for my weekend!

https://youtu.be/nns-dMHKGbg

So happy that the motor is running and had great oil pressure. I gave it a few revs at the end, but the fuel maps were just a base map that Holley provided. I also used a 2.5bar LSA map sensor, but something must be off because it was reading 117 kpa key on engine off. I'm sure there are other things too, but I am very pleased given how little run time the car has. I need to get the radiator and transmission installed so I can get the engine up to operating temperature and let the learn clean up the VE table a bit.

Cheers,
Ryan

1976 Trans Am LS1 and much more...SOLD
1968 Camaro LSA, T56 Magnum, and much more...SOLD

Current Project: 1955 Nomad LC9, 4L80e, C5 brakes and etc...

5th T/A

  • Oracle Forum Member
  • *
  • Posts: 1401
Re: Madaguy 1955 Nomad Build
« Reply #150 on: October 16, 2023, 02:44:19 PM »
It's alive! Looks and sounds great.

Congratulations Ryan!
1980 T/A with a Pontiac 461

Gone but not forgotten;
1973 T/A 455
1975 T/A 400
1978 T/A W72
1982 T/A cross fire injected

Two wheel toys;
2014 Harley Ultra Classic Limited
2013 Honda CB1100
2010 Yamaha Vmax
1982 Yamaha Seca 750

FormTA

  • Oracle Forum Member
  • *
  • Posts: 5587
  • Life is short, have fun, Drive a T/A
Re: Madaguy 1955 Nomad Build
« Reply #151 on: October 16, 2023, 07:40:30 PM »
Oh man! That is awesome! That is such a great feeling and really hard to explain to someone who has never fired a engine they built for the first time
 It's especially exciting that it's a EFI build.
79 Trans am low buck LS swapped
79 Formula 301 (Work in progress)
67 RS Camaro (waiting it's turn)
69 Dodge charger on late model charger chassis
49 Ford F1 on a 2003 Chevy ZR2 Chassis (current project)
Names, Luke. If I hear anyone telling me they're my father....

ryeguy2006a

  • Oracle Forum Member
  • *
  • Posts: 6043
Re: Madaguy 1955 Nomad Build
« Reply #152 on: October 17, 2023, 05:25:14 AM »
My wife was taking the video and I told her that it's going one of two ways after I turn the key haha. Great mood, or leave me alone for a while mood.

1976 Trans Am LS1 and much more...SOLD
1968 Camaro LSA, T56 Magnum, and much more...SOLD

Current Project: 1955 Nomad LC9, 4L80e, C5 brakes and etc...

roadking77

  • Oracle Forum Member
  • *
  • Posts: 13263
Re: Madaguy 1955 Nomad Build
« Reply #153 on: October 17, 2023, 05:40:55 AM »
Thats awesome! You will have that thing on the road in no time now.
Finished!
77 T/A - I will Call this one DONE!
79 TATA 4sp-Next Project?
79 TATA - Lost to Fire!
86 Grand Prix - Sold
85 T/A - Sold
85 Fiero - Sold
82 Firebird - Sold
'38-CZ 250
'39-BSA Gold Star
'49-Triumph 350
'52-Ariel Red Hunter
'66-BSA Lightning
'01-HD RoadKing

rkellerjr

  • Oracle Forum Member
  • *
  • Posts: 6721
  • When you turn your car on does it return the favor
Re: Madaguy 1955 Nomad Build
« Reply #154 on: October 17, 2023, 06:58:28 AM »
Wow, haven't been here in a while, lots of progress and things are looking good!  That tank modification is the cats meow. I need to move and become your neighbor :)

FormTA

  • Oracle Forum Member
  • *
  • Posts: 5587
  • Life is short, have fun, Drive a T/A
Re: Madaguy 1955 Nomad Build
« Reply #155 on: October 17, 2023, 09:43:26 AM »
Rich, I was thinking the same thing. Too bad there's no snow by him....
79 Trans am low buck LS swapped
79 Formula 301 (Work in progress)
67 RS Camaro (waiting it's turn)
69 Dodge charger on late model charger chassis
49 Ford F1 on a 2003 Chevy ZR2 Chassis (current project)
Names, Luke. If I hear anyone telling me they're my father....

ryeguy2006a

  • Oracle Forum Member
  • *
  • Posts: 6043
Re: Madaguy 1955 Nomad Build
« Reply #156 on: October 17, 2023, 10:44:48 AM »
There's plenty of houses for sale near me Rich!  :cool: I'm still planning to reach out once the car is back on the road to meet you at Cars and Coffee Richmond, VA.

Luke, it's a crying shame haha. I'll let you keep all the snow.

1976 Trans Am LS1 and much more...SOLD
1968 Camaro LSA, T56 Magnum, and much more...SOLD

Current Project: 1955 Nomad LC9, 4L80e, C5 brakes and etc...

rkellerjr

  • Oracle Forum Member
  • *
  • Posts: 6721
  • When you turn your car on does it return the favor
Re: Madaguy 1955 Nomad Build
« Reply #157 on: October 17, 2023, 10:51:15 AM »
There's plenty of houses for sale near me Rich!  :cool: I'm still planning to reach out once the car is back on the road to meet you at Cars and Coffee Richmond, VA.

Luke, it's a crying shame haha. I'll let you keep all the snow.

Don't have to wait for the car to get done, just let me know if you decide your going to go. My cell phone is (757) 876-8991.

TATurbo

  • Active Forum Member
  • *
  • Posts: 819
Re: Madaguy 1955 Nomad Build
« Reply #158 on: October 17, 2023, 07:21:15 PM »
Congrats on getting things fired up. I've only done a couple engine swaps, and one big turbo install project where it wasn't a certainty things would run after it was put back together.  It's a great feeling.
  I suppose it never gets old huh?
Tom
King of Prussia, PA

1981 Turbo Trans-Am
Build thread - http://transamcountry.com/community/index.php?topic=83354.0

ryeguy2006a

  • Oracle Forum Member
  • *
  • Posts: 6043
Re: Madaguy 1955 Nomad Build
« Reply #159 on: October 25, 2023, 12:27:56 PM »
It was a huge relief to know that the motor is running and that I could move on with getting everything else completed to take the maiden voyage! I'll be working on the brakes and wiring next. After inspecting what's left of my original wiring harness I came to the conclusion that I needed to upgrade. I've never used one of the harnesses from eBay but given the cost of one vs a Painless or AAW, I took a chance on this one.

I had heard that the wiring was cheap and not as thick of gauge, but I found that to be not true. I was actually impressed with all the gauge thicknesses and overall it was a great value. The terminals look a little on the thin side, but overall they do fit nicely and should work great. One thing that is a little frustrating is that while all the wires are labelled, some of the printing is very faint. Either faint or rather than being labelled every 12", it's maybe every 30". But, I was able to at least find a label for every wire, so it's a minor inconvenience.


Out with the old. It's really amazing that the cars ran on only a few fuses. The wires were all cracking and breaking when I went to remove them, so I'm happy that I made the choice to replace.


Found a nice spot and used the existing hole to route the engine wires through.


That's where the fun began. The wires are labelled, but some were very hard to find or hard to read. Once I got the harness bulkhead location locked in, I started to organize all of the wires and fed them to where they needed to go in groups. Gauges, head lights, etc.


I've been wanting a vintage tach for the steering column, and my father in law just removed the one from his '56 Belair, so I put this on the column quick. That's just the look I want, but I'll rotate it down to the left about 45*.


I was able to get the ignition wiring hooked up so that I could test out the circuits to confirm that it's all working as it should. One thing that I found out was that on the 55-56 ignition switches, the IGN-1 and IGN-2 activate at different positions on the key. #1 is hot with the key on, but #2 is off key on. Then they switch in the start position, so a common thing guys did back in the day when swapping to HEI is to jumper the two together. So that's my plan, but I'm not sure exactly how I want to accomplish that. With a jumper wire on the switch itself or just tie them both together further up in the wiring.

I jumped around during this phase, but I was simultaneously working on the bracket for swapping to the Tesla brake booster. I had to add a radius to the inside of the bracket for the booster to clear. Took the opportunity to chuck it into my mill and used a whole saw. Probably better ways to do that, but this worked perfectly and quickly.


Now that the bracket is finalized, I added some gussets and TIG welded it all back together. I forgot to take a picture of it, but there wasn't much to write home about. I think I'd like to remake the bracket from scratch at some point, but for now it will work great. My next task was figuring out how to mount the Wilwood proportional valve and line lock kit. I came up with a pretty simple bracket that mounts to the brake MC where the prop valve is on the bottom and the line lock mounts to the side.


I got to this point and got out my rivnut tool from Harbor Freight. Some things are great from that store and others aren't. This is basically a modified rivet tool that was reworked for installing rivnuts. It got worn out from the last time I used it and had so much slop in it that I wasn't able to get enough throw to compress the nut. So after some thought, I modified the pivot hole to give me more throw. Worked great and fully compresses the rivnuts.


Once the rivnuts were installed, I was able to test fit it all together. I'm very happy with the layout and can't wait to get some lines on it and bolt it down. I'll be painting the blue anodized parts black, but for now it's all test fit in there.


My next obstacle is to find some brake fittings that will work with the iBooster. They have M12x1 inverted flare fittings with 6mm lines and I need to adapt those to 3/8" with 3/16" lines. I bought a set of M12x1 fittings made for 3/16" lines, but I've heard that the flares may not be big enough to seal with the opening of the MC. I'm going to give it a shot since this would be the simplest way for me, but if it doesn't seal, I'll have to get some adapters or something. I also need to make a plan to finalize the booster rod, but I'm going to use the original '55 rod, and weld it to the nut that came with the booster. I'll also need to drill a new hole lower on the brake pedal to give a better throw angle. Much more to come.

Cheers,
Ryan
« Last Edit: October 25, 2023, 12:32:07 PM by ryeguy2006a »

1976 Trans Am LS1 and much more...SOLD
1968 Camaro LSA, T56 Magnum, and much more...SOLD

Current Project: 1955 Nomad LC9, 4L80e, C5 brakes and etc...

Re: Madaguy 1955 Nomad Build
« Reply #159 on: October 25, 2023, 12:27:56 PM »
You can help support TAC!


You can help support TAC!